=> {
return await Promise.all(txs.map((tx) => solanaSigner.signTransaction(tx)));
},
};
// Create the Anchor provider
const provider = new anchor.AnchorProvider(
solanaConnection,
anchorWallet,
{ commitment: "confirmed" }
);
// Now you can use this provider with any Anchor program
const program = new anchor.Program(
YOUR_IDL,
"PROGRAM_ID_HERE",
provider
);
// Interact with your program
await program.methods
.yourProgramMethod()
.accounts({
// Your accounts here
})
.rpc();
```
## Best Practices
- Use higher commitment levels (`confirmed` or `finalized`) for critical transactions
- Implement proper error handling for network failures
- Consider retry logic for Solana RPC endpoints, which can occasionally be unreliable
- Cache account data where appropriate to reduce RPC usage
## Learn More
For detailed examples of using Para with Solana, including SPL token transfers, NFT interactions, and more, refer to our web documentation:
## Examples
Explore our server-side Solana integration examples:
# Stellar Integration
Source: https://docs.getpara.com/v2/server/guides/stellar
import { Card } from '/snippets/v2/components/ui/card.mdx';
import { Link } from '/snippets/v2/components/ui/link.mdx';
Para Server SDK provides seamless integration with the Stellar blockchain. Once you've set up and authenticated your Para Server client, the Stellar integration works identically to the client-side implementation.
Before using these integrations, ensure you've completed the server setup by importing a client session or creating a pregenerated wallet. See the for details.
## Installation
Install the required dependencies:
```bash npm
npm install @getpara/stellar-sdk-v14-integration @stellar/stellar-sdk --save-exact
```
```bash yarn
yarn add @getpara/stellar-sdk-v14-integration @stellar/stellar-sdk --exact
```
## Implementation
### Functional API
The `createParaStellarSigner` function returns a signer compatible with Stellar SDK's `contract.SignTransaction` and `contract.SignAuthEntry` interfaces:
```typescript
import { Para as ParaServer } from "@getpara/server-sdk";
import { createParaStellarSigner } from "@getpara/stellar-sdk-v14-integration";
import { Horizon, Networks, TransactionBuilder, Operation, Asset, BASE_FEE } from "@stellar/stellar-sdk";
// Para server client (already authenticated)
const paraServer = new ParaServer("YOUR_API_KEY");
// Set up Horizon connection
const server = new Horizon.Server("https://horizon.stellar.org");
// Create the Stellar signer
const signer = createParaStellarSigner({
para: paraServer,
networkPassphrase: Networks.PUBLIC,
});
console.log(`Stellar address: ${signer.address}`);
// Load the source account
const sourceAccount = await server.loadAccount(signer.address);
// Build a payment transaction
const transaction = new TransactionBuilder(sourceAccount, {
fee: BASE_FEE,
networkPassphrase: Networks.PUBLIC,
})
.addOperation(
Operation.payment({
destination: "GRECIPI...",
asset: Asset.native(),
amount: "10",
})
)
.setTimeout(180)
.build();
// Sign and submit
const { signedTxXdr } = await signer.signTransaction(transaction.toXDR());
const signedTx = TransactionBuilder.fromXDR(signedTxXdr, Networks.PUBLIC);
const result = await server.submitTransaction(signedTx);
console.log(`Transaction hash: ${result.hash}`);
```
### Class API
The `ParaStellarSigner` class can also be instantiated directly. Pass `networkPassphrase` to the constructor so `signTransaction` uses it as the default:
```typescript
import { Para as ParaServer } from "@getpara/server-sdk";
import { ParaStellarSigner } from "@getpara/stellar-sdk-v14-integration";
import { Horizon, Networks, TransactionBuilder, Operation, Asset, BASE_FEE } from "@stellar/stellar-sdk";
const paraServer = new ParaServer("YOUR_API_KEY");
const server = new Horizon.Server("https://horizon.stellar.org");
// Create the signer
const signer = new ParaStellarSigner(paraServer, Networks.PUBLIC);
console.log(`Stellar address: ${signer.address}`);
// Load account and build transaction
const sourceAccount = await server.loadAccount(signer.address);
const transaction = new TransactionBuilder(sourceAccount, {
fee: BASE_FEE,
networkPassphrase: Networks.PUBLIC,
})
.addOperation(
Operation.payment({
destination: "GRECIPI...",
asset: Asset.native(),
amount: "10",
})
)
.setTimeout(180)
.build();
// Sign and submit
const { signedTxXdr } = await signer.signTransaction(transaction.toXDR());
const signedTx = TransactionBuilder.fromXDR(signedTxXdr, Networks.PUBLIC);
const result = await server.submitTransaction(signedTx);
console.log(`Transaction hash: ${result.hash}`);
```
## Best Practices
- Always load the source account from Horizon before building transactions to get the correct sequence number
- Use `setTimeout()` on transactions to prevent them from being valid indefinitely
- Consider fee bump transactions during network congestion
- Use higher fees during high-traffic periods to ensure transaction inclusion
## Learn More
For detailed examples including multi-operation transactions, fee bumps, and Soroban auth, refer to our web documentation:
# Para Server SDK
Source: https://docs.getpara.com/v2/server/overview
import { Card } from '/snippets/v2/components/ui/card.mdx';
Para's Server SDK enables you to perform blockchain operations on the server-side across Node.js, Bun, Deno, and Cloudflare Workers environments. The server SDK shares the same core functionality as the web SDK, with authentication being the primary difference.
The Server SDK only works with Embedded Wallets. For connecting to and signing with external wallets such as MetaMask and Phantom, you
will need to integrate one of Para's Client SDKs.
**Non-Node.js runtimes** (Bun, Deno, Cloudflare Workers) require `disableWebSockets: true` in the constructor.
See the [setup guide](/v2/server/setup#runtime-compatibility) for details.
## Getting Started
## Blockchain Ecosystem Support
Para works seamlessly with major blockchain ecosystems on the server-side, allowing you to leverage Para's authentication alongside chain-specific libraries:
## Authentication Options
Para offers two authentication methods for server-side applications:
## Resources
# Server Setup
Source: https://docs.getpara.com/v2/server/setup
import { Card } from '/snippets/v2/components/ui/card.mdx';
import { Link } from '/snippets/v2/components/ui/link.mdx';
The Para Server SDK enables secure server-side blockchain operations across different JavaScript runtime environments.
With nearly identical functionality to client-side implementations, the server SDK allows you to perform signing
operations server-side by either importing client-side sessions or using pregenerated wallets.
## Installation
Install the Para Server SDK in your preferred JavaScript runtime environment:
```bash npm
npm install @getpara/server-sdk --save-exact
```
```bash yarn
yarn add @getpara/server-sdk --exact
```
```bash pnpm
pnpm add @getpara/server-sdk --save-exact
```
```bash bun
bun add @getpara/server-sdk --exact
```
```bash deno
deno install npm:@getpara/server-sdk
```
**Why `--save-exact`?** The Para Server SDK may publish breaking changes in minor versions during active development.
Pinning the exact version prevents unexpected breakage when you install or update dependencies.
## Initialization
Initialize the Para Server SDK with your API key. The initialization process varies slightly depending on your runtime
environment:
```typescript Node.js
import { Para as ParaServer } from "@getpara/server-sdk";
// Standard initialization for Node.js
const paraServer = new ParaServer("YOUR_API_KEY");
````
```typescript Bun
import { Para as ParaServer } from "@getpara/server-sdk";
// Bun requires disabling WebSockets
const paraServer = new ParaServer("YOUR_API_KEY", {
disableWebSockets: true
});
````
```typescript Deno
import { Para as ParaServer } from "@getpara/server-sdk";
// Deno requires disabling WebSockets
const paraServer = new ParaServer("YOUR_API_KEY", {
disableWebSockets: true,
});
```
### Runtime Compatibility
The Server SDK works across multiple JavaScript runtimes. Some runtimes require additional constructor options:
| Runtime | `disableWebSockets` | Notes |
|---------|:-------------------:|-------|
| Node.js | Not needed | Full support out of the box |
| Bun | **Required** | Bun's WebSocket implementation is incompatible with the SDK's internal transport |
| Deno | **Required** | Same as Bun — the SDK falls back to HTTP polling |
| Cloudflare Workers | **Required** | Workers runtime doesn't support persistent WebSocket connections |
If you omit `disableWebSockets: true` in Bun, Deno, or Cloudflare Workers, the SDK may fail silently or hang
during signing operations. Always set this option for non-Node.js runtimes.
**Signing performance tip:** Para's signing infrastructure runs in `us-east-1`. For the lowest latency on server-side signing operations, deploy your application servers in or near that region.
If you're using a legacy API key (one without an environment prefix) you must provide the `Environment` as the first argument to the `ParaServer` constructor. You can retrieve your updated API key from the Para Developer Portal at https://developer.getpara.com/
## Authentication Methods
After initializing the Para Server SDK, you need to authenticate it before performing any operations. The server SDK
supports two authentication methods:
### Option 1: Importing Client Sessions
Import an active session from your client application to create a server-side replica that can perform the same
operations.
First, in your client application, export the active session to get a serialized string:
```typescript
// Client-side
const serializedSession = await para.exportSession();
// Send this string to your server endpoint
```
This serialiazed sessions tring can then be sent to your server via an API endpoint or any other secure method.
If signing on the server isn't required, you can pass `{ excludeSigners: true }` as an argument to `exportSession` to remove the signer data from the exported wallets:`await para.exportSession({ excludeSigners: true });` before sending it to your server.
Then, on your server, import the serialized session to create a functional server-side client:
```typescript
// Server-side
await paraServer.importSession(serializedSession);
```
With a session no loaded into the para server instance, you can now perform all operations that the Para Server SDK supports.
### Option 2: Using Pregenerated Wallets
Generate and use deterministic wallets server-side without requiring client-side authentication. This pregen wallet will load the para server instance with a wallet that can be used for all operations that the Para Server SDK supports.
```typescript
import { WalletType } from "@getpara/server-sdk";
await paraServer.createPregenWallet({
type: 'EVM', // or 'SOLANA', 'COSMOS', 'STELLAR'
pregenId: { email: "user@example.com" },
});
```
When using pregenerated wallets, you'll need to manage the user share of the wallet and store it securely.
Learn more about pregen wallets and their usage on the server in our pregen wallets guide.
## Examples
Explore our example implementations of the Para Server SDK across different runtime environments:
## Troubleshooting
If you encounter issues while setting up the Para Server SDK, check out our troubleshooting guide:
## Next Steps
Once your Para Server SDK is set up and authenticated, you can start performing blockchain operations. The server SDK
provides the same functionality as the client SDK, allowing you to:
# Server Troubleshooting
Source: https://docs.getpara.com/v2/server/troubleshooting
# Para + Svelte
Source: https://docs.getpara.com/v2/svelte/setup/overview
import { Card } from '/snippets/v2/components/ui/card.mdx';
Para integrates seamlessly with Svelte applications, providing powerful features for building interactive interfaces.
Para does not offer a dedicated Svelte SDK at this time. However, we provide solutions for utilizing our React based `ParaModal` component in Svelte applications.
## Using the React Modal
Use our React-based `ParaModal` in Svelte via the `svelte-preprocess-react` bridge:
## Custom UI with Web SDK
Build your own authentication UI using `@getpara/web-sdk` directly.
### Installation
```bash
npm install @getpara/web-sdk
```
### Para Client
```ts src/lib/para.ts
import { Environment, ParaWeb } from "@getpara/web-sdk";
export const para = new ParaWeb(
Environment.BETA,
import.meta.env.VITE_PARA_API_KEY
);
```
### Check Authentication
```ts
const isLoggedIn = await para.isFullyLoggedIn();
if (isLoggedIn) {
const wallets = Object.values(await para.getWallets());
const address = wallets[0]?.address;
}
```
### Email Authentication
```ts
const authState = await para.signUpOrLogIn({ auth: { email } });
if (authState.stage === "verify" && authState.loginUrl) {
const isNewUser = authState.nextStage === "signup";
// 1. Display authState.loginUrl in an iframe
// 2. Start polling for completion in the background
handleAuthComplete(isNewUser);
}
async function handleAuthComplete(isNewUser: boolean) {
if (isNewUser) {
await para.waitForWalletCreation();
} else {
const result = await para.waitForLogin();
if (result.needsWallet) {
await para.waitForWalletCreation();
}
}
// Auth complete - update your UI
}
```
### Iframe with Message Handler
Display the `loginUrl` in an iframe. Listen for the `CLOSE_WINDOW` message to hide the iframe when the user completes or cancels:
```ts
const portalOrigins = [
"https://app.getpara.com",
"https://app.beta.getpara.com",
];
function handleMessage(event: MessageEvent) {
if (!portalOrigins.some((origin) => event.origin.startsWith(origin))) return;
if (event.data?.type === "CLOSE_WINDOW") {
// Hide the iframe - waitForLogin/waitForWalletCreation handles completion
}
}
window.addEventListener("message", handleMessage);
```
```html
```
### Logout
```ts
await para.logout();
```
See the [Custom Auth UI with Web SDK](/v2/react/guides/custom-ui-web-sdk) guide for all available client methods including OAuth, phone auth, and wallet operations.
## Example
# Para with SvelteKit
Source: https://docs.getpara.com/v2/svelte/setup/svelte-kit
import EnvironmentInfo from "/snippets/v2/quick-start-environment-info.mdx";
import Prerequisites from "/snippets/v2/quick-start-prerequisites.mdx";
import IntegrationSupport from "/snippets/v2/integration-support.mdx";
import { Card } from '/snippets/v2/components/ui/card.mdx';
import { Link } from '/snippets/v2/components/ui/link.mdx';
import BetaCredentialsFull from "/snippets/v2/beta-credentials/beta-credentials-full.mdx";
If you haven't already you can create a new SvelteKit project by following the .
Although mixing React and Svelte is unusual, we can do so via . If you prefer to build your own custom UI, you can also use `@getpara/web-sdk` directly.Reach out to use for help with custom UI integration.
## Installing Dependencies & Peer Dependencies
First, install the Para React SDK and needed peer dependencies, plus React dependencies using your preferred package manager:
```bash npm
npm install @getpara/react-sdk react react-dom @tanstack/react-query graz @cosmjs/cosmwasm-stargate @cosmjs/launchpad @cosmjs/proto-signing @cosmjs/stargate @cosmjs/tendermint-rpc @leapwallet/cosmos-social-login-capsule-provider long starknet wagmi@^2 viem @solana-mobile/wallet-adapter-mobile @solana/wallet-adapter-base @solana/wallet-adapter-react @solana/wallet-adapter-walletconnect @solana/web3.js --save-exact
```
```bash yarn
yarn add @getpara/react-sdk react react-dom @tanstack/react-query graz @cosmjs/cosmwasm-stargate @cosmjs/launchpad @cosmjs/proto-signing @cosmjs/stargate @cosmjs/tendermint-rpc @leapwallet/cosmos-social-login-capsule-provider long starknet wagmi@^2 viem @solana-mobile/wallet-adapter-mobile @solana/wallet-adapter-base @solana/wallet-adapter-react @solana/wallet-adapter-walletconnect @solana/web3.js --exact
```
```bash pnpm
pnpm add @getpara/react-sdk react react-dom @tanstack/react-query graz @cosmjs/cosmwasm-stargate @cosmjs/launchpad @cosmjs/proto-signing @cosmjs/stargate @cosmjs/tendermint-rpc @leapwallet/cosmos-social-login-capsule-provider long starknet wagmi@^2 viem @solana-mobile/wallet-adapter-mobile @solana/wallet-adapter-base @solana/wallet-adapter-react @solana/wallet-adapter-walletconnect @solana/web3.js --save-exact
```
```bash bun
bun add @getpara/react-sdk react react-dom @tanstack/react-query graz @cosmjs/cosmwasm-stargate @cosmjs/launchpad @cosmjs/proto-signing @cosmjs/stargate @cosmjs/tendermint-rpc @leapwallet/cosmos-social-login-capsule-provider long starknet wagmi@^2 viem @solana-mobile/wallet-adapter-mobile @solana/wallet-adapter-base @solana/wallet-adapter-react @solana/wallet-adapter-walletconnect @solana/web3.js --exact
```
## Configuring SvelteKit (Preprocessor & Polyfills)
### Svelte Preprocess React
In your **svelte.config.js**, import and apply `svelte-preprocess-react`:
```js svelte.config.js
import adapter from "@sveltejs/adapter-auto";
import { vitePreprocess } from "@sveltejs/vite-plugin-svelte";
import preprocessReact from "svelte-preprocess-react/preprocessReact";
/** @type {import('@sveltejs/kit').Config} */
const config = {
preprocess: [vitePreprocess(), preprocessReact()],
kit: {
adapter: adapter(),
},
};
export default config;
```
### Vite Plugins (Node Polyfills)
SvelteKit uses Vite under the hood. Install and configure polyfills for Node modules:
```bash npm
npm install vite-plugin-node-polyfills --save-dev
```
```bash yarn
yarn add vite-plugin-node-polyfills -D
```
```bash pnpm
pnpm add vite-plugin-node-polyfills -D
```
```bash bun
bun add vite-plugin-node-polyfills
```
Then enable it in `vite.config.ts`:
```ts vite.config.ts
import { sveltekit } from "@sveltejs/kit/vite";
import { defineConfig } from "vite";
import { nodePolyfills } from "vite-plugin-node-polyfills";
export default defineConfig({
plugins: [sveltekit(), nodePolyfills()],
});
```
If you prefer SSR, ensure you dynamically handle the React-based modal on the client. If you want pure client-side
usage, set `export const ssr = false;` in your page's `.ts` or `.js` files for SvelteKit to skip SSR.
## Creating a QueryClient Instance
```ts client/queryClient.ts
import { QueryClient, QueryClientProvider } from "@tanstack/react-query";
export const queryClient = new QueryClient();
```
## Setting Up the Para SDK
Now that you've installed the necessary dependencies, let's set up the Para SDK in your SvelteKit application. This
involves creating a client instance and integrating the Para Modal.
### Creating a Para Client Instance
As with other frameworks, you'll need a dedicated file for your client instance (e.g., `client/para.ts`):
```ts client/para.ts
import { ParaWeb } from "@getpara/react-sdk";
const PARA_API_KEY = import.meta.env.VITE_PARA_API_KEY;
export const para = new ParaWeb(PARA_API_KEY);
```
If you're using a legacy API key (one without an environment prefix) you must provide the `Environment` as the first argument to the `ParaWeb` constructor. You can retrieve your updated API key from the Para Developer Portal at https://developer.getpara.com/
### Using the Para Modal in a SvelteKit Route
Let's say you have a **`+page.svelte`** in `src/routes/`. You would use the Para Modal with the preprocessed React
component:
```svelte
isModalOpen = false},
logo: Logo,
disableEmailLogin: false,
disablePhoneLogin: false,
authLayout: [AuthLayout.AUTH_FULL],
oAuthMethods: [
"APPLE",
"DISCORD",
"FACEBOOK",
"FARCASTER",
"GOOGLE",
"TWITTER",
],
onRampTestMode: true,
recoverySecretStepEnabled: true,
twoFactorAuthEnabled: false,
theme: {
foregroundColor: "#2D3648",
backgroundColor: "#FFFFFF",
accentColor: "#0066CC",
darkForegroundColor: "#E8EBF2",
darkBackgroundColor: "#1A1F2B",
darkAccentColor: "#4D9FFF",
mode: "light",
borderRadius: "none",
font: "Inter",
},
}}
externalWalletConfig={{
wallets: []
}}
/>
```
With SSR disabled, the page will be served client-side only, ensuring the React-based modal can load without conflicts.
### Customizing the Para Modal
Just like in React, you can provide any additional props to the `` component. For example, customizing modal
theming:
```svelte
```
For a full list of available `ParaModalProps`, refer to the customization guide:
## Examples
For an example of using Para SDK in a Svelte application, check out our Examples Hub repository:
## Troubleshooting
If you encounter issues during the integration or usage of the Para Modal in a Svelte-based app, here are some common
problems and their solutions:
# Para with Svelte + Vite
Source: https://docs.getpara.com/v2/svelte/setup/vite
import EnvironmentInfo from "/snippets/v2/quick-start-environment-info.mdx";
import Prerequisites from "/snippets/v2/quick-start-prerequisites.mdx";
import IntegrationSupport from "/snippets/v2/integration-support.mdx";
import { Card } from '/snippets/v2/components/ui/card.mdx';
import { Link } from '/snippets/v2/components/ui/link.mdx';
import BetaCredentialsFull from "/snippets/v2/beta-credentials/beta-credentials-full.mdx";
If you haven't already you can create a new Svelte project with Vite by following the .
Although mixing React and Svelte is unusual, we can do so via . If you prefer to build your own custom UI, you can also use `@getpara/web-sdk` directly. Reach out to use for help with custom UI integration.
## Installing Dependencies & Peer Dependencies
First, install the Para React SDK and needed peer dependencies, plus React dependencies using your preferred package manager:
```bash npm
npm install @getpara/react-sdk react react-dom @tanstack/react-query graz @cosmjs/cosmwasm-stargate @cosmjs/launchpad @cosmjs/proto-signing @cosmjs/stargate @cosmjs/tendermint-rpc @leapwallet/cosmos-social-login-capsule-provider long starknet wagmi@^2 viem @solana-mobile/wallet-adapter-mobile @solana/wallet-adapter-base @solana/wallet-adapter-react @solana/wallet-adapter-walletconnect @solana/web3.js --save-exact
```
```bash yarn
yarn add @getpara/react-sdk react react-dom @tanstack/react-query graz @cosmjs/cosmwasm-stargate @cosmjs/launchpad @cosmjs/proto-signing @cosmjs/stargate @cosmjs/tendermint-rpc @leapwallet/cosmos-social-login-capsule-provider long starknet wagmi@^2 viem @solana-mobile/wallet-adapter-mobile @solana/wallet-adapter-base @solana/wallet-adapter-react @solana/wallet-adapter-walletconnect @solana/web3.js --exact
```
```bash pnpm
pnpm add @getpara/react-sdk react react-dom @tanstack/react-query graz @cosmjs/cosmwasm-stargate @cosmjs/launchpad @cosmjs/proto-signing @cosmjs/stargate @cosmjs/tendermint-rpc @leapwallet/cosmos-social-login-capsule-provider long starknet wagmi@^2 viem @solana-mobile/wallet-adapter-mobile @solana/wallet-adapter-base @solana/wallet-adapter-react @solana/wallet-adapter-walletconnect @solana/web3.js --save-exact
```
```bash bun
bun add @getpara/react-sdk react react-dom @tanstack/react-query graz @cosmjs/cosmwasm-stargate @cosmjs/launchpad @cosmjs/proto-signing @cosmjs/stargate @cosmjs/tendermint-rpc @leapwallet/cosmos-social-login-capsule-provider long starknet wagmi@^2 viem @solana-mobile/wallet-adapter-mobile @solana/wallet-adapter-base @solana/wallet-adapter-react @solana/wallet-adapter-walletconnect @solana/web3.js --exact
```
## Setting Up the Svelte Preprocessor and Vite Polyfills
### Svelte Preprocessor for React
You must configure your **Svelte** app to accept React components. For that, install and configure
`svelte-preprocess-react`:
```bash npm
npm install svelte-preprocess-react
```
```bash yarn
yarn add svelte-preprocess-react
```
```bash pnpm
pnpm add svelte-preprocess-react
```
```bash bun
bun add svelte-preprocess-react
```
Then add it to your `svelte.config.js`:
```js svelte.config.js
import { vitePreprocess } from "@sveltejs/vite-plugin-svelte";
import preprocessReact from "svelte-preprocess-react/preprocessReact";
export default {
preprocess: [vitePreprocess(), preprocessReact()],
};
```
### Vite Polyfills
Like other React-based setups, you may need Node.js polyfills for features like `crypto`, `buffer`, and `stream`.
Install `vite-plugin-node-polyfills`:
```bash npm
npm install vite-plugin-node-polyfills --save-dev
```
```bash yarn
yarn add vite-plugin-node-polyfills -D
```
```bash pnpm
pnpm add vite-plugin-node-polyfills -D
```
```bash bun
bun add vite-plugin-node-polyfills
```
Then configure it in `vite.config.js` or `vite.config.ts`:
```ts vite.config.ts
import { defineConfig } from "vite";
import { svelte } from "@sveltejs/vite-plugin-svelte";
import { nodePolyfills } from "vite-plugin-node-polyfills";
export default defineConfig({
plugins: [svelte(), nodePolyfills()],
});
```
## Creating a QueryClient Instance
```ts client/queryClient.ts
import { QueryClient, QueryClientProvider } from "@tanstack/react-query";
export const queryClient = new QueryClient();
```
## Setting Up the Para SDK
Now that you've installed the necessary dependencies, let's set up the Para SDK in your Svelte application. This
involves creating a client instance and integrating the Para Modal.
### Creating a Para Client Instance
Much like in React or Vue, you'll need a Para client instance. Keep it in a dedicated file (e.g., `client/para.ts`):
```ts client/para.ts
import { ParaWeb } from "@getpara/react-sdk";
const PARA_API_KEY = import.meta.env.VITE_PARA_API_KEY;
export const para = new ParaWeb(PARA_API_KEY);
```
If you're using a legacy API key (one without an environment prefix) you must provide the `Environment` as the first argument to the `ParaWeb` constructor. You can retrieve your updated API key from the Para Developer Portal at https://developer.getpara.com/
### Integrating the Para Modal in Svelte
With `svelte-preprocess-react`, you can **directly** use React components in Svelte:
```svelte
isModalOpen = false},
logo: Logo,
disableEmailLogin: false,
disablePhoneLogin: false,
authLayout: [AuthLayout.AUTH_FULL],
oAuthMethods: [
"APPLE",
"DISCORD",
"FACEBOOK",
"FARCASTER",
"GOOGLE",
"TWITTER",
],
onRampTestMode: true,
recoverySecretStepEnabled: true,
twoFactorAuthEnabled: false,
theme: {
foregroundColor: "#2D3648",
backgroundColor: "#FFFFFF",
accentColor: "#0066CC",
darkForegroundColor: "#E8EBF2",
darkBackgroundColor: "#1A1F2B",
darkAccentColor: "#4D9FFF",
mode: "light",
borderRadius: "none",
font: "Inter",
},
}}
externalWalletConfig={{
wallets: []
}}
/>
```
When you click **Open Para Modal**, the React-based Para Modal will appear inside your Svelte application.
### Customizing the Para Modal
Just like in React, you can provide any additional props to the `` component. For example, customizing modal
theming:
```svelte
```
For a full list of available `ParaModalProps`, refer to the customization guide:
## Examples
For an example of using Para SDK in a Svelte application, check out our Examples Hub repository:
## Troubleshooting
If you encounter issues during the integration or usage of the Para Modal in a Svelte-based app, here are some common
problems and their solutions:
# Swift SDK API Reference
Source: https://docs.getpara.com/v2/swift/api/sdk
The Para Swift SDK provides a comprehensive toolkit for integrating non-custodial wallet functionality, passkey-based authentication, and blockchain interactions into your native iOS applications.
## ParaManager Class
The `ParaManager` class is the central component for managing user authentication, wallet operations, and session state.
### Properties
An array of `Wallet` objects currently associated with the authenticated user. This list is updated after operations like `fetchWallets()` or `createWallet()`.
The current session state of the Para SDK (e.g., `.unknown`, `.inactive`, `.active`, `.activeLoggedIn`).
The environment configuration for the Para SDK (e.g., `.beta`, `.prod`).
The API key used for authenticating with Para services.
Indicates if the `ParaManager` and its underlying WebView are initialized and ready to process requests.
### Initialization
Initializes a new `ParaManager` instance.
The Para environment to use (e.g., `.beta`, `.prod`).
Your Para API key.
Optional. Your app's custom URL scheme (e.g., "yourapp://"). Defaults to the app's bundle identifier. Used for OAuth and other redirection flows.
### Authentication Methods
Starts the authentication (signup or login) process for a user with the specified email or phone number. When a default `WebAuthenticationSession` is registered via `setDefaultWebAuthenticationSession(_:)`, hosted Para One Click flows are handled automatically and the returned state's `stage` will be `.done`.
The authentication identifier: `.email(String)` for email or `.phone(String)` for a full phone number (e.g., "+15551234567").
An `AuthState` object indicating the next step in the flow (e.g., `.done` when hosted auth completed, `.verify` for new users, `.login` for existing users).
Stores a `WebAuthenticationSession` that the SDK reuses for hosted login, signup, and OAuth flows.
The shared session to reuse. Pass `nil` to clear the default and fall back to per-call overrides.
Submits the verification code (OTP) received by the user via email or SMS.
The verification code entered by the user.
An `AuthState` object, typically with `stage == .signup`, indicating the user is verified and needs to choose a signup method (passkey or password).
Requests a new verification code to be sent to the user's email or phone.
Checks if a specific signup method (passkey or password) is available based on the current `AuthState`.
The signup method to check (e.g., `.passkey`).
The current `AuthState` (should have `stage == .signup`).
`true` if the method is available, `false` otherwise.
Completes the signup process for a new, verified user using the chosen method (passkey or password). This typically includes creating a passkey/password and the first wallet.
The current `AuthState` (must have `stage == .signup`).
The chosen signup method (`.passkey` or `.password`).
An `ASAuthorizationController` instance for handling Passkey UI operations.
Optional override for web-based authentication (e.g., password setup). Defaults to the session registered via `setDefaultWebAuthenticationSession(_:)`.
Checks if a specific login method (passkey or password) is available for an existing user.
The login method to check (e.g., `.passkey`).
The current `AuthState` (should have `stage == .login`).
`true` if the method is available, `false` otherwise.
Logs in an existing user, automatically determining and using the preferred available method (passkey or password).
The current `AuthState` (must have `stage == .login`).
An `ASAuthorizationController` instance for Passkey UI.
Optional override for web-based login (e.g., password). Defaults to the session registered via `setDefaultWebAuthenticationSession(_:)`.
Logs in a user directly using their passkey.
An `ASAuthorizationController` instance for Passkey UI.
Optional. The user's email if known, to help filter passkeys.
Optional. The user's full phone number if known, to help filter passkeys. If both email and phone are nil, the system prompts for any available passkey.
Generates and registers a new passkey for the user. Typically called during signup when `authState.stage == .signup` and `SignupMethod.passkey` is chosen.
The user's identifier (email or full phone number).
The `passkeyId` obtained from `AuthState.passkeyId` when `authState.stage == .signup`.
An `ASAuthorizationController` instance for Passkey UI.
Presents a web URL (typically for password setup/login) using a web authentication session.
The URL to present (e.g., `authState.passwordUrl`).
Optional override. Defaults to the session registered via `setDefaultWebAuthenticationSession(_:)`.
The callback URL if authentication was successful via direct callback, or nil on failure/cancellation.
Initiates and handles the entire OAuth flow with the specified provider (e.g., Google, Apple, Discord).
This includes user authentication with the provider, Para account lookup/creation, and passkey setup if it's a new Para user.
The OAuth provider to use (e.g., `.google`).
Optional override for handling the OAuth web flow. Defaults to the session registered via `setDefaultWebAuthenticationSession(_:)`.
An `ASAuthorizationController` for potential passkey setup.
Returns nothing on success. Throws ParaError or other authentication-related errors on failure.
Logs into Para using an externally managed wallet (e.g., MetaMask).
Information about the external wallet, including its address and type.
### Session Management Methods
Checks if there is an active session and the user is fully authenticated (e.g., passkey/password set up).
`true` if the user is fully logged in, `false` otherwise.
Checks if there is any active session with Para, even if the user is not fully logged in (e.g., pending verification).
`true` if there is any active session, `false` otherwise.
Exports the current session for backup or transfer purposes.
The session data as a string that can be saved and restored later.
Logs out the current user and clears all session data.
Gets the current user's persisted authentication details.
The current user's authentication state, or nil if no user is authenticated. The 'stage' will be set to 'login' for active sessions.
Manually checks and updates the current session state. This method waits for the Para WebView to be ready and updates the session state accordingly.
### Wallet Management Methods
Retrieves all wallets associated with the current user.
An array of `Wallet` objects associated with the user.
Creates a new wallet for the authenticated user. This method initiates wallet creation and refreshes the internal `wallets` list. Observe the `paraManager.wallets` property for the new wallet.
The type of wallet to create (e.g., `.evm`, `.solana`, `.cosmos`).
Whether to skip the distributable key generation step.
Retrieves the email of the currently authenticated user, if available and the session was initiated with an email.
The user's email address.
(Advanced) Distributes a new share for an existing wallet.
The ID of the wallet.
The user share to distribute.
Gets the balance for any wallet type. This unified method works with all wallet types (EVM, Solana, Cosmos).
The ID of the wallet.
Optional token identifier (contract address for EVM, mint address for Solana, etc.).
Optional RPC URL (recommended for Solana and Cosmos to avoid 403/CORS issues).
Optional bech32 prefix for Cosmos (e.g., "juno", "stars").
Optional denom for Cosmos balances (e.g., "ujuno", "ustars").
The balance as a string (format depends on the chain).
Synchronizes required wallets by creating any missing non-optional wallet types. This should be called after successful authentication for new users.
Array of newly created wallets, if any.
### Transfer Methods
Transfers tokens using an EVM wallet. This method builds, signs, and broadcasts the transaction in one call.
The ID of the EVM wallet to use for the transfer.
The recipient address.
The amount to send in wei (smallest unit).
Optional. The chain ID for the EVM network. If not provided, uses the wallet's default chain.
Optional. Custom RPC URL for the transaction. If not provided, uses the default RPC for the chain.
A TransferResult object containing transaction details.
This method is only available for EVM wallets. Solana and Cosmos wallets must use signing methods only.
### Signing Methods
Signs an arbitrary message using the specified wallet.
The ID of the wallet to use for signing.
The raw message string to sign. The SDK will Base64-encode this string before signing.
Optional. Timeout for the signing operation in milliseconds.
A SignatureResult object containing the signature and metadata.
Signs a transaction object using the specified wallet. The method accepts any Encodable transaction type (EVMTransaction, SolanaTransaction, CosmosTransaction) and handles chain-specific formatting internally.
The ID of the wallet to use for signing.
The transaction object to sign. Can be EVMTransaction, SolanaTransaction, or CosmosTransaction.
Optional. Timeout for the signing operation in milliseconds.
A SignatureResult containing the signed transaction. For EVM, this includes the complete RLP-encoded transaction in `signedTransaction`. For Solana/Cosmos, if only a signature is available (e.g., pre-serialized transactions), it's provided in `signedTransaction`. Use `result.transactionData` (computed property) to get the value for broadcasting.
For EVM transactions, the returned `SignatureResult` contains the complete RLP-encoded transaction ready for broadcasting via `eth_sendRawTransaction`.
Signs an RLP-encoded EVM transaction string using the private key of the specified wallet. This method is maintained for backward compatibility.
The ID of the EVM wallet to use for signing.
The RLP-encoded transaction as a hex string. The SDK will Base64-encode this string.
The chain ID of the EVM network.
Optional. Timeout for the signing operation in milliseconds.
The resulting transaction signature as a hex string.
### Two-Factor Authentication (2FA) Methods
Initiates the setup process for 2FA.
Returns `.alreadySetup` if 2FA is already configured, or `.needsSetup(uri: String)` containing the URI to be displayed in an authenticator app (e.g., as a QR code).
Enables 2FA for the user after they have scanned the URI and entered the code from their authenticator app.
The 2FA code from the user's authenticator app.
## MetaMaskConnector Class
The `MetaMaskConnector` class enables integration with MetaMask wallet for external wallet operations and authentication.
### Properties
Indicates whether the connector is currently connected to MetaMask.
Array of connected MetaMask account addresses.
The current chain ID from MetaMask (e.g., "0x1" for Ethereum mainnet, "0xaa36a7" for Sepolia).
### Initialization
Initializes a new `MetaMaskConnector` instance.
The ParaManager instance.
Your app's URL scheme for deep link callbacks.
Configuration object containing app metadata.
### Methods
Processes incoming deep link URLs from MetaMask responses.
The incoming URL to process.
Initiates connection to MetaMask and requests account access. This method is `async throws`. Upon successful connection, the `accounts`, `chainId`, and `isConnected` properties of the `MetaMaskConnector` instance are updated. `ParaManager.loginExternalWallet` is also called internally.
Requests MetaMask to sign a message with the specified account.
The message string to be signed.
The account address to use for signing.
The resulting signature from MetaMask.
Sends a transaction through MetaMask using the specified account.
The transaction object or dictionary containing transaction parameters.
The account address to use for the transaction.
The transaction hash returned by MetaMask.
## Error Types
The main error type for Para SDK operations.
An error occurred while executing JavaScript bridge code.
The JavaScript bridge did not respond in time.
A general error occurred.
Feature not implemented yet.
Errors specific to MetaMask connector operations.
Another MetaMask operation is already in progress.
Failed to construct a valid URL for MetaMask communication.
Received an invalid or unexpected response from MetaMask.
An error reported by the MetaMask app itself (e.g., user rejection code 4001).
MetaMask app is not installed on the device.
Errors specific to CosmosTransaction operations.
Invalid address format.
Invalid amount format.
Invalid denomination.
Invalid chain prefix.
Transaction encoding failed.
Errors related to authorization handling in external wallet operations.
Invalid response received from authorization process.
Authorization was cancelled by the user.
### CosmosChain
Supported Cosmos chains with testnet configurations.
Cosmos Hub network with chain ID "provider", prefix "cosmos" and default denom "uatom" (testnet).
Osmosis network with chain ID "osmo-test-5", prefix "osmo" and default denom "uosmo" (testnet).
Juno network with chain ID "uni-6", prefix "juno" and default denom "ujuno" (testnet).
Stargaze network with chain ID "elgafar-1", prefix "stars" and default denom "ustars" (testnet).
The chain ID for this network.
The bech32 prefix for this chain.
Default denomination for this chain.
Default RPC URL for this chain's testnet.
### CosmosSigningMethod
Signing method for Cosmos transactions.
Legacy Amino JSON signing method for backward compatibility.
Modern Proto/Direct binary signing method (recommended - more efficient).
### CosmosTransaction
A struct representing a Cosmos transaction with messages, fees, and metadata.
The transaction messages.
Transaction fee.
Optional memo.
Preferred signing method (defaults to proto).
Convenience initializer for creating token transfer transactions.
### CosmosSignResponse
Response from a Cosmos transaction signing operation.
The signature information.
The signed document.
### CosmosCoin
Represents a coin amount in Cosmos with denomination and amount.
The token denomination (e.g., "uatom").
The amount as a string in the smallest unit.
Creates a new coin with string amount.
Creates a new coin with UInt64 amount.
### CosmosFee
Represents transaction fees in Cosmos.
Array of fee coins.
Gas limit as a string.
Creates a fee with array of coins.
Convenience initializer for simple fee.
## Type Definitions
### SignatureResult
Result of a message or transaction signing operation.
For transaction signing: Contains the complete signed transaction ready for broadcasting (RLP-encoded for EVM, serialized for other chains).
For message signing: Contains just the signature.
Note: The bridge returns `signature` for messages and `signedTransaction` for transactions, but Swift SDK normalizes both to `signedTransaction` for consistency.
Computed property that returns the signed transaction data for broadcasting.
The ID of the wallet that performed the signing.
The wallet type that signed (e.g., "evm", "solana", "cosmos").
### AuthState
Authentication state returned by authentication operations.
The stage of authentication (`.verify`, `.signup`, `.login`).
The Para userId for the currently authenticating user.
Email address if using email auth.
Phone number if using phone auth.
Display name for the authenticating user.
Profile picture URL for the authenticating user.
Username for the authenticating user.
URL for passkey authentication.
ID for the passkey.
URL for passkey authentication on a known device.
URL for password authentication.
Biometric hints for the user's devices.
### TransferResult
Result returned from a successful EVM transfer operation.
The transaction hash on the blockchain.
The sender address.
The recipient address.
The amount transferred in wei (smallest unit).
The chain ID where the transaction was broadcast.
### Auth
Authentication type for initiateAuthFlow method.
Email-based authentication.
Phone-based authentication with full phone number including country code.
### OAuthProvider
Supported OAuth provider types for authentication.
Google authentication provider.
Discord authentication provider.
Apple authentication provider.
### SignupMethod & LoginMethod
The possible methods for signup when the stage is .signup.
Passkey-based signup.
Password-based signup.
The possible methods for login when the stage is .login.
Passkey-based login.
Password-based login.
Passkey login on a known device.
### Wallet
Represents a wallet associated with a Para user account.
Unique identifier for the wallet.
The type of wallet (e.g., `.evm`, `.solana`, `.cosmos`).
Primary public address of the wallet.
Secondary address (e.g., Cosmos bech32 address for Cosmos wallets).
Public key of the wallet.
Scheme used by the wallet.
Timestamp when the wallet was created.
### WalletType
Supported wallet types for Para wallets.
Ethereum Virtual Machine compatible wallet (Ethereum, Polygon, etc.).
Solana blockchain wallet.
Cosmos ecosystem wallet supporting bech32 addresses.
### MetaMaskConfig
Configuration object for MetaMask connector initialization.
The name of your application as displayed in MetaMask.
Your application's identifier (typically the bundle identifier).
The API version to use (e.g., "1.0").
# Mobile Examples
Source: https://docs.getpara.com/v2/swift/examples
import { Card } from '/snippets/v2/components/ui/card.mdx';
import { Link } from '/snippets/v2/components/ui/link.mdx';
Para offers a comprehensive Swift example to help you integrate our technology into your iOS applications. Our example repository demonstrates minimal implementation requirements with clean, focused code that you can easily adapt to your specific application needs.
## Para Swift Example
Explore our Swift example showcasing Para integration with various features:
The Swift example demonstrates:
- Native iOS passkey authentication
- Face ID and Touch ID integration
- Wallet creation and management
- Transaction signing across multiple chains
- Session management
- Integration with Apple's Secure Enclave
- iCloud Sharechain support
## Need Something Specific?
Don't see an example for your use case? Para's team is eager to create new examples to help you integrate with different libraries, third-party features, or providers.
# Cosmos Integration
Source: https://docs.getpara.com/v2/swift/guides/cosmos
import { Card } from '/snippets/v2/components/ui/card.mdx';
## Quick Start
```swift
import ParaSwift
// Sign a Cosmos transaction
let paraManager = ParaManager(apiKey: "your-api-key")
// Get an existing Cosmos wallet or create one
let wallets = try await paraManager.fetchWallets()
let wallet: Wallet
if let existing = wallets.first(where: { $0.type == .cosmos }) {
wallet = existing
} else {
wallet = try await paraManager.createWallet(type: .cosmos, skipDistributable: false)
}
let transaction = CosmosTransaction(
to: "cosmos1recipient...",
amount: "1000000", // 1 ATOM in micro-units
chainId: "theta-testnet-001", // Cosmos Hub testnet (use "cosmoshub-4" for mainnet)
format: "proto"
)
let result = try await paraManager.signTransaction(
walletId: wallet.id,
transaction: transaction,
chainId: "theta-testnet-001"
)
print("Transaction signed: \(result.signedTransaction)")
```
## Common Operations
### Sign Transactions for Different Chains
```swift
// Sign ATOM transaction on Cosmos Hub testnet
let atomTx = CosmosTransaction(
to: "cosmos1recipient...",
amount: "1000000", // 1 ATOM
denom: "uatom",
chainId: "theta-testnet-001", // Testnet
format: "proto"
)
// Sign OSMO transaction on Osmosis testnet
let osmoTx = CosmosTransaction(
to: "osmo1recipient...",
amount: "1000000", // 1 OSMO
denom: "uosmo",
chainId: "osmo-test-5", // Testnet
format: "proto"
)
// Sign JUNO transaction on Juno mainnet
let junoTx = CosmosTransaction(
to: "juno1recipient...",
amount: "1000000", // 1 JUNO
denom: "ujuno",
chainId: "juno-1",
format: "proto"
)
```
### Sign Transaction
```swift
let transaction = CosmosTransaction(
to: "cosmos1recipient...",
amount: "1000000", // 1 ATOM
denom: "uatom",
memo: "Transfer via Para",
chainId: "theta-testnet-001", // Testnet
format: "proto" // or "amino" for legacy
)
let result = try await paraManager.signTransaction(
walletId: wallet.id,
transaction: transaction,
chainId: "theta-testnet-001",
rpcUrl: "https://rpc.sentry-01.theta-testnet.polypore.xyz"
)
// Cosmos returns: { signBytes, signDoc, format }
print("Signed: \(result.signedTransaction)")
```
### Get Wallet Address
```swift
// Get the Cosmos wallet address for a specific chain
let wallet = (try await paraManager.fetchWallets()).first { $0.type == .cosmos }!
let address = wallet.address // Returns the primary address
print("Cosmos address: \(address ?? "No address")")
```
### Check Balance
```swift
// Native token balance
let balance = try await paraManager.getBalance(
walletId: wallet.id,
rpcUrl: "https://cosmos-rpc.publicnode.com",
chainPrefix: "cosmos" // Important: specify chain prefix for address derivation
)
print("Balance: \(balance) uatom")
// Different chain
let osmoBalance = try await paraManager.getBalance(
walletId: wallet.id,
rpcUrl: "https://osmosis-rpc.publicnode.com",
chainPrefix: "osmo" // Different prefix for Osmosis
)
print("Balance: \(osmoBalance) uosmo")
```
### Sign Message
```swift
let message = "Hello, Cosmos!"
let result = try await paraManager.signMessage(
walletId: wallet.id,
message: message
)
print("Signature: \(result.signedTransaction)")
```
## Supported Networks
### Testnets
| Network | Chain ID | Prefix | Native Token | RPC URL |
|---------|----------|--------|--------------|---------|
| **Cosmos Hub Testnet** | `theta-testnet-001` | `cosmos` | `uatom` | `https://rpc.sentry-01.theta-testnet.polypore.xyz` |
| **Osmosis Testnet** | `osmo-test-5` | `osmo` | `uosmo` | `https://rpc.osmotest5.osmosis.zone` |
### Mainnets
| Network | Chain ID | Prefix | Native Token | Decimals | RPC URL |
|---------|----------|--------|--------------|----------|---------|
| **Cosmos Hub** | `cosmoshub-4` | `cosmos` | `uatom` | 6 | `https://cosmos-rpc.publicnode.com` |
| **Osmosis** | `osmosis-1` | `osmo` | `uosmo` | 6 | `https://osmosis-rpc.publicnode.com` |
| **Juno** | `juno-1` | `juno` | `ujuno` | 6 | `https://rpc-juno.itastakers.com` |
| **Stargaze** | `stargaze-1` | `stars` | `ustars` | 6 | `https://rpc.stargaze-apis.com` |
| **Akash** | `akashnet-2` | `akash` | `uakt` | 6 | `https://rpc.akash.forbole.com` |
| **Celestia** | `celestia` | `celestia` | `utia` | 6 | `https://rpc.celestia.pops.one` |
| **dYdX** | `dydx-mainnet-1` | `dydx` | `adydx` | 18 | `https://dydx-dao-api.polkachu.com` |
| **Injective** | `injective-1` | `inj` | `inj` | 18 | `https://injective-rpc.publicnode.com` |
## Complete Example
```swift
import SwiftUI
import ParaSwift
struct CosmosWalletView: View {
@EnvironmentObject var paraManager: ParaManager
@State private var selectedChain = "theta-testnet-001"
@State private var isLoading = false
@State private var result: String?
let wallet: Wallet
let chains = [
"theta-testnet-001": ("Cosmos Hub Testnet", "https://rpc.sentry-01.theta-testnet.polypore.xyz", "uatom", "cosmos"),
"osmo-test-5": ("Osmosis Testnet", "https://rpc.osmotest5.osmosis.zone", "uosmo", "osmo")
]
var body: some View {
VStack(spacing: 20) {
Picker("Chain", selection: $selectedChain) {
ForEach(chains.keys.sorted(), id: \.self) { chainId in
Text(chains[chainId]!.0).tag(chainId)
}
}
.pickerStyle(.segmented)
Text(wallet.address ?? "No address")
.font(.system(.caption, design: .monospaced))
Button(action: signTransaction) {
Text(isLoading ? "Signing..." : "Sign Transaction for \(chains[selectedChain]!.0)")
}
.disabled(isLoading)
if let result = result {
Text(result)
.font(.caption)
}
}
.padding()
}
private func signTransaction() {
isLoading = true
Task {
do {
let chainInfo = chains[selectedChain]!
let transaction = CosmosTransaction(
to: "\(chainInfo.3)1recipient...", // Uses chain prefix
amount: "1000000", // 1 token in micro-units
denom: chainInfo.2,
memo: "Test transaction from Swift",
chainId: selectedChain,
format: "proto"
)
let txResult = try await paraManager.signTransaction(
walletId: wallet.id,
transaction: transaction,
chainId: selectedChain,
rpcUrl: chainInfo.1
)
result = "Signed! Signature: \(txResult.signedTransaction)"
} catch {
result = "Error: \(error)"
}
isLoading = false
}
}
}
```
## Proto vs Amino Formats
```swift
// Modern Proto format (recommended)
let protoTx = CosmosTransaction(
to: "cosmos1recipient...",
amount: "1000000",
denom: "uatom",
format: "proto",
chainId: "theta-testnet-001" // Testnet
)
// Legacy Amino format (compatibility)
let aminoTx = CosmosTransaction(
to: "cosmos1recipient...",
amount: "1000000",
denom: "uatom",
format: "amino",
chainId: "theta-testnet-001" // Testnet
)
// Use convenience constructor
let simpleTx = CosmosTransaction(
to: "cosmos1recipient...",
amount: "1000000",
denom: "uatom",
chainId: "theta-testnet-001"
)
```
# Email & Phone Login
Source: https://docs.getpara.com/v2/swift/guides/email-phone-login
import Prerequisites from "/snippets/v2/quick-start-prerequisites.mdx";
import IntegrationSupport from "/snippets/v2/integration-support.mdx";
import { Link } from '/snippets/v2/components/ui/link.mdx';
import BetaCredentialsFull from "/snippets/v2/beta-credentials/beta-credentials-full.mdx";
## Overview
Para One Click Login is the default experience—Para hosts the entire flow for existing users and new signups. If you turn on passkey or password requirements in the Developer Portal, the optional sections below show how to handle them.
Need to install the SDK? Start with the .
Para ships with One Click enabled. You can add requirements like Passkey-only signup or password fallback from the . Adjust the optional sections below only if you turn on those features.
## Start the Authentication Flow
Inject the Para manager and authentication helpers, then launch the flow with whichever identifier your UI collects (email or phone). Para One Click handles the rest unless you enable extra verification.
```swift AuthenticationView.swift
import AuthenticationServices
import ParaSwift
struct AuthenticationView: View {
@EnvironmentObject var paraManager: ParaManager
@Environment(\.authorizationController) private var authorizationController
@Environment(\.webAuthenticationSession) private var webAuthenticationSession
@State private var pendingState: AuthState? // Only used if you enable OTP/passkey requirements
var body: some View {
VStack {
// Render your auth UI and call startAuth(identifier:)
}
.task {
paraManager.setDefaultWebAuthenticationSession(webAuthenticationSession)
}
}
private func startAuth(identifier: String) {
let auth: Auth = identifier.contains("@")
? .email(identifier.lowercased())
: .phone(identifier) // Expect E.164 format
Task {
do {
let state = try await paraManager.initiateAuthFlow(auth: auth)
switch state.stage {
case .done:
completeLogin()
case .verify:
// Store state to finish OTP/passkey signup later if you enabled it
pendingState = state
case .login:
try await paraManager.handleLogin(
authState: state,
authorizationController: authorizationController
)
completeLogin()
case .signup:
// Signup completes after OTP + passkey if required
break
}
} catch {
// Handle errors according to your UI needs
}
}
}
}
```
The `completeLogin()` helper can mark your app as authenticated and transition to the signed-in experience:
```swift AuthenticationView.swift
private func completeLogin() {
// Mark the user as authenticated in your app
}
```
## Handle OTP Signup (Optional)
Only implement this step if you turn on OTP / passkey signup in the Developer Portal. Collect the OTP, exchange it for a verified state, and finish signup:
```swift AuthenticationView.swift
private func submitOtp(_ code: String) {
guard let pendingState else { return }
Task {
do {
let verifiedState = try await paraManager.handleVerificationCode(
verificationCode: code
)
try await paraManager.handleSignup(
authState: verifiedState,
method: .passkey,
authorizationController: authorizationController
)
completeLogin()
} catch {
// Handle errors according to your UI needs
}
}
}
```
If you skip `setDefaultWebAuthenticationSession(_:)`, `initiateAuthFlow` returns a `loginUrl` you can present manually using `presentAuthUrl(_:context:webAuthenticationSession:)`. The automatic `.done` stage shown above relies on the default session being set.
## Support Direct Passkey Login
If you already know a user has passkeys registered, you can offer a shortcut that skips email/phone input:
```swift AuthenticationView.swift
private func loginWithPasskey(email: String?) {
Task {
do {
try await paraManager.loginWithPasskey(
authorizationController: authorizationController,
email: email,
phone: nil
)
completeLogin()
} catch {
// Handle errors according to your UI needs
}
}
}
```
## Next Steps
- Add social providers alongside this flow in
- Manage existing sessions with
# EVM Integration
Source: https://docs.getpara.com/v2/swift/guides/evm
import { Card } from '/snippets/v2/components/ui/card.mdx';
## Quick Start
### Transfer
Para handles signing and broadcasting in one call:
```swift
import ParaSwift
let paraManager = ParaManager(apiKey: "your-api-key")
// Get an existing EVM wallet or create one
let wallets = try await paraManager.fetchWallets()
let wallet: Wallet
if let existing = wallets.first(where: { $0.type == .evm }) {
wallet = existing
} else {
wallet = try await paraManager.createWallet(type: .evm, skipDistributable: false)
}
// Send ETH - Para signs and broadcasts
let result = try await paraManager.transfer(
walletId: wallet.id,
to: "0x742d35Cc6634C0532925a3b844Bc454e4438f44e",
amount: "1000000000000000", // 0.001 ETH in wei
chainId: "11155111", // Optional: Sepolia testnet (defaults to wallet's chain)
rpcUrl: nil // Optional: override default RPC
)
print("Transaction sent: \(result.hash)")
print("From: \(result.from), To: \(result.to)")
print("Amount: \(result.amount), Chain: \(result.chainId)")
```
### Advanced Control
Sign with Para, then broadcast yourself for custom gas/RPC settings:
```swift
import ParaSwift
import BigInt
// Step 1: Sign transaction with Para
let transaction = EVMTransaction(
to: "0x742d35Cc6634C0532925a3b844Bc454e4438f44e",
value: BigUInt("1000000000000000")!,
gasLimit: BigUInt("21000")!
)
let result = try await paraManager.signTransaction(
walletId: wallet.id,
transaction: transaction,
chainId: "11155111" // Sepolia testnet
)
// Step 2: Broadcast using your preferred method (e.g., web3.swift)
// The transactionData property provides the complete signed transaction
// let txHash = try await broadcastWithWeb3Swift(result.transactionData)
```
## Common Operations
### Send ETH
```swift
// Para handles everything - signing and broadcasting
let result = try await paraManager.transfer(
walletId: wallet.id,
to: "0x742d35Cc6634C0532925a3b844Bc454e4438f44e",
amount: "1000000000000000", // 0.001 ETH in wei
chainId: "11155111", // Optional: Sepolia testnet
rpcUrl: nil // Optional: custom RPC URL
)
print("Transaction hash: \(result.hash)")
print("From: \(result.from), To: \(result.to), Chain: \(result.chainId)")
```
### Sign Transaction
```swift
import BigInt
let transaction = EVMTransaction(
to: "0x742d35Cc6634C0532925a3b844Bc454e4438f44e",
value: BigUInt("1000000000000000")!,
gasLimit: BigUInt("21000")!,
maxPriorityFeePerGas: BigUInt("1000000000")!,
maxFeePerGas: BigUInt("3000000000")!,
nonce: BigUInt("0")!,
chainId: BigUInt("11155111")!, // Sepolia
type: 2
)
let result = try await paraManager.signTransaction(
walletId: wallet.id,
transaction: transaction,
chainId: "11155111"
)
// The transactionData property returns the complete RLP-encoded transaction
// ready for broadcasting via eth_sendRawTransaction
print("Signed transaction: \(result.transactionData)")
// For backward compatibility, signature field still contains the raw signature
print("Raw signature: \(result.signedTransaction)")
```
### Check Balance
```swift
// Native ETH balance
let ethBalance = try await paraManager.getBalance(walletId: wallet.id)
// ERC-20 token balance
let tokenBalance = try await paraManager.getBalance(
walletId: wallet.id,
token: "0xA0b86991c6218b36c1d19D4a2e9Eb0cE3606eB48" // USDC
)
```
### Sign Message
```swift
let message = "Hello, Ethereum!"
let result = try await paraManager.signMessage(
walletId: wallet.id,
message: message
)
print("Signature: \(result.signedTransaction)")
```
## Networks
### Testnets
| Network | Chain ID | Native Token | Default RPC |
|---------|----------|--------------|-------------|
| **Sepolia** | `11155111` | ETH | `https://ethereum-sepolia-rpc.publicnode.com` |
| **Polygon Mumbai** | `80001` | MATIC | `https://rpc-mumbai.maticvigil.com` |
| **Base Sepolia** | `84532` | ETH | `https://sepolia.base.org` |
### Mainnets
| Network | Chain ID | Native Token | Default RPC |
|---------|----------|--------------|-------------|
| **Ethereum** | `1` | ETH | `https://eth.llamarpc.com` |
| **Polygon** | `137` | MATIC | `https://polygon-rpc.com` |
| **Base** | `8453` | ETH | `https://mainnet.base.org` |
| **Arbitrum** | `42161` | ETH | `https://arb1.arbitrum.io/rpc` |
| **Optimism** | `10` | ETH | `https://mainnet.optimism.io` |
## Complete Example
```swift
import SwiftUI
import ParaSwift
import BigInt
struct EVMWalletView: View {
@EnvironmentObject var paraManager: ParaManager
@State private var isLoading = false
@State private var txHash: String?
let wallet: Wallet
var body: some View {
VStack(spacing: 20) {
Text(wallet.address ?? "No address")
.font(.system(.caption, design: .monospaced))
Button(action: sendETH) {
Text(isLoading ? "Sending..." : "Send 0.001 ETH")
}
.disabled(isLoading)
if let txHash = txHash {
Text("Sent: \(txHash)")
.font(.caption)
}
}
.padding()
}
private func sendETH() {
isLoading = true
Task {
do {
let result = try await paraManager.transfer(
walletId: wallet.id,
to: "0x742d35Cc6634C0532925a3b844Bc454e4438f44e",
amount: "1000000000000000",
chainId: "11155111", // Optional: Sepolia testnet
rpcUrl: nil // Optional: custom RPC
)
txHash = result.hash
} catch {
print("Error: \(error)")
}
isLoading = false
}
}
}
```
## Smart Contract Interaction
**Transaction Data**: For EVM transactions, `result.transactionData` returns the complete RLP-encoded signed transaction that's ready to broadcast via `eth_sendRawTransaction`. The `signature` field contains just the raw signature for backward compatibility.
```swift
// Call a contract function
let contractTransaction = EVMTransaction(
to: "0x123abc...", // Contract address
value: BigUInt(0),
gasLimit: BigUInt("150000")!,
maxPriorityFeePerGas: BigUInt("1000000000")!,
maxFeePerGas: BigUInt("3000000000")!,
nonce: BigUInt("0")!,
chainId: BigUInt("11155111")!, // Sepolia testnet
smartContractAbi: """
[{
"inputs": [{"name":"num","type":"uint256"}],
"name": "store",
"type": "function"
}]
""",
smartContractFunctionName: "store",
smartContractFunctionArgs: ["42"],
type: 2
)
let result = try await paraManager.signTransaction(
walletId: wallet.id,
transaction: contractTransaction,
chainId: "11155111" // Sepolia testnet
)
// Use result.transactionData to get the complete signed transaction
print("Signed transaction: \(result.transactionData)")
```
### ERC20 Token Transfer
```swift
// Transfer USDC on Sepolia testnet
let usdcTransaction = EVMTransaction(
to: "0x1c7D4B196Cb0C7B01d743Fbc6116a902379C7238", // USDC contract on Sepolia
value: BigUInt(0), // No ETH value for token transfer
gasLimit: BigUInt("100000")!, // Higher gas limit for token transfers
maxPriorityFeePerGas: BigUInt("1000000000")!,
maxFeePerGas: BigUInt("3000000000")!,
nonce: BigUInt("0")!,
chainId: BigUInt("11155111")!, // Sepolia testnet
smartContractAbi: """
[{
"inputs": [
{"name": "recipient", "type": "address"},
{"name": "amount", "type": "uint256"}
],
"name": "transfer",
"outputs": [{"name": "", "type": "bool"}],
"type": "function"
}]
""",
smartContractFunctionName: "transfer",
smartContractFunctionArgs: [
"0xcb53FD7529d257D40618992993c5F863f5d86572", // Recipient address
"100000" // 0.1 USDC (6 decimals, so 100000 = 0.1)
],
type: 2
)
// Sign the transaction - Para bridge handles ABI encoding
let result = try await paraManager.signTransaction(
walletId: wallet.id,
transaction: usdcTransaction,
chainId: "11155111"
)
// The signed transaction is ready to broadcast
// Para encodes the function call data using the provided ABI
print("Signed ERC20 transfer: \(result.transactionData)")
// You can broadcast using your preferred method
// The transaction will transfer 0.1 USDC to the recipient
```
# External Wallets
Source: https://docs.getpara.com/v2/swift/guides/external-wallets
import EnvironmentInfo from "/snippets/v2/quick-start-environment-info.mdx";
import Prerequisites from "/snippets/v2/quick-start-prerequisites.mdx";
import IntegrationSupport from "/snippets/v2/integration-support.mdx";
import { Card } from '/snippets/v2/components/ui/card.mdx';
import BetaCredentialsFull from "/snippets/v2/beta-credentials/beta-credentials-full.mdx";
import { Link } from '/snippets/v2/components/ui/link.mdx';
## Overview
This guide outlines how to integrate and use external cryptocurrency wallets with the ParaSwift SDK. With the unified wallet architecture, the Swift SDK has removed all blockchain-specific dependencies and now provides a streamlined approach to external wallet connectivity.
The SDK supports external wallets like MetaMask through deep-linking protocols and provides built-in authentication and transaction signing capabilities. You can also use external wallet addresses to authenticate with Para.
**Unified Wallet Architecture:** The Swift SDK v2 has removed all blockchain-specific packages (web3swift, solana-swift, etc.) and now uses only BigInt for handling blockchain values. This provides a cleaner, more maintainable architecture while still supporting all necessary external wallet operations.
The SDK now has minimal dependencies:
- **BigInt**: For handling large blockchain numbers (Wei, gas values, etc.)
- **PhoneNumberKit**: For phone number validation in authentication flows
## Deep Linking
The ParaSwift SDK communicates with other apps via deep linking. To enable deep linking for your application, you'll need to configure your app appropriately.
### Configure URL Schemes
First, you need to configure your app to handle custom URL schemes:
1. Open your app's Info.plist file
2. Add a new entry for `LSApplicationQueriesSchemes` as an array
3. Add the URL schemes of supported wallets as strings to this array
```xml
LSApplicationQueriesSchemes
metamask
```
### Configure URL Types
Next, you need to set up URL Types to handle callbacks from external wallets:
1. In Xcode, select your app target
2. Go to "Info" tab
3. Expand "URL Types"
4. Click the "+" button to add a new URL Type
5. Set the "Identifier" to your app's bundle identifier
6. Set the "URL Schemes" to a unique identifier for your app
**Important:** You must use a unique URL scheme to avoid conflicts with other apps. We recommend using reverse-domain notation like `com.yourcompany.yourapp`.
In our examples we use `paraswift`, but you **must replace this** with your own unique scheme:
```xml
CFBundleURLTypes
CFBundleURLSchemes
com.yourcompany.yourapp
```
## MetaMask Connector
### Setup
Create and initialize the MetaMask connector with your app's configuration:
```swift
import ParaSwift
// Create MetaMask configuration
let appScheme = "com.yourcompany.yourapp" // Replace with your unique scheme
let metaMaskConfig = MetaMaskConfig(
appName: "Your App Name",
appId: appScheme,
apiVersion: "1.0"
)
// Initialize the connector
let metaMaskConnector = MetaMaskConnector(
para: paraManager,
appUrl: "https://\(appScheme)",
config: metaMaskConfig
)
```
### Handle Deep Links
Handle incoming deep links from MetaMask by adding a URL handler in your SwiftUI app:
```swift
@main
struct YourApp: App {
var body: some Scene {
WindowGroup {
ContentView()
.onOpenURL { url in
// Handle MetaMask deep links with URL validation
if url.scheme == "yourapp", url.host == "mmsdk" {
MetaMaskConnector.handleDeepLink(url)
}
}
}
}
}
```
The deep link handling has been simplified to use a static method. You no longer need to maintain a MetaMaskConnector instance at the app level just for handling deep links.
### Connecting
To connect to MetaMask and retrieve the user's accounts:
```swift
do {
try await metaMaskConnector.connect()
// MetaMask will automatically attempt Para authentication after connection
// Access connected accounts via metaMaskConnector.accounts
} catch {
// Handle connection error
}
```
**Automatic Authentication:** The MetaMask connector automatically attempts to authenticate with Para after a successful connection. This streamlines the user experience by reducing the number of manual steps required.
### Sign Message
To request a signature for a message from MetaMask:
```swift
guard let account = metaMaskConnector.accounts.first else { return }
do {
let signature = try await metaMaskConnector.signMessage(
"Message to sign! Hello World",
account: account
)
// Use the signature
} catch {
// Handle signing error
}
```
### Send Transaction
To send a transaction through MetaMask using the EVMTransaction model:
```swift
import BigInt
guard let account = metaMaskConnector.accounts.first else { return }
do {
// Convert 0.001 ETH to wei (1 ETH = 10^18 wei)
let valueInWei = BigUInt("1000000000000000")! // 0.001 ETH in wei
let gasLimit = BigUInt(100000)
let transaction = EVMTransaction(
to: "0x13158486860B81Dee9e43Dd0391e61c2F82B577F",
value: valueInWei,
gasLimit: gasLimit
)
let txHash = try await metaMaskConnector.sendTransaction(transaction, account: account)
// Transaction sent successfully, use txHash
} catch {
// Handle transaction error
}
```
### Alternative: Raw Transaction Format
You can also use a raw transaction dictionary format:
```swift
guard let account = metaMaskConnector.accounts.first else { return }
let transaction: [String: String] = [
"from": account,
"to": "0x13158486860B81Dee9e43Dd0391e61c2F82B577F",
"value": "0x38D7EA4C68000", // 0.001 ETH in wei (hex)
"gasLimit": "0x186A0" // 100000 in hex
]
do {
let txHash = try await metaMaskConnector.sendTransaction(
transaction,
account: account
)
// Transaction sent successfully
} catch {
// Handle transaction error
}
```
### Properties
The MetaMask connector provides several useful properties:
```swift
// Check if connected to MetaMask
let isConnected = metaMaskConnector.isConnected
// Get list of connected accounts
let accounts = metaMaskConnector.accounts
// Get current chain ID (e.g., "0x1" for Ethereum mainnet)
let chainId = metaMaskConnector.chainId
```
### Supported Networks
The MetaMask connector works with any EVM-compatible network that MetaMask supports. Common networks include:
| Network | Chain ID | Description |
|---------|----------|-------------|
| Ethereum Mainnet | `0x1` | Main Ethereum network |
| Sepolia Testnet | `0xaa36a7` | Ethereum test network |
| Polygon | `0x89` | Polygon mainnet |
| Arbitrum One | `0xa4b1` | Arbitrum Layer 2 |
| Base | `0x2105` | Base Layer 2 |
## Working with BigUInt Values
Since the Swift SDK now uses BigInt for handling blockchain values, here are some utility patterns for working with Ether and Wei conversions:
```swift
import BigInt
// Convert Ether to Wei (multiply by 10^18)
func etherToWei(_ ether: String) -> BigUInt? {
guard let etherDecimal = Decimal(string: ether) else { return nil }
let weiDecimal = etherDecimal * pow(10, 18)
return BigUInt(weiDecimal.description.components(separatedBy: ".").first ?? "")
}
// Convert Wei to Ether (divide by 10^18)
func weiToEther(_ wei: BigUInt) -> String {
let weiDecimal = Decimal(string: wei.description) ?? 0
let etherDecimal = weiDecimal / pow(10, 18)
return etherDecimal.description
}
// Usage examples
let oneEthInWei = etherToWei("1.0")! // 1000000000000000000
let halfEthInWei = etherToWei("0.5")! // 500000000000000000
let pointZeroOneEthInWei = etherToWei("0.01")! // 10000000000000000
// Convert back to Ether
let ethAmount = weiToEther(BigUInt("1000000000000000000")!) // "1"
```
These utility functions help you convert between human-readable Ether amounts and the Wei values required by the blockchain. Always validate decimal inputs to prevent runtime crashes.
## Advanced Configuration
### Customizing MetaMask Connection
You can customize various aspects of the MetaMask connection by modifying the MetaMaskConfig:
```swift
let metaMaskConfig = MetaMaskConfig(
appName: "Your App Name",
appId: bundleId,
apiVersion: "1.0"
)
```
### Working with Different Networks
MetaMask supports multiple networks. You can check the current network and adjust your app's behavior accordingly:
```swift
switch metaMaskConnector.chainId {
case "0x1":
// Ethereum Mainnet
case "0x5":
// Goerli Testnet
case "0x89":
// Polygon
default:
// Other network
}
```
## External Wallet Authentication with Para
Para supports authentication using external wallets like MetaMask. This allows users to log into Para using their existing wallet credentials.
### Using External Wallet for Para Login
After connecting to MetaMask, you can use the wallet address to authenticate with Para:
```swift
// First, connect to MetaMask
try await metaMaskConnector.connect()
// Get the first connected account
guard let account = metaMaskConnector.accounts.first else {
throw ParaError.error("No MetaMask accounts found")
}
// Create external wallet info for Para authentication
let externalWallet = ExternalWalletInfo(
address: account,
type: .evm,
provider: "metamask",
isConnectionOnly: false // Set to false for full authentication
)
// Login to Para using the external wallet
try await paraManager.loginExternalWallet(wallet: externalWallet)
// User is now logged into Para with their MetaMask wallet
```
### Complete External Wallet Login Example
Here's a complete example showing external wallet authentication:
```swift
import SwiftUI
import ParaSwift
struct ExternalWalletLoginView: View {
@EnvironmentObject var paraManager: ParaManager
@EnvironmentObject var appRootManager: AppRootManager
@StateObject private var metaMaskConnector: MetaMaskConnector
@State private var isConnecting = false
@State private var errorMessage: String?
init(paraManager: ParaManager) {
let config = MetaMaskConfig(
appName: "Your App",
appId: "com.yourcompany.yourapp", // Use your unique app scheme
apiVersion: "1.0"
)
_metaMaskConnector = StateObject(wrappedValue: MetaMaskConnector(
para: paraManager,
appUrl: "https://com.yourcompany.yourapp", // Use your unique app scheme
config: config
))
}
var body: some View {
VStack(spacing: 20) {
Image("metamask")
.resizable()
.frame(width: 80, height: 80)
Text("Connect with MetaMask")
.font(.title2)
.fontWeight(.semibold)
Text("Use your existing MetaMask wallet to log into Para")
.font(.body)
.foregroundColor(.secondary)
.multilineTextAlignment(.center)
if let errorMessage = errorMessage {
Text(errorMessage)
.foregroundColor(.red)
.font(.caption)
.padding()
.background(Color.red.opacity(0.1))
.cornerRadius(8)
}
Button {
connectAndLogin()
} label: {
if isConnecting {
ProgressView()
.tint(.white)
} else {
Text("Connect MetaMask")
.fontWeight(.semibold)
}
}
.frame(maxWidth: .infinity)
.padding()
.background(Color.blue)
.foregroundColor(.white)
.cornerRadius(10)
.disabled(isConnecting)
}
.padding()
.navigationTitle("External Wallet")
}
private func connectAndLogin() {
isConnecting = true
errorMessage = nil
Task {
do {
// Connect to MetaMask
try await metaMaskConnector.connect()
// Get the first account
guard let account = metaMaskConnector.accounts.first else {
throw ParaError.error("No MetaMask accounts found")
}
// Create external wallet info
let externalWallet = ExternalWalletInfo(
address: account,
type: .evm,
provider: "metamask",
isConnectionOnly: false // Set to false for full authentication
)
// Login to Para using external wallet
try await paraManager.loginExternalWallet(wallet: externalWallet)
// Navigate to home on success
appRootManager.currentRoot = .home
} catch {
errorMessage = error.localizedDescription
}
isConnecting = false
}
}
}
```
# Wallet Pregeneration & Claiming
Source: https://docs.getpara.com/v2/swift/guides/pregen
import { Link } from '/snippets/v2/components/ui/link.mdx';
import { Card } from '/snippets/v2/components/ui/card.mdx';
**Coming Soon**: Wallet pregeneration and claiming functionality for Swift applications is currently in development and will be available soon. Reach out to us at if you'd like to get early access.
Para will soon provide support for wallet pregeneration and claiming in Swift applications, allowing you to create blockchain wallets for users before they complete authentication.
# Swift Session Management
Source: https://docs.getpara.com/v2/swift/guides/sessions
import { Link } from '/snippets/v2/components/ui/link.mdx';
import { Card } from '/snippets/v2/components/ui/card.mdx';
Para Swift SDK provides robust session management, automatically tracking authentication states and ensuring secure, seamless interactions. Effective session management is critical for security, usability, and reliability of your application.
## Session States
Para manages sessions using the `ParaSessionState` enum:
- `unknown`: Initial state before the status is determined.
- `inactive`: SDK initialized but no active session.
- `active`: Session is active but user not fully logged in.
- `activeLoggedIn`: User is fully logged in with an active session.
### Observing Session States
Utilize SwiftUI's Combine or other state management tools to observe changes:
```swift
@StateObject private var paraManager: ParaManager
.onChange(of: paraManager.sessionState) { newState in
switch newState {
case .activeLoggedIn:
print("User authenticated")
case .inactive:
print("Session inactive")
default:
print("Session state: \(newState)")
}
}
```
## Session Duration
The Para session length is `2 hours` by default, but can be configured to up to 30 days. To configure this parameter, please visit the Configuration section of the . A user signing a message or transaction extends the session by the duration of the session length.
## Key Session Methods
- `isSessionActive() async throws -> Bool`: Checks if the session is currently valid before performing authenticated operations.
- `isFullyLoggedIn() async throws -> Bool`: Checks if the user is fully logged in with an active session.
- `exportSession() async throws -> String`: Exports session state as a string that can be used for advanced integration scenarios.
- `logout() async throws`: Clears the current session, removes all website data from the WebView, and resets the session state to inactive.
## Maintaining Active Sessions
For long-running applications, check session status before performing sensitive operations:
```swift
func performSensitiveOperation() {
Task {
do {
if try await paraManager.isSessionActive() {
// Proceed with sensitive operation
try await signTransaction(...)
} else {
// Handle session expiration - redirect to login
navigateToLogin()
}
} catch {
await MainActor.run {
isLoggedIn = false
}
}
}
}
```
## Refreshing Expired Sessions
When a session has expired, Para recommends initiating a full authentication flow rather than trying to refresh the session.
For Swift applications, always call `logout()` before reinitiating authentication when a session has expired to ensure all stored data is properly cleared.
```swift
import ParaSwift
func handleSessionExpiration() async {
do {
// When session expires, first clear storage
try await paraManager.logout()
// Then redirect to authentication screen
await MainActor.run {
// Navigate to authentication screen
}
} catch {
// Handle error
}
}
```
## Background Security
Clear sensitive data when app goes to background by logging out:
```swift
class AppDelegate: NSObject, UIApplicationDelegate {
func applicationDidEnterBackground(_ application: UIApplication) {
Task {
try? await paraManager.logout()
}
}
}
```
## Exporting Sessions to Your Server
In some advanced scenarios, you may need to export the session state:
```swift
func sendSessionToServer() async throws {
do {
// Export session without signing capabilities
let sessionString = try await paraManager.exportSession()
// Create URL request
var request = URLRequest(url: URL(string: "https://your-api.com/sessions")!)
request.httpMethod = "POST"
request.addValue("application/json", forHTTPHeaderField: "Content-Type")
// Create request body
let body: [String: Any] = ["session": sessionString]
request.httpBody = try JSONSerialization.data(withJSONObject: body)
// Send request
let (_, response) = try await URLSession.shared.data(for: request)
guard let httpResponse = response as? HTTPURLResponse,
httpResponse.statusCode == 200 else {
throw URLError(.badServerResponse)
}
// Handle success
} catch {
// Handle error
throw error
}
}
```
## Best Practices
### Check Sessions on App Launch
Verify session status when your app starts to determine if users need to reauthenticate:
```swift
import SwiftUI
import ParaSwift
class AppStartupManager: ObservableObject {
@Published var isLoggedIn = false
let paraManager: ParaManager
init(paraManager: ParaManager) {
self.paraManager = paraManager
checkSessionOnLaunch()
}
func checkSessionOnLaunch() {
Task {
do {
let isActive = try await paraManager.isSessionActive()
await MainActor.run {
if isActive {
// User is logged in
isLoggedIn = true
} else {
// Session not active, clear any lingering data
Task {
try? await paraManager.logout()
}
isLoggedIn = false
}
}
} catch {
await MainActor.run {
isLoggedIn = false
}
}
}
}
}
```
### Handle App Lifecycle Changes
Swift apps can be backgrounded and foregrounded, which may affect session status:
```swift
import SwiftUI
import ParaSwift
class LifecycleManager: ObservableObject {
let paraManager: ParaManager
init(paraManager: ParaManager) {
self.paraManager = paraManager
// Register for foreground notifications
NotificationCenter.default.addObserver(
self,
selector: #selector(appMovedToForeground),
name: UIApplication.willEnterForegroundNotification,
object: nil
)
}
@objc func appMovedToForeground() {
// App came to foreground, check session
checkSession()
}
func checkSession() {
Task {
let isActive = try? await paraManager.isSessionActive()
if isActive != true {
try? await paraManager.logout()
await MainActor.run {
// Navigate to login screen
}
}
}
}
deinit {
NotificationCenter.default.removeObserver(self)
}
}
```
## Next Steps
Explore more advanced features and integrations with Para in Swift:
# Social Login
Source: https://docs.getpara.com/v2/swift/guides/social-login
import EnvironmentInfo from "/snippets/v2/quick-start-environment-info.mdx";
import Prerequisites from "/snippets/v2/quick-start-prerequisites.mdx";
import IntegrationSupport from "/snippets/v2/integration-support.mdx";
import { Card } from '/snippets/v2/components/ui/card.mdx';
import BetaCredentialsFull from "/snippets/v2/beta-credentials/beta-credentials-full.mdx";
import { Link } from '/snippets/v2/components/ui/link.mdx';
## Overview
Social login (OAuth) is integrated directly into Para's unified authentication experience. This guide covers how to implement social login alongside email and phone authentication in a single, streamlined interface. Para supports Google, Apple, and Discord as OAuth providers.
## Prerequisites
You must have the ParaSwift SDK installed and configured in your project. If you haven't done this yet, please refer to our .
## Unified Authentication Approach
Para's recommended approach is to integrate social login directly into your main authentication view alongside email and phone options. This provides users with all authentication methods in one place.
### Environment Setup
Ensure your authentication view can access the system authentication helpers and register the default web session once:
```swift
@Environment(\.webAuthenticationSession) private var webAuthenticationSession
@Environment(\.authorizationController) private var authorizationController
var body: some View {
VStack { /* auth UI */ }
.task {
paraManager.setDefaultWebAuthenticationSession(webAuthenticationSession)
}
}
```
## Implementing Social Login
### Integration with Unified Auth View
Social login should be integrated alongside email and phone authentication in your main authentication view. Here's a basic example:
```swift
import SwiftUI
import ParaSwift
import AuthenticationServices
struct AuthView: View {
@EnvironmentObject var paraManager: ParaManager
@Environment(\.webAuthenticationSession) private var webAuthenticationSession
@Environment(\.authorizationController) private var authorizationController
@State private var emailOrPhone = ""
var body: some View {
VStack(spacing: 20) {
// Email/Phone input
TextField("Email or phone number", text: $emailOrPhone)
.textFieldStyle(RoundedBorderTextFieldStyle())
Button("Continue") {
handleEmailPhoneAuth()
}
.buttonStyle(.borderedProminent)
// Divider
Text("or")
.foregroundColor(.gray)
// Social login buttons
Button("Continue with Google") {
handleSocialLogin(.google)
}
Button("Continue with Apple") {
handleSocialLogin(.apple)
}
Button("Continue with Discord") {
handleSocialLogin(.discord)
}
}
.padding()
.task {
paraManager.setDefaultWebAuthenticationSession(webAuthenticationSession)
}
}
}
```
### Handling Social Login
Implement the social login handler that manages the OAuth flow:
```swift
private func handleSocialLogin(_ provider: OAuthProvider) {
Task {
do {
try await paraManager.handleOAuth(
provider: provider,
authorizationController: authorizationController
)
// OAuth flow completed successfully
// User is now logged in and wallets are available
print("User authenticated successfully")
// Navigate to authenticated area of your app
} catch {
// Handle OAuth error
print("OAuth error: \(error.localizedDescription)")
}
}
}
```
The `handleOAuth` method:
- Authenticates the user with the OAuth provider
- Checks if a Para account exists for the user
- For new users: creates a Para account and sets up a passkey automatically
- For existing users: logs them in directly
- Returns nothing on success, throws errors on failure
- Uses the default `WebAuthenticationSession` you registered; pass a custom one only if you need to override it for a specific call.
### Creating Social Login Buttons
Create buttons for each OAuth provider:
```swift
// Google Login
Button("Continue with Google") {
handleSocialLogin(.google)
}
// Apple Login
Button("Continue with Apple") {
handleSocialLogin(.apple)
}
// Discord Login
Button("Continue with Discord") {
handleSocialLogin(.discord)
}
```
## Available OAuth Providers
The ParaSwift SDK supports the following OAuth providers:
- Google (`.google`)
- Apple (`.apple`)
- Discord (`.discord`)
## Key Points
- Social login is handled through the `handleOAuth` method
- The method manages the complete OAuth flow including user authentication, Para account creation/lookup, and passkey setup for new users
- For existing users, it logs them in directly
- The SDK supports Google, Apple, and Discord as OAuth providers
- Social login should be integrated with email/phone authentication for a unified experience
## Next Steps
After implementing social login, you might want to:
1. for new users
2. for session management
3. as an additional security layer
# Solana Integration
Source: https://docs.getpara.com/v2/swift/guides/solana
import { Card } from '/snippets/v2/components/ui/card.mdx';
## Quick Start
```swift
import ParaSwift
// Sign a Solana transaction
let paraManager = ParaManager(apiKey: "your-api-key")
// Get an existing Solana wallet or create one
let wallets = try await paraManager.fetchWallets()
let wallet: Wallet
if let existing = wallets.first(where: { $0.type == .solana }) {
wallet = existing
} else {
wallet = try await paraManager.createWallet(type: .solana, skipDistributable: false)
}
let transaction = try SolanaTransaction(
to: "9WzDXwBbmkg8ZTbNMqUxvQRAyrZzDsGYdLVL9zYtAWWM",
lamports: UInt64(1_000_000), // 0.001 SOL
feePayer: nil, // Uses wallet as fee payer
recentBlockhash: nil // Fetched automatically with RPC URL
)
let result = try await paraManager.signTransaction(
walletId: wallet.id,
transaction: transaction,
chainId: nil, // Not needed for Solana
rpcUrl: "https://api.devnet.solana.com"
)
print("Transaction signed: \(result.signedTransaction)")
```
## Common Operations
### Sign Transaction
```swift
let transaction = try SolanaTransaction(
to: "9WzDXwBbmkg8ZTbNMqUxvQRAyrZzDsGYdLVL9zYtAWWM",
lamports: UInt64(1_000_000), // 0.001 SOL
feePayer: nil, // Uses wallet as fee payer
recentBlockhash: nil // Fetched automatically with RPC URL
)
let result = try await paraManager.signTransaction(
walletId: wallet.id,
transaction: transaction,
chainId: nil, // Not needed for Solana
rpcUrl: "https://api.devnet.solana.com"
)
print("Signed: \(result.signedTransaction)")
```
### Check Balance
```swift
let balance = try await paraManager.getBalance(
walletId: wallet.id,
token: nil, // Native SOL
rpcUrl: "https://api.devnet.solana.com"
)
// Convert lamports to SOL
let lamports = Double(balance) ?? 0
let sol = lamports / 1_000_000_000
print("Balance: \(String(format: "%.4f", sol)) SOL")
```
### Sign Message
```swift
let message = "Hello, Solana!"
let result = try await paraManager.signMessage(
walletId: wallet.id,
message: message
)
print("Signature: \(result.signedTransaction)")
```
## Networks
### Testnets
| Network | RPC URL | Native Token |
|---------|---------|--------------|
| **Devnet** | `https://api.devnet.solana.com` | SOL |
| **Testnet** | `https://api.testnet.solana.com` | SOL |
### Mainnets
| Network | RPC URL | Native Token | Network Type |
|---------|---------|--------------|--------------|
| **Mainnet** | `https://api.mainnet-beta.solana.com` | SOL | Production |
| **Alchemy** | `https://solana-mainnet.g.alchemy.com/v2/YOUR_KEY` | SOL | Production |
## Complete Example
```swift
import SwiftUI
import ParaSwift
struct SolanaWalletView: View {
@EnvironmentObject var paraManager: ParaManager
@State private var isLoading = false
@State private var signature: String?
let wallet: Wallet
private let rpcUrl = "https://api.devnet.solana.com"
var body: some View {
VStack(spacing: 20) {
Text(wallet.address ?? "No address")
.font(.system(.caption, design: .monospaced))
Button(action: signTransaction) {
Text(isLoading ? "Signing..." : "Sign Transaction")
}
.disabled(isLoading)
if let signature = signature {
Text("Signed: \(signature)")
.font(.caption)
}
}
.padding()
}
private func signTransaction() {
isLoading = true
Task {
do {
let transaction = try SolanaTransaction(
to: "9WzDXwBbmkg8ZTbNMqUxvQRAyrZzDsGYdLVL9zYtAWWM",
lamports: 1_000_000, // 0.001 SOL
feePayer: nil,
recentBlockhash: nil
)
let result = try await paraManager.signTransaction(
walletId: wallet.id,
transaction: transaction,
chainId: nil, // Not needed for Solana
rpcUrl: rpcUrl
)
signature = result.signedTransaction
} catch {
print("Error: \(error)")
}
isLoading = false
}
}
}
```
## Advanced Transaction Options
```swift
// Transaction with compute budget
let transaction = try SolanaTransaction(
to: "9WzDXwBbmkg8ZTbNMqUxvQRAyrZzDsGYdLVL9zYtAWWM",
lamports: UInt64(1_000_000),
computeUnitLimit: UInt32(200_000), // Set compute budget
computeUnitPrice: UInt64(1_000) // Set priority fee
)
// Transaction with custom blockhash
let transaction = try SolanaTransaction(
to: "9WzDXwBbmkg8ZTbNMqUxvQRAyrZzDsGYdLVL9zYtAWWM",
lamports: UInt64(1_000_000),
recentBlockhash: "custom_blockhash",
feePayer: wallet.address
)
```
## Pre-Serialized Transactions
Sign base64-encoded Solana transactions from dApps or backend services.
```swift
let base64Transaction = "AQABA8GlkLb8bd/L6i5/YftGpxyig/iBvof2eNEF9WPF2o0Z..."
let result = try await paraManager.signSolanaSerializedTransaction(
walletId: wallet.id,
base64Tx: base64Transaction
)
```
### Use Cases
```swift
// From dApp
let serializedTx = dApp.getSerializedTransaction()
let signature = try await paraManager.signSolanaSerializedTransaction(
walletId: wallet.id,
base64Tx: serializedTx
)
// From backend
let preparedTx = await backend.prepareTransaction()
let result = try await paraManager.signSolanaSerializedTransaction(
walletId: wallet.id,
base64Tx: preparedTx.serialized
)
```
Accepts base64-encoded bytes from `transaction.serializeMessage()` or compatible Solana SDKs.
# Swift SDK Overview
Source: https://docs.getpara.com/v2/swift/overview
import { Card } from '/snippets/v2/components/ui/card.mdx';
Para Swift SDK eliminates the complexity of blockchain integration by providing a unified interface for wallet creation, authentication, and multi-chain transactions in iOS applications.
## Quick Start
```swift AuthView.swift
import SwiftUI
import ParaSwift
struct AuthView: View {
@EnvironmentObject var paraManager: ParaManager
@Environment(\.webAuthenticationSession) private var webAuthenticationSession
@Environment(\.authorizationController) private var authorizationController
var body: some View {
VStack {
Button("Authenticate") {
startAuth()
}
}
.task {
// Reuse the system WebAuthenticationSession for hosted auth flows
paraManager.setDefaultWebAuthenticationSession(webAuthenticationSession)
}
}
private func startAuth() {
Task {
do {
let authState = try await paraManager.initiateAuthFlow(auth: .email("user@example.com"))
switch authState.stage {
case .done:
// One Click hosted auth finished automatically
handleAuthenticatedUser()
case .verify:
// Show OTP or passkey enrollment UI
presentVerification(authState)
case .signup:
// Let the user pick passkey vs password enrollment
presentSignupOptions(authState)
case .login:
// Existing user — Para chooses passkey/password automatically
try await paraManager.handleLogin(
authState: authState,
authorizationController: authorizationController
)
handleAuthenticatedUser()
default:
// Handle other states as needed (e.g., show error UI)
break
}
} catch {
// Handle errors according to your UI needs
}
}
}
}
```
Implement lightweight helpers like `handleAuthenticatedUser()`, `presentVerification(_:)`, or `presentSignupOptions(_:)` to align with your navigation flow.
Create the `ParaManager` once at your app entry point (for example with `@StateObject` in `App`) and inject it into views with `.environmentObject(paraManager)`.
## Sign Transactions
```swift TransactionHandler.swift
// Get wallet
let wallets = try await paraManager.fetchWallets()
let evmWallet = wallets.first { $0.type == .evm }!
let solanaWallet = wallets.first { $0.type == .solana }!
// EVM transaction
let transaction = EVMTransaction(
to: "0x742d35Cc6634C0532925a3b844Bc9e7595f6E2c0",
value: BigUInt("1000000000000000")!, // 0.001 ETH in wei
gasLimit: BigUInt("21000")!
)
let result = try await paraManager.signTransaction(
walletId: evmWallet.id,
transaction: transaction,
chainId: "11155111", // Sepolia
rpcUrl: "https://sepolia.infura.io/v3/YOUR_API_KEY"
)
// Solana message signing
let signature = try await paraManager.signMessage(
walletId: solanaWallet.id,
message: "Hello, Solana!"
)
```
## Next Steps
# Setup
Source: https://docs.getpara.com/v2/swift/setup
import Prerequisites from "/snippets/v2/quick-start-prerequisites.mdx";
import { Card } from '/snippets/v2/components/ui/card.mdx';
import { Link } from '/snippets/v2/components/ui/link.mdx';
The Para Swift SDK enables you to integrate secure wallet features including creation, passkey-based authentication, and transaction signing into your iOS applications. This guide covers all necessary steps from installation to implementing authentication flows.
## Install the SDK
1. In your Xcode project, go to **File > Add Packages** or (in your target) **Frameworks, Libraries, and Embedded Content** and click **+**.
2. Enter `https://github.com/getpara/swift-sdk`
3. Select **Up to Next Major Version** and enter `2.0.0`
4. Add the package to your app target and click **Add Package**.
The Para Swift SDK automatically includes the following dependencies:
- **BigInt**: For handling large numbers in blockchain operations
- **PhoneNumberKit**: For phone number validation and formatting
These dependencies will be automatically resolved by Swift Package Manager.
To enable passkeys on iOS, you need to configure Associated Domains:
1. In Xcode, go to **Signing & Capabilities** for your app target
2. Click **+ Capability** and add **Associated Domains**
3. Add the following entries:
```
webcredentials:app.usecapsule.com
webcredentials:app.beta.usecapsule.com
```
4. Register your Team ID + Bundle ID with Para via the
Without properly registering your Team ID and Bundle ID with Para, passkey authentication flows will fail. Contact Para support if you encounter issues with passkey registration.
Heading to App Review? Check for Sign in with Apple, reviewer, and deletion tips.
## Configure URL Scheme
Before initializing Para, you need to configure your app's URL scheme for deep linking. This is required for the `appScheme` parameter and enables OAuth authentication flows.
1. In Xcode, select your project in the navigator
2. Select your app target
3. Go to the **Info** tab
4. Scroll down to **URL Types** and click **+** to add a new URL type
5. Fill in the fields:
- **URL Schemes**: Enter your scheme name (e.g., `paraswift`, `yourapp`)
- **Role**: Select **Editor**
## Initialize Para
To use Para's features, you'll need to initialize a Para manager that can be accessed throughout your app. This manager handles all interactions with Para's services, including authentication, wallet management, and transaction signing.
Below is an example of initializing the SDK in a SwiftUI application:
```swift App.swift
import SwiftUI
import ParaSwift
@main
struct ExampleApp: App {
@StateObject private var paraManager: ParaManager
init() {
// Initialize Para manager
_paraManager = StateObject(wrappedValue: ParaManager(
environment: .beta, // Use .prod for production
apiKey: "YOUR_API_KEY_HERE", // Get from: https://developer.getpara.com
appScheme: "yourapp" // Your app's URL scheme for deep linking
))
}
var body: some Scene {
WindowGroup {
ContentView()
.environmentObject(paraManager)
}
}
}
```
The `appScheme` parameter must match the URL scheme you configured in your Info.plist. This enables deep linking for external wallet integrations like MetaMask and OAuth authentication flows.
## Continue with Authentication
Once Para is initialized, implement your auth experience using the Authentication & Users guides:
-
-
For wallet creation and transaction signing examples, jump into the blockchain guides:
-
-
-
## Example
For a complete implementation example, check out our Swift SDK example app:
## Next Steps
After integrating Para into your Swift app, you can explore other features and integrations to enhance your Para experience.
# Troubleshooting
Source: https://docs.getpara.com/v2/swift/troubleshooting
import { Link } from '/snippets/v2/components/ui/link.mdx';
This guide helps you identify and resolve common issues encountered while integrating the Para Swift SDK into your iOS application.
Using an LLM (ChatGPT, Claude) or Coding Assistant (Cursor, Github Copilot)? Here are a few tips:
1) Include the for the most up-to-date help
2) Check out the for an interactive LLM using Para Examples Hub
## General Troubleshooting Steps
Before diving into specific issues, try these basic troubleshooting steps:
In Xcode, go to **Product → Clean Build Folder** (Option + Shift + Command + K).
For Swift Package Manager: **File → Packages → Update to Latest Package Versions**
For CocoaPods: Run `pod update` in your terminal.
Ensure you are using the latest Para SDK compatible with your minimum deployment target (iOS 13.0+).
Confirm your API key, Associated Domains, custom URL scheme, Team ID, and Bundle ID are correctly configured.
## Common Issues and Solutions
### Authentication Issues
**Error:** `ParaError.bridgeError` or system authentication errors
**Solution:** Verify Associated Domains, Team ID, Bundle ID, and domain setup.
```swift
do {
try await paraManager.generatePasskey(
identifier: email,
biometricsId: biometricsId,
authorizationController: authorizationController
)
} catch let error as ParaError {
print("Para error occurred: \(error.description)")
} catch let error as ASAuthorizationError {
print("Authentication error: \(error.localizedDescription)")
}
```
**Solution:** Confirm biometric setup on the device and check permissions in app settings.
Make sure your app includes the necessary privacy descriptions in Info.plist:
- `NSFaceIDUsageDescription` for Face ID
- Proper permission handling for biometric authentication
**Error:** `ASAuthorizationError.canceled` or similar system errors
**Solution:** Catch authentication cancellation errors and offer a retry option to the user. This error occurs when the user cancels a biometric prompt.
```swift
do {
try await paraManager.loginWithPasskey(authorizationController: authorizationController)
} catch let error as ASAuthorizationError where error.code == .canceled {
print("User canceled authentication")
}
```
**Solution:** Verify:
- Correct environment settings (BETA/prod)
- Proper user input (valid email/phone format)
- Active network connection
- You haven't hit rate limits for verification attempts
### Transaction Signing Issues
**Error:** `ParaError.bridgeError` or `ParaError.error`
**Solution:** Verify transaction parameters, proper encoding (Base64), and integration with web3 libraries.
```swift
do {
let result = try await paraManager.signTransaction(
walletId: walletId,
transaction: transaction
)
} catch let error as ParaError {
print("Transaction signing failed: \(error.description)")
}
```
**Error:** Transaction signing failures
**Solution:** Handle signing errors appropriately:
```swift
do {
let result = try await paraManager.signTransaction(
walletId: wallet.id,
transaction: transaction
)
print("Signed transaction: \(result.signedTransaction)")
} catch ParaError.bridgeError(let message) {
print("Signing failed: \(message)")
} catch {
print("Unexpected error: \(error)")
}
```
**Solution:**
- Ensure wallet balance covers gas fees
- Verify correct gas parameters
- Use reliable web3 libraries for estimates
- Consider implementing fallback gas values
### Network Issues
**Error:** `ParaError.bridgeError` or `ParaError.bridgeTimeoutError`
**Solution:** Check network connectivity, implement retry logic, and use network monitoring tools.
```swift
do {
try await paraManager.createWallet(type: .evm, skipDistributable: false)
} catch ParaError.bridgeTimeoutError {
print("Bridge operation timed out. Check connectivity and try again.")
} catch ParaError.bridgeError(let message) {
print("Bridge error occurred: \(message)")
}
```
**Error:** `ParaError.bridgeTimeoutError`
**Solution:**
- Implement timeout handling using Swift concurrency features
- Provide retry options for users
- Display loading indicators during network operations
- Consider implementing exponential backoff for retries
### External Wallet Issues
**Error:** `MetaMaskError` or `ParaError.bridgeError`
**Solution:** Check MetaMask installation and connection flow.
```swift
do {
try await metaMaskConnector.connect()
} catch let error as MetaMaskError {
print("MetaMask error: \(error.localizedDescription)")
} catch let error as ParaError {
print("Para error during MetaMask connection: \(error.description)")
}
```
**Solution:** Confirm wallet address and type are correct for external wallet login.
```swift
do {
let walletInfo = ExternalWalletInfo(
address: walletAddress,
type: .evm,
provider: "metamask"
)
try await paraManager.loginExternalWallet(wallet: walletInfo)
} catch let error as ParaError {
print("External wallet login failed: \(error.description)")
}
```
**Solution:**
- Verify URL schemes in `Info.plist`
- Confirm deep-link handling in AppDelegate or SceneDelegate
- Test with simple deep links to isolate the issue
- Check if the external wallet app is properly installed
## Best Practices
## Development Tools
Enable debug mode in the Para SDK (if available) to get more detailed logging information.
Utilize network debugging tools like Charles Proxy or Xcode's network debugger to inspect API calls.
Leverage Xcode's built-in debugging features:
- Set breakpoints at critical points
- Inspect variables and state
- Use the console for logging
### Setup and Integration Issues
If you're having trouble initializing the Para SDK:
- Ensure you're providing the required `appScheme` parameter
- Verify that you're using the correct API key and environment
- Check that all necessary dependencies are installed properly
- Look for any Swift compiler errors in your Xcode console
- Verify that your minimum deployment target is iOS 13.0 or higher
If passkey creation, retrieval, or usage isn't working:
- Verify that you've set up Associated Domains correctly in your Xcode project
- Make sure you've registered your Team ID + Bundle ID with Para via the Developer Portal
- Ensure that biometric authentication is enabled on the test device
- Check that `AuthorizationController` is properly configured
- Verify Face ID/Touch ID permissions are properly set in Info.plist
- Check for `ASAuthorizationError.canceled` when users cancel the biometric prompt
If you're experiencing authentication issues:
- Double-check that your API key is correct and properly set in your Para manager initialization
- Verify you're using the correct environment (`beta` or `prod`) that matches your API key
- Ensure your account has the necessary permissions for the operations you're attempting
- Check that your URL scheme matches what's configured in your Info.plist
- Verify the authentication flow is being followed correctly (verify → signup/login)
If OAuth callbacks or deep links aren't functioning:
- Verify your URL scheme is correctly configured in Info.plist
- Check that `onOpenURL` modifier is properly implemented
- Ensure the `appScheme` parameter matches your URL scheme exactly
- Test with a simple deep link first to isolate the issue
- Make sure your app is handling the URL in the main app file
## Getting Help
If you're still experiencing issues after trying the solutions above, you can get additional help:
-
- Contact Para Support via or [Slack](https://join.slack.com/t/para-community/shared_invite/zt-304keeulc-Oqs4eusCUAJEpE9DBwAqrg)
- When reporting issues, include:
- Detailed error messages
- Steps to reproduce the issue
- Device and iOS version details
- Para SDK version
# Para with Nuxt 3
Source: https://docs.getpara.com/v2/vue/setup/nuxt
import EnvironmentInfo from "/snippets/v2/quick-start-environment-info.mdx";
import Prerequisites from "/snippets/v2/quick-start-prerequisites.mdx";
import IntegrationSupport from "/snippets/v2/integration-support.mdx";
import { Card } from '/snippets/v2/components/ui/card.mdx';
import { Link } from '/snippets/v2/components/ui/link.mdx';
import BetaCredentialsFull from "/snippets/v2/beta-credentials/beta-credentials-full.mdx";
This guide shows you how to integrate the **Para Modal**—which is React-based—within a **Nuxt 3** application.
If you haven't already created your Nuxt 3 app, follow
to set up a new project.
While mixing React with Vue isn't always considered best practice, it is entirely possible by bridging to the React
modal via a connector. If you prefer to build your own custom UI, you can also use `@getpara/web-sdk` directly.
## Installing Dependencies & Peer Dependencies
First, install the Para React SDK and needed peer dependencies, plus React dependencies using your preferred package manager:
```bash npm
npm install @getpara/react-sdk react react-dom @tanstack/react-query graz @cosmjs/cosmwasm-stargate @cosmjs/launchpad @cosmjs/proto-signing @cosmjs/stargate @cosmjs/tendermint-rpc @leapwallet/cosmos-social-login-capsule-provider long starknet wagmi@^2 viem @solana-mobile/wallet-adapter-mobile @solana/wallet-adapter-base @solana/wallet-adapter-react @solana/wallet-adapter-walletconnect @solana/web3.js --save-exact
```
```bash yarn
yarn add @getpara/react-sdk react react-dom @tanstack/react-query graz @cosmjs/cosmwasm-stargate @cosmjs/launchpad @cosmjs/proto-signing @cosmjs/stargate @cosmjs/tendermint-rpc @leapwallet/cosmos-social-login-capsule-provider long starknet wagmi@^2 viem @solana-mobile/wallet-adapter-mobile @solana/wallet-adapter-base @solana/wallet-adapter-react @solana/wallet-adapter-walletconnect @solana/web3.js --exact
```
```bash pnpm
pnpm add @getpara/react-sdk react react-dom @tanstack/react-query graz @cosmjs/cosmwasm-stargate @cosmjs/launchpad @cosmjs/proto-signing @cosmjs/stargate @cosmjs/tendermint-rpc @leapwallet/cosmos-social-login-capsule-provider long starknet wagmi@^2 viem @solana-mobile/wallet-adapter-mobile @solana/wallet-adapter-base @solana/wallet-adapter-react @solana/wallet-adapter-walletconnect @solana/web3.js --save-exact
```
```bash bun
bun add @getpara/react-sdk react react-dom @tanstack/react-query graz @cosmjs/cosmwasm-stargate @cosmjs/launchpad @cosmjs/proto-signing @cosmjs/stargate @cosmjs/tendermint-rpc @leapwallet/cosmos-social-login-capsule-provider long starknet wagmi@^2 viem @solana-mobile/wallet-adapter-mobile @solana/wallet-adapter-base @solana/wallet-adapter-react @solana/wallet-adapter-walletconnect @solana/web3.js --exact
```
## Configuring Nuxt (vite plugins & polyfills)
Nuxt 3 uses Vite under the hood, so we can add the **React plugin** and polyfills in `nuxt.config.ts`:
```ts nuxt.config.ts
import react from "@vitejs/plugin-react";
import { nodePolyfills } from "vite-plugin-node-polyfills";
export default defineNuxtConfig({
ssr: false, // If you plan to show the modal on the client only
vite: {
plugins: [react(), nodePolyfills()],
},
});
```
Depending on your app's architecture, you may or may not disable SSR entirely. The key requirement is ensuring the
React-based modal is client-rendered.
## Setting Up the Para SDK
Now that you've installed the necessary dependencies, let's set up the Para SDK in your Vue project. This involves
creating a client instance and optionally configuring Next.js to transpile external modules if needed.
### Creating a Para Client Instance
Just like in React apps, you need a Para client instance. You can keep it in a dedicated file (e.g., `client/para.ts`):
```ts client/para.ts
import { ParaWeb } from "@getpara/react-sdk";
const PARA_API_KEY = import.meta.env.VITE_PARA_API_KEY;
export const para = new ParaWeb(PARA_API_KEY);
```
If you're using a legacy API key (one without an environment prefix) you must provide the `Environment` as the first argument to the `ParaWeb` constructor. You can retrieve your updated API key from the Para Developer Portal at https://developer.getpara.com/
### Building a Connector for the React Modal
Just as with Vue + Vite, we need a component that mounts the React para modal into a DOM element. For instance:
```jsx para-react-component.jsx
import React from "react";
import { QueryClient, QueryClientProvider } from "@tanstack/react-query";
import { AuthLayout, ParaProvider } from "@getpara/react-sdk";
import { para } from "./client/para";
import "@getpara/react-sdk/styles.css";
const queryClient = new QueryClient();
export function ParaReactComponent({ onClose, isOpen }) {
return (
{
onClose?.();
},
logo: "/para.svg",
disableEmailLogin: false,
disablePhoneLogin: false,
authLayout: [AuthLayout.AUTH_FULL],
oAuthMethods: [
"APPLE",
"DISCORD",
"FACEBOOK",
"FARCASTER",
"GOOGLE",
"TWITTER",
],
onRampTestMode: true,
recoverySecretStepEnabled: true,
twoFactorAuthEnabled: false,
theme: {
foregroundColor: "#2D3648",
backgroundColor: "#FFFFFF",
accentColor: "#0066CC",
darkForegroundColor: "#E8EBF2",
darkBackgroundColor: "#1A1F2B",
darkAccentColor: "#4D9FFF",
mode: "light",
borderRadius: "none",
font: "Inter",
},
}}
externalWalletConfig={{
wallets: [],
}}
/>
);
}
```
This connector creates a React root within a given DOM element and renders the Para Modal into it. It also provides a
few methods to open, close, and check the modal's state.
### Using the Connector in a Nuxt Component
Nuxt 3 uses a file-based routing system. Let's assume you have a top-level `app.vue` or a page component where you want
to show the modal:
```vue app.vue
Para Modal in Nuxt 3
```
When you click **Open Para Modal**, the React-based Para Modal appears in your Nuxt app.
### Customizing the Para Modal
All the usual customization props apply, just as in a React app:
```tsx
```
Add them to your `ParaReactComponent` as needed.
### If You Don't Want to Use the React Modal
You can also build a fully custom UI using [@getpara/web-sdk](https://www.npmjs.com/package/@getpara/web-sdk) This
approach avoids mixing React into your Nuxt application by letting you directly call Para methods and build your own Vue
components.
## Examples
For a simple example of Para in a Nuxt app, check out our Examples Hub repository:
## Troubleshooting
If you encounter issues during the integration or usage of the Para Modal in a Vue-based app, here are some common
problems and their solutions:
# Para + Vue
Source: https://docs.getpara.com/v2/vue/setup/overview
import { Card } from '/snippets/v2/components/ui/card.mdx';
Para integrates seamlessly with Vue applications, providing powerful features for building interactive interfaces.
Para does not offer a dedicated Vue SDK at this time. However, we provide solutions for utilizing our React based `ParaModal` component in Vue applications.
## Using the React Modal
Use our React-based `ParaModal` in Vue via a wrapper component:
## Custom UI with Web SDK
Build your own authentication UI using `@getpara/web-sdk` directly.
### Installation
```bash
npm install @getpara/web-sdk
```
### Para Client
```ts src/lib/para.ts
import { Environment, ParaWeb } from "@getpara/web-sdk";
export const para = new ParaWeb(
Environment.BETA,
import.meta.env.VITE_PARA_API_KEY
);
```
### Check Authentication
```ts
const isLoggedIn = await para.isFullyLoggedIn();
if (isLoggedIn) {
const wallets = Object.values(await para.getWallets());
const address = wallets[0]?.address;
}
```
### Email Authentication
```ts
const authState = await para.signUpOrLogIn({ auth: { email } });
if (authState.stage === "verify" && authState.loginUrl) {
const isNewUser = authState.nextStage === "signup";
// 1. Display authState.loginUrl in an iframe
// 2. Start polling for completion in the background
handleAuthComplete(isNewUser);
}
async function handleAuthComplete(isNewUser: boolean) {
if (isNewUser) {
await para.waitForWalletCreation();
} else {
const result = await para.waitForLogin();
if (result.needsWallet) {
await para.waitForWalletCreation();
}
}
// Auth complete - update your UI
}
```
### Iframe with Message Handler
Display the `loginUrl` in an iframe. Listen for the `CLOSE_WINDOW` message to hide the iframe when the user completes or cancels:
```ts
const portalOrigins = [
"https://app.getpara.com",
"https://app.beta.getpara.com",
];
function handleMessage(event: MessageEvent) {
if (!portalOrigins.some((origin) => event.origin.startsWith(origin))) return;
if (event.data?.type === "CLOSE_WINDOW") {
// Hide the iframe - waitForLogin/waitForWalletCreation handles completion
}
}
window.addEventListener("message", handleMessage);
```
```html
```
### Logout
```ts
await para.logout();
```
See the [Custom Auth UI with Web SDK](/v2/react/guides/custom-ui-web-sdk) guide for all available client methods including OAuth, phone auth, and wallet operations.
## Example
# Para with Vue + Vite
Source: https://docs.getpara.com/v2/vue/setup/vite
import EnvironmentInfo from "/snippets/v2/quick-start-environment-info.mdx";
import Prerequisites from "/snippets/v2/quick-start-prerequisites.mdx";
import IntegrationSupport from "/snippets/v2/integration-support.mdx";
import { Card } from '/snippets/v2/components/ui/card.mdx';
import BetaCredentialsFull from "/snippets/v2/beta-credentials/beta-credentials-full.mdx";
While mixing React with Vue isn't always considered best practice, it is entirely possible by bridging to the React
modal via a connector. If you prefer to build your own custom UI, you can also use `@getpara/web-sdk` directly. Reach out to use for help with custom UI integration.
## Installing Dependencies & Peer Dependencies
First, install the Para React SDK and needed peer dependencies, plus React dependencies using your preferred package manager:
```bash npm
npm install @getpara/react-sdk react react-dom @tanstack/react-query graz @cosmjs/cosmwasm-stargate @cosmjs/launchpad @cosmjs/proto-signing @cosmjs/stargate @cosmjs/tendermint-rpc @leapwallet/cosmos-social-login-capsule-provider long starknet wagmi@^2 viem @solana-mobile/wallet-adapter-mobile @solana/wallet-adapter-base @solana/wallet-adapter-react @solana/wallet-adapter-walletconnect @solana/web3.js --save-exact
```
```bash yarn
yarn add @getpara/react-sdk react react-dom @tanstack/react-query graz @cosmjs/cosmwasm-stargate @cosmjs/launchpad @cosmjs/proto-signing @cosmjs/stargate @cosmjs/tendermint-rpc @leapwallet/cosmos-social-login-capsule-provider long starknet wagmi@^2 viem @solana-mobile/wallet-adapter-mobile @solana/wallet-adapter-base @solana/wallet-adapter-react @solana/wallet-adapter-walletconnect @solana/web3.js --exact
```
```bash pnpm
pnpm add @getpara/react-sdk react react-dom @tanstack/react-query graz @cosmjs/cosmwasm-stargate @cosmjs/launchpad @cosmjs/proto-signing @cosmjs/stargate @cosmjs/tendermint-rpc @leapwallet/cosmos-social-login-capsule-provider long starknet wagmi@^2 viem @solana-mobile/wallet-adapter-mobile @solana/wallet-adapter-base @solana/wallet-adapter-react @solana/wallet-adapter-walletconnect @solana/web3.js --save-exact
```
```bash bun
bun add @getpara/react-sdk react react-dom @tanstack/react-query graz @cosmjs/cosmwasm-stargate @cosmjs/launchpad @cosmjs/proto-signing @cosmjs/stargate @cosmjs/tendermint-rpc @leapwallet/cosmos-social-login-capsule-provider long starknet wagmi@^2 viem @solana-mobile/wallet-adapter-mobile @solana/wallet-adapter-base @solana/wallet-adapter-react @solana/wallet-adapter-walletconnect @solana/web3.js --exact
```
## Setting Up Polyfills
Like any React + Vite project that may rely on Node modules (`crypto`, `buffer`, `stream`), you'll likely need
polyfills:
```bash npm
npm install vite-plugin-node-polyfills
```
```bash yarn
yarn add vite-plugin-node-polyfills -D
```
```bash pnpm
pnpm add vite-plugin-node-polyfills -D
```
```bash bun
bun add vite-plugin-node-polyfills
```
Then, update your `vite.config.js` or `vite.config.ts`:
```js vite.config.js
import { defineConfig } from "vite";
import vue from "@vitejs/plugin-vue";
import react from "@vitejs/plugin-react"; // Needed for the React-based modal
import { nodePolyfills } from "vite-plugin-node-polyfills";
export default defineConfig({
plugins: [
vue(),
react(),
nodePolyfills({
protocolImports: true,
}),
],
});
```
## Setting Up the Para SDK
Now that you've installed the necessary dependencies, let's set up the Para SDK in your Vue project. This involves
creating a client instance and optionally configuring Next.js to transpile external modules if needed.
### Creating a Para Client Instance
Just like in React apps, you need a Para client instance. You can keep it in a dedicated file (e.g., `client/para.ts`):
```ts client/para.ts
import { ParaWeb } from "@getpara/react-sdk";
const PARA_API_KEY = import.meta.env.VITE_PARA_API_KEY;
export const para = new ParaWeb(PARA_API_KEY);
```
If you're using a legacy API key (one without an environment prefix) you must provide the `Environment` as the first argument to the `ParaWeb` constructor. You can retrieve your updated API key from the Para Developer Portal at https://developer.getpara.com/
### Building a Connector for the React Modal
To display the React-based Para Modal from within Vue, we'll create a component that mounts the React modal into a DOM
element. You can store this in a file such as `para-react-component.jsx`:
```jsx para-react-component.jsx
import React from "react";
import { QueryClient, QueryClientProvider } from "@tanstack/react-query";
import { AuthLayout, ParaProvider } from "@getpara/react-sdk";
import { para } from "./client/para";
import "@getpara/react-sdk/styles.css";
const queryClient = new QueryClient();
export function ParaReactComponent({ onClose, isOpen }) {
return (
{
onClose?.();
},
logo: "/para.svg",
disableEmailLogin: false,
disablePhoneLogin: false,
authLayout: [AuthLayout.AUTH_FULL],
oAuthMethods: [
"APPLE",
"DISCORD",
"FACEBOOK",
"FARCASTER",
"GOOGLE",
"TWITTER",
],
onRampTestMode: true,
recoverySecretStepEnabled: true,
twoFactorAuthEnabled: false,
theme: {
foregroundColor: "#2D3648",
backgroundColor: "#FFFFFF",
accentColor: "#0066CC",
darkForegroundColor: "#E8EBF2",
darkBackgroundColor: "#1A1F2B",
darkAccentColor: "#4D9FFF",
mode: "light",
borderRadius: "none",
font: "Inter",
},
}}
externalWalletConfig={{
wallets: [],
}}
/>
);
}
```
This connector creates a React root within a given DOM element and renders the Para Modal into it. It also provides a
few methods to open, close, and check the modal's state.
### Integrating in a Vue Component
Use Vue's lifecycle hooks to create and destroy the modal connector. Below is a simplified example (`index.vue`):
```vue index.vue
Para Modal Starter (Vue + Vite)
```
When you click the **Open Para Modal** button, the React-based Para Modal will appear within your Vue application.
### Customizing the Para Modal
All the usual customization props apply, just as in a React app:
```tsx
```
Add them to your `ParaReactComponent` as needed.
## Examples
For an example of a fully working Vue + Vite integration, check out our starter templates or example repositories:
## Troubleshooting
If you encounter issues during the integration or usage of the Para Modal in a Vue-based app, here are some common
problems and their solutions:
# Integrate Para Wallets with Eliza OS
Source: https://docs.getpara.com/v2/walkthroughs/Eliza
Build wallet-enabled AI agents by integrating Para's wallet infrastructure with Eliza OS. Your agent will create and manage EVM wallets and send transactions across Ethereum-compatible chains.
## Prerequisites
You need these components before starting:
- Node.js 18+ and npm/pnpm/yarn/bun installed
- An active [Eliza OS](https://docs.elizaos.ai/) project
- Para API credentials (get them from the [Para Developer Portal](https://developer.getpara.com/))
## Installation and Setup
Choose your preferred package manager to install the [Para plugin](https://github.com/aipop-fun/plugin-para):
```bash
# npm
npm install @elizaos/plugin-para
# pnpm
pnpm add @elizaos/plugin-para
# yarn
yarn add @elizaos/plugin-para
# bun
bun add @elizaos/plugin-para
```
Create or update your `.env` file with Para credentials:
```env
# Para Configuration
PARA_API_KEY=your-para-api-key
PARA_ENV=production
# Optional: Chain-specific RPC URLs
ETH_RPC_URL=https://mainnet.infura.io/v3/your-key
POLYGON_RPC_URL=https://polygon-rpc.com
```
Register the Para plugin in your Eliza character configuration:
```typescript
// character.config.ts
import { paraPlugin } from '@elizaos/plugin-para';
export const characterConfig = {
name: "ParaAgent",
description: "An AI agent with wallet management capabilities",
plugins: [paraPlugin],
settings: {
secrets: {
PARA_API_KEY: process.env.PARA_API_KEY,
PARA_ENV: process.env.PARA_ENV || 'production'
}
}
};
```
Create your agent with Para capabilities:
```typescript
// index.ts
import { ElizaOS } from '@elizaos/core';
import { characterConfig } from './character.config';
async function main() {
const agent = new ElizaOS({
character: characterConfig,
runtime: {
// Additional runtime configuration
logLevel: 'info',
persistState: true
}
});
await agent.start();
console.log('🤖 Para-enabled agent is running!');
}
main().catch(console.error);
```
## Next Steps
Add more features to your Eliza + Para integration
Learn more about building AI agents with Eliza
## Related Walkthroughs
Intermediate · 15 min · AI-powered migration tooling
Advanced · 40 min · Smart accounts and gas sponsorship
Advanced · 45 min · Browser extensions with Para wallets
# Integrating Para with Rhinestone
Source: https://docs.getpara.com/v2/walkthroughs/Rhinestone
Build cross-chain smart accounts using Para's embedded wallets and [Rhinestone](https://www.rhinestone.dev/) — enabling intent-based transactions, automatic bridging, and gas abstraction across EVM chains. The `useRhinestoneSmartAccount` hook handles account creation, orchestrator setup, and Pimlico bundler configuration automatically.
## Prerequisites
- Para API key from the [Para Developer Portal](https://developer.getpara.com/)
- Rhinestone API key from the Rhinestone team
- Optionally a Pimlico API key for bundler/paymaster infrastructure
- Node.js 18+ and Next.js development environment
## Installation
```bash npm
npm install @getpara/react-sdk viem @tanstack/react-query
```
```bash yarn
yarn add @getpara/react-sdk viem @tanstack/react-query
```
```bash pnpm
pnpm add @getpara/react-sdk viem @tanstack/react-query
```
## Setup Para Provider
Configure the Para provider:
```tsx filename="app/providers.tsx"
"use client";
import { QueryClient, QueryClientProvider } from "@tanstack/react-query";
import { ParaProvider } from "@getpara/react-sdk";
const queryClient = new QueryClient();
export default function Providers({ children }: { children: React.ReactNode }) {
return (
{children}
);
}
```
## Usage
Use the `useRhinestoneSmartAccount` hook to create and manage a Rhinestone smart account. The hook handles Para signer creation, Rhinestone account setup, and orchestrator configuration internally.
```tsx filename="components/RhinestoneDemo.tsx"
"use client";
import { useRhinestoneSmartAccount } from "@getpara/react-sdk";
import { useMutation } from "@tanstack/react-query";
import { sepolia } from "viem/chains";
import { parseEther } from "viem";
const RHINESTONE_API_KEY = process.env.NEXT_PUBLIC_RHINESTONE_API_KEY!;
const PIMLICO_API_KEY = process.env.NEXT_PUBLIC_PIMLICO_API_KEY!;
export function RhinestoneDemo() {
const { smartAccount, isLoading, error } = useRhinestoneSmartAccount({
chain: sepolia,
rhinestoneApiKey: RHINESTONE_API_KEY,
pimlicoApiKey: PIMLICO_API_KEY,
});
const {
mutate: sendTransaction,
isPending: isSending,
error: sendError,
} = useMutation({
mutationFn: async () => {
if (!smartAccount) throw new Error("Smart account not ready");
return smartAccount.sendTransaction({
to: "0xRecipient",
value: parseEther("0.01"),
});
},
onSuccess: (receipt) => {
console.log("Transaction hash:", receipt.transactionHash);
},
});
const {
mutate: sendBatch,
isPending: isBatching,
error: batchError,
} = useMutation({
mutationFn: async () => {
if (!smartAccount) throw new Error("Smart account not ready");
return smartAccount.sendBatchTransaction([
{ to: "0xRecipientA", value: parseEther("0.01") },
{ to: "0xRecipientB", data: "0xencodedCallData" },
]);
},
onSuccess: (receipt) => {
console.log("Batch tx hash:", receipt.transactionHash);
},
});
if (isLoading) return Setting up smart account...
;
if (error) return Error: {error.message}
;
if (!smartAccount) return null;
return (
Rhinestone Smart Account
Address: {smartAccount.smartAccountAddress}
Mode: {smartAccount.mode}
{sendError &&
{sendError.message}
}
{batchError &&
{batchError.message}
}
);
}
```
Rhinestone only supports EIP-4337 mode. Both `rhinestoneApiKey` and `pimlicoApiKey` are optional but recommended for production use. For advanced cross-chain use cases with automatic bridging, see the [Rhinestone documentation](https://docs.rhinestone.dev).
## Key Features
- **Cross-chain smart accounts**: Single account across multiple EVM chains
- **Intent-based transactions**: Automatic execution of cross-chain operations
- **Gas abstraction**: Sponsored transactions without users managing gas fees
- **Automatic bridging**: Seamless asset transfers between chains
- **Para wallet management**: Embedded wallet infrastructure with MPC security
## Complete Example
View the complete working example in Para's Examples Hub
## Next Steps
Explore Rhinestone's features and advanced use cases
See all supported AA providers and the unified SmartAccount interface
## Related Walkthroughs
Intermediate · 30 min · EIP-7702 smart accounts with session keys
Advanced · 40 min · Smart accounts and gas sponsorship
Advanced · 45 min · Cross-chain USDC bridges
# Integrating Para with Squid
Source: https://docs.getpara.com/v2/walkthroughs/Squid
Build a cross-chain USDC bridge using Squid Router API with Para SDK for seamless wallet management across Ethereum, Base, and Solana networks.
**The key integration pattern:** Squid Router provides the cross-chain route and signable transaction data, while Para SDK handles the wallet management and transaction signing across multiple networks.
## Para Setup Requirements
Before integrating with Squid Router, ensure your Para configuration supports all required networks:
- **Para API key** with **Ethereum, Base, and Solana networks enabled**
- **Squid Router integrator ID** from [Squid Router](https://squidrouter.com)
- Each enabled network will create wallets for your users on that chain
**Important:** Your Para API key must have all three networks (Ethereum, Base, Solana) enabled in your [Developer Portal](https://developer.getpara.com) for the multi-network signers to work properly.
## Prerequisites
Before integrating Para with Squid Router, ensure you have:
- Para API key with **all three networks enabled**: Ethereum, Base, and Solana
- Squid Router integrator ID from [Squid Router](https://squidrouter.com)
- Node.js 18+ and Next.js development environment
## Installation
Install the required dependencies:
```bash
npm install @getpara/react-sdk @0xsquid/sdk
npm install @getpara/ethers-v6-integration @getpara/solana-web3.js-v1-integration
npm install @tanstack/react-query ethers@^6 @solana/web3.js lucide-react
```
## Environment Variables
Configure your environment variables:
```bash
# .env.local
NEXT_PUBLIC_PARA_API_KEY=your_para_api_key
NEXT_PUBLIC_PARA_ENVIRONMENT=BETA
NEXT_PUBLIC_SQUID_INTEGRATOR_ID=your_squid_integrator_id
```
## Configuration Setup
Create your constants file with network configurations and validation:
```typescript
// src/constants.ts
import { Environment } from "@getpara/react-sdk";
export const PARA_API_KEY = process.env.NEXT_PUBLIC_PARA_API_KEY ?? "";
export const PARA_ENVIRONMENT = (process.env.NEXT_PUBLIC_PARA_ENVIRONMENT as Environment) || Environment.BETA;
if (!PARA_API_KEY) {
throw new Error("API key is not defined. Please set NEXT_PUBLIC_PARA_API_KEY in your environment variables.");
}
export const SQUID_INTEGRATOR_ID = process.env.NEXT_PUBLIC_SQUID_INTEGRATOR_ID ?? "";
if (!SQUID_INTEGRATOR_ID) {
throw new Error(
"Squid integrator ID is not defined. Please set NEXT_PUBLIC_SQUID_INTEGRATOR_ID in your environment variables."
);
}
export const SUPPORTED_NETWORKS = ["ethereum", "base", "solana"] as const;
export type SupportedNetwork = (typeof SUPPORTED_NETWORKS)[number];
type NetworkConfig = {
name: string;
icon: string;
chainId: number | string;
usdcContractAddress: string;
rpcUrl: string;
networkType: "mainnet" | "testnet" | "devnet";
networkCategory: "evm" | "svm";
};
export const NETWORK_CONFIG: Record = {
ethereum: {
name: "Ethereum",
icon: "/ethereum.png",
chainId: 1,
usdcContractAddress: "0xA0b86991c6218b36c1d19D4a2e9Eb0cE3606eB48",
rpcUrl: process.env.NEXT_PUBLIC_ETHEREUM_RPC_URL ?? "https://ethereum-rpc.publicnode.com",
networkType: "mainnet",
networkCategory: "evm",
},
base: {
name: "Base",
icon: "/base.png",
chainId: 8453,
usdcContractAddress: "0x833589fCD6eDb6E08f4c7C32D4f71b54bdA02913",
rpcUrl: process.env.NEXT_PUBLIC_BASE_RPC_URL ?? "https://base-rpc.publicnode.com",
networkType: "mainnet",
networkCategory: "evm",
},
solana: {
name: "Solana",
icon: "/solana.png",
chainId: "solana-mainnet-beta",
usdcContractAddress: "EPjFWdd5AufqSSqeM2qN1xzybapC8G4wEGGkZwyTDt1v",
rpcUrl: process.env.NEXT_PUBLIC_SOLANA_RPC_URL ?? "https://solana-rpc.publicnode.com",
networkType: "mainnet",
networkCategory: "svm",
},
};
export const SUPPORTED_ASSETS = ["usdc"] as const;
export type SupportedAsset = (typeof SUPPORTED_ASSETS)[number];
export const ASSET_DETAILS: Record = {
usdc: {
id: "usdc",
name: "USD Coin",
symbol: "USDC",
icon: "/usdc.png",
},
};
```
## Squid Client Hook
Initialize the Squid Router SDK:
```typescript
// src/hooks/useSquidClient.tsx
import { useEffect, useState } from "react";
import { Squid } from "@0xsquid/sdk";
import { SQUID_INTEGRATOR_ID } from "@/constants";
let squidInstance: Squid | null = null;
export function useSquidClient() {
const [client, setClient] = useState(squidInstance);
useEffect(() => {
if (squidInstance) {
setClient(squidInstance);
return;
}
const initSquid = async () => {
const squid = new Squid({
baseUrl: "https://apiplus.squidrouter.com",
integratorId: SQUID_INTEGRATOR_ID,
});
await squid.init();
squidInstance = squid;
setClient(squid);
};
initSquid();
}, []);
return client;
}
```
## Multi-Network Signers
Para creates separate signers for each network, allowing you to sign transactions on Ethereum, Base, and Solana:
```typescript
// src/hooks/useSigners.tsx
import { useQuery } from "@tanstack/react-query";
import { useAccount, useClient } from "@getpara/react-sdk";
import { ParaEthersSigner } from "@getpara/ethers-v6-integration";
import { ParaSolanaWeb3Signer } from "@getpara/solana-web3.js-v1-integration";
import { ethers } from "ethers";
import { Connection } from "@solana/web3.js";
import { NETWORK_CONFIG } from "@/constants";
async function initializeSigners(para, account) {
// Initialize Ethereum signer
const ethereumProvider = new ethers.JsonRpcProvider(NETWORK_CONFIG.ethereum.rpcUrl);
const ethereumSigner = new ParaEthersSigner(para, ethereumProvider);
// Initialize Base signer
const baseProvider = new ethers.JsonRpcProvider(NETWORK_CONFIG.base.rpcUrl);
const baseSigner = new ParaEthersSigner(para, baseProvider);
// Initialize Solana signer
const solanaConnection = new Connection(NETWORK_CONFIG.solana.rpcUrl);
const solanaSigner = new ParaSolanaWeb3Signer(para, solanaConnection);
return {
ethereumEthers: { provider: ethereumProvider, signer: ethereumSigner, address: "...", isInitialized: true },
baseEthers: { provider: baseProvider, signer: baseSigner, address: "...", isInitialized: true },
solanaSvm: { signer: solanaSigner, connection: solanaConnection, address: "...", isInitialized: true },
};
}
export function useSigners() {
const para = useClient();
const { data: account } = useAccount();
const { data: signers } = useQuery({
queryKey: ["globalSigners", account?.isConnected],
queryFn: () => initializeSigners(para, account),
enabled: !!para && !!account?.isConnected,
staleTime: Infinity,
});
// Returns initialized signers for all three networks
return signers || defaultSignerState;
}
```
**Key Point:** Para automatically creates wallets for each enabled network in your API key configuration. Each signer can then sign transactions for its respective blockchain.
*See the [full implementation](https://github.com/getpara/examples-hub/blob/2.0.0/defi-integrations/with-squid-router-api/src/hooks/useSigners.tsx) for complete error handling and initialization logic.*
## Bridge Operations Hook
The integration follows a clear pattern: **Squid Router provides the route and signable transaction data, Para SDK handles the signing**:
```typescript
// src/hooks/useSquidBridge.tsx
import { useQuery, useMutation } from "@tanstack/react-query";
import { useSquidClient } from "./useSquidClient";
import { useSigners } from "./useSigners";
export function useSquidBridge() {
const squid = useSquidClient();
const { ethereumEthers, baseEthers, solanaSvm } = useSigners();
const useQuote = (params: QuoteParams) => {
return useQuery({
queryKey: ["squidQuote", params],
queryFn: () => fetchQuote(params), // Squid generates route and transaction data
enabled: !!(squid && params.originNetwork && params.destNetwork && params.amount),
staleTime: 20000,
refetchInterval: 20000,
});
};
const executeMutation = useMutation({
mutationFn: async ({ quote, originNetwork, onProgress }) => {
// 1. Squid provides the signable route object
const route = quote.route;
// 2. Para signer signs the transaction for the appropriate network
const signer = originNetwork === "ethereum" ? ethereumEthers.signer :
originNetwork === "base" ? baseEthers.signer :
solanaSvm.signer;
// 3. Execute with Squid client + Para signer
const tx = await squid.executeRoute({ signer, route });
// 4. Monitor transaction status
return tx;
},
});
return {
useQuote,
executeBridge: executeMutation.mutate,
isExecuting: executeMutation.isPending,
};
}
```
*See the [full implementation](https://github.com/getpara/examples-hub/blob/2.0.0/defi-integrations/with-squid-router-api/src/hooks/useSquidBridge.tsx) for complete quote fetching, transaction execution, and status monitoring logic.*
## Main Application Component
Create the core bridge interface structure:
```typescript
// src/app/page.tsx
"use client";
import { useState } from "react";
import { useAccount, useModal, ParaModal } from "@getpara/react-sdk";
import { useSquidBridge } from "@/hooks/useSquidBridge";
import { useSigners } from "@/hooks/useSigners";
export default function Home() {
const { openModal } = useModal();
const { data: account } = useAccount();
const { useQuote, executeBridge, isExecuting } = useSquidBridge();
const { ethereumEthers, baseEthers, solanaSvm } = useSigners();
const [originNetwork, setOriginNetwork] = useState(null);
const [destNetwork, setDestNetwork] = useState(null);
const [amount, setAmount] = useState("");
const { data: quote } = useQuote({
originNetwork,
destNetwork,
amount,
originAddress: getNetworkAddress(originNetwork),
destAddress: getNetworkAddress(destNetwork),
});
const handleBridge = () => {
executeBridge({
quote,
originNetwork,
onProgress: (progressData) => {
// Handle transaction progress updates
},
});
};
return (
{/* Network selection, amount input, bridge button */}
Setting up smart account...
;
if (error) return Error: {error.message}
;
if (!smartAccount) return null;
return (
thirdweb Smart Account
Address: {smartAccount.smartAccountAddress}
Mode: {smartAccount.mode}
{sendError &&
{sendError.message}
}
{batchError &&
{batchError.message}
}
);
}
```
## Key Features
- **Dual mode support**: Choose between EIP-4337 (smart wallets via bundler) or EIP-7702 (EOA delegation)
- **Built-in gas sponsorship**: Enable `sponsorGas: true` for gasless transactions
- **Transaction batching**: Send multiple transactions atomically via `sendBatchTransaction`
- **Para wallet management**: Embedded wallet infrastructure with MPC security
## Next Steps
Explore thirdweb's smart wallet features and SDK documentation
See all supported AA providers and the unified SmartAccount interface
## Related Walkthroughs
Intermediate · 30 min · EIP-7702 smart accounts with session keys
Advanced · 40 min · Cross-chain smart accounts with gas abstraction
Advanced · 45 min · Lending, borrowing, and yield strategies
# Integrate x402 with Para
Source: https://docs.getpara.com/v2/walkthroughs/X402
Para provides a standard ViemAccount that works seamlessly with x402's HTTP payment protocol. This guide shows you how to integrate Para wallets with x402 for stablecoin payments.
## Prerequisites
- Para SDK configured with API credentials
- Node.js 18+ or modern browser environment
- Basic understanding of Viem accounts
- x402 facilitator URL (default: `https://x402.org/facilitator`)
## Installation
### Install packages
Install the required packages:
```bash
npm install @getpara/viem-v2-integration viem@^2 @coinbase/x402 x402-express --save-exact
```
## Setup
```typescript
import Para, { Environment } from '@getpara/web-sdk';
const para = new Para(Environment.BETA, YOUR_API_KEY);
```
Para provides a standard ViemAccount that works with any Viem-compatible library:
```typescript
import { createParaAccount } from '@getpara/viem-v2-integration';
const viemAccount = await createParaAccount(para);
```
## Usage
### Client-Side Payments
```typescript
import { wrapFetchWithPayment } from '@coinbase/x402';
// Wrap fetch with x402 payments using Para's ViemAccount
const paymentFetch = wrapFetchWithPayment(fetch, viemAccount);
// Make payment-enabled requests
const response = await paymentFetch('https://api.example.com/premium');
const data = await response.json();
```
### React Hook Integration
```typescript
import { useAccount } from '@getpara/react-sdk';
import { createParaAccount } from '@getpara/viem-v2-integration';
import { wrapFetchWithPayment } from '@coinbase/x402';
function PaymentComponent() {
const { para } = useAccount();
const handlePayment = async () => {
const viemAccount = await createParaAccount(para);
const paymentFetch = wrapFetchWithPayment(fetch, viemAccount);
const response = await paymentFetch('/api/endpoint');
const data = await response.json();
console.log('Payment complete:', data);
};
return ;
}
```
### Server-Side Setup
Set up your Express server with x402 payment middleware:
```typescript
import express from 'express';
import { paymentMiddleware } from 'x402-express';
import { facilitator } from '@coinbase/x402';
const app = express();
```
Configure the middleware with your wallet address and pricing:
```typescript
app.use('/api/premium', paymentMiddleware(
'0xYourWalletAddress', // Your receiving wallet
{
'GET /api/premium': {
price: '$0.01',
network: 'base'
}
},
facilitator // or { url: 'https://x402.org/facilitator' } for testnet
));
```
Add your protected endpoint and start the server:
```typescript
app.get('/api/premium', (req, res) => {
res.json({ data: 'Premium content' });
});
app.listen(3000);
```
## Examples
### Autonomous Agent
Build an agent that makes autonomous payments:
```typescript
import Para, { Environment } from '@getpara/server-sdk';
import { createParaAccount } from '@getpara/viem-v2-integration';
import { wrapFetchWithPayment } from '@coinbase/x402';
class PaymentAgent {
private para: Para;
private viemAccount: any;
async initialize() {
this.para = new Para(Environment.BETA, process.env.PARA_API_KEY);
this.viemAccount = await createParaAccount(this.para);
}
async payForService(url: string, maxAmount: string) {
const paymentFetch = wrapFetchWithPayment(fetch, this.viemAccount, {
maxAmount
});
return await paymentFetch(url);
}
}
// Usage
const agent = new PaymentAgent();
await agent.initialize();
const response = await agent.payForService('https://api.example.com/premium', '0.10');
```
### Multi-Chain Payments
Use Para's multi-chain support with x402:
```typescript
import { createParaAccount } from '@getpara/viem-v2-integration';
import { http } from 'viem';
import { base, ethereum, polygon } from 'viem/chains';
// Create Para Viem client with multi-chain support
const paraClient = createParaAccount(para, {
chain: base, // Default chain
transport: http()
});
// Use with x402 - automatically handles chain switching
const paymentFetch = wrapFetchWithPayment(fetch, paraClient.account);
```
## Next Steps
Learn more about the x402 payment protocol
Explore Para's Viem integration in detail
## Related Walkthroughs
Intermediate · 25 min · Large-scale wallet generation
Intermediate · 25 min · Zero-knowledge virtual machine
Advanced · 45 min · Browser extensions with Para wallets
# Integrate Aave v3 with Para
Source: https://docs.getpara.com/v2/walkthroughs/aave
## Integrating Aave V3 with Para's Viem Accounts
Combine Para's viem account infrastructure with [Aave v3](https://docs-aave-git-feat-api-sdk-documentation-avaraxyz.vercel.app/docs/developers/aave-v3/overview) to enable seamless borrowing, lending, and yield strategies, all from a Para-powered wallet.
## What You Need
You need these components to integrate Aave V3 with Para:
- **Para SDK** for creating and managing wallets
- **Aave V3 SDK / ABI** for interacting with the protocol
- **EVM-compatible chain** such as Polygon, Optimism, or Arbitrum
## Step-by-Step Integration
1. Initialize Para (complete authentication before signing)
```
import { supply } from '@aave/client/actions';
import { sendWith } from '@aave/client/viem';
import { createParaViemClient, createParaAccount } from "@getpara/viem-v2-integration";
import { http } from 'viem';
import { mainnet } from 'viem/chains';
import {ParaWeb } from "@getpara/react-sdk";
// Initialize Para (complete authentication before signing)
const para = new ParaWeb('YOUR_API_KEY_HERE');
```
2. Create Para account
```
const account = await createParaAccount(para);
```
3. Create Para Viem wallet client for transactions
```
const wallet = createParaViemClient(para, {
account,
chain: mainnet,
transport: http(), // Or specify RPC URL: http('https://your-rpc-url')
});
const result = await supply(client, {
market: evmAddress('0x87870Bca3F3fD6335C3F4ce8392D69350B4fA4e2'), // Aave V3 Pool address
amount: {
erc20: {
currency: evmAddress('0xA0b86991c6218b36c1d19D4a2e9Eb0cE3606eB48'), // USDC on Mainnet
value: '1000' // 1000 USDC
}
},
supplier: evmAddress('0xYourUserAddressHere'),
chainId: chainId(1), // Mainnet
})
.andThen(sendWith(wallet)) // Signs and sends via Para Viem wallet client
.andThen(client.waitForTransaction); // Waits for confirmation
```
## Why Combine Para and Aave
| Feature | Benefit |
|---------------|----------------------------------------------|
| Para wallets | Instant onboarding, MPC-secure, white-label |
| Aave V3 | Yield, borrow, leverage strategies |
Together, you can enable [fintech-grade](https://www.getpara.com/fintech) defi UX in your app without friction.
## Example Use Cases
Integrating Para and Aave enable these example use cases:
**1. Fintech App Integration**: Embed borrow and lend flows directly in your fintech or stablecoin application
**2. Stablecoin Vaults**: Run automated stablecoin vaults using Aave yield generation
**3. Treasury Management**: Automate treasury strategies from a Para wallet with programmable rules
## Related Walkthroughs
Beginner · 20 min · Programmable stablecoin infrastructure
Advanced · 45 min · Cross-chain USDC bridges
Beginner · 20 min · Stablecoin issuance API
# Integrate Arc Chain with Para
Source: https://docs.getpara.com/v2/walkthroughs/arc
## Prerequisites
Before integrating Para with Arc Chain, ensure you have:
- A Para API key from the Para Developer Portal
- Node.js 18+ and Next.js development environment
- Basic familiarity with React and TypeScript
## Installation
``` npm install @getpara/react-sdk ```
Please make sure to be on version 2.2.0
## Setup Para Provider
Create a ParaSDKProvider that communicates with Arc Chain.
```import { ParaSDKProvider } from "@para/sdk-react";
const ARC_TESTNET = {
name: "Arc Testnet",
evmChainId: "5042002" as const,
nativeTokenSymbol: "USDC",
logoUrl:
"", // Replace with your Arc logo URL
rpcUrl: "https://rpc.testnet.arc.network",
explorer: {
name: "ArcScan Testnet Explorer",
url: "https://testnet.arcscan.app",
txUrlFormat:
"https://testnet.arcscan.app/tx/{HASH}",
},
isTestnet: true,
};
export function ParaProvider({ children }: { children: React.ReactNode }) {
return (
", // Replace with your Arc logo URL
implementations: [
{
network: ARC_TESTNET,
},
],
},
],
},
disableEmailLogin: false,
disablePhoneLogin: false,
authLayout: ["AUTH:FULL", "EXTERNAL:FULL"],
oAuthMethods: ["GOOGLE"],
onRampTestMode: true,
theme: {
foregroundColor: "#222222",
backgroundColor: "#FFFFFF",
accentColor: "#888888",
darkForegroundColor: "#EEEEEE",
darkBackgroundColor: "#111111",
darkAccentColor: "#AAAAAA",
mode: "light",
borderRadius: "none",
font: "Inter",
},
logo: "/para.svg",
recoverySecretStepEnabled: true,
twoFactorAuthEnabled: false,
}}
>
{children}
);
}
```
## Key Features
This integration provides a way to use Para Wallet with Arc Chain, an EVM-compatible L1 blockchain that uses USDC as its native gas token for predictable fiat-based transaction fees. Arc features sub-second deterministic finality and is designed for programmable money, lending, capital markets, FX, and payments.
## Related Walkthroughs
Beginner · 20 min · Bitcoin sidechain with EVM compatibility
Intermediate · 20 min · Send ETH with Ethers and Viem
Beginner · 20 min · Programmable stablecoin infrastructure
# Integrate Brale with Para
Source: https://docs.getpara.com/v2/walkthroughs/brale
## Integrating Brale with Para Wallets
[Brale](https://docs.brale.xyz) is a compliant stablecoin issuance and orchestration platform built for fintechs and onchain ecosystems. Combine Para's wallet infrastructure with [Brale](https://docs.brale.xyz)'s financial rails to mint, redeem, and manage stablecoins across 20+ chains, all from a Para-powered wallet.
## What You Need
You need these components to integrate Brale with Para:
- **Para SDK** for creating and managing wallets
- **Brale API credentials** (`client_id` and `client_secret`) from the [Brale dashboard](https://app.brale.xyz/)
- **EVM-compatible chain** such as Base, Polygon, or Ethereum
## Step-by-Step Integration
1. Initialize Para and create a viem wallet client
```typescript
import { createParaViemClient, createParaAccount } from "@getpara/viem-v2-integration";
import { http } from "viem";
import { base } from "viem/chains";
import { ParaWeb } from "@getpara/react-sdk";
// Initialize Para (complete authentication before signing)
const para = new ParaWeb("YOUR_PARA_API_KEY");
const account = await createParaAccount(para);
const wallet = createParaViemClient(para, {
account,
chain: base,
transport: http(),
});
```
2. Obtain a Brale bearer token via OAuth 2.0 client credentials
```typescript
const tokenResponse = await fetch("https://auth.brale.xyz/oauth/token", {
method: "POST",
headers: { "Content-Type": "application/json" },
body: JSON.stringify({
grant_type: "client_credentials",
client_id: BRALE_CLIENT_ID,
client_secret: BRALE_CLIENT_SECRET,
}),
});
const { access_token } = await tokenResponse.json();
```
3. Retrieve your Brale account ID
```typescript
const accountsResponse = await fetch("https://api.brale.xyz/accounts", {
headers: { Authorization: `Bearer ${access_token}` },
});
const accounts = await accountsResponse.json();
const accountId = accounts[0].id;
```
4. Register the Para wallet address with Brale
```typescript
const walletAddress = account.address;
const registerResponse = await fetch(
`https://api.brale.xyz/accounts/${accountId}/addresses/external`,
{
method: "POST",
headers: {
Authorization: `Bearer ${access_token}`,
"Content-Type": "application/json",
},
body: JSON.stringify({
name: "Non-Custodial (External) Wallet",
transfer_types: ["ethereum", "base"],
wallet_address: walletAddress,
}),
}
);
const addressData = await registerResponse.json();
const addressId = addressData.id;
```
5. Mint stablecoins (fiat-to-stablecoin) to the Para wallet
These examples use [SBC (Stablecoin)](https://stablecoin.xyz/) — Brale's native stablecoin. When you mint via Brale today, funds arrive as SBC. From there you can swap SBC to USDC or any other supported stablecoin through Brale's platform.
```typescript
const mintResponse = await fetch(
`https://api.brale.xyz/accounts/${accountId}/transfers`,
{
method: "POST",
headers: {
Authorization: `Bearer ${access_token}`,
"Content-Type": "application/json",
},
body: JSON.stringify({
amount: { value: "1000", currency: "USD" },
source: { value_type: "USD", transfer_type: "wire" },
destination: { address_id: addressId, value_type: "SBC", transfer_type: "base" },
}),
}
);
const mint = await mintResponse.json();
```
6. Redeem stablecoins (stablecoin-to-fiat) from the Para wallet
```typescript
const redeemResponse = await fetch(
`https://api.brale.xyz/accounts/${accountId}/transfers`,
{
method: "POST",
headers: {
Authorization: `Bearer ${access_token}`,
"Content-Type": "application/json",
},
body: JSON.stringify({
amount: { value: "500", currency: "USD" },
source: { address_id: addressId, value_type: "SBC", transfer_type: "base" },
destination: { value_type: "USD", transfer_type: "wire" },
}),
}
);
const redeem = await redeemResponse.json();
```
## Why Combine Para and Brale
[Para](https://www.getpara.com) and [Brale](https://docs.brale.xyz) are purpose-built for the same audience — fintechs, neobanks, and onchain ecosystems that need to move real money. Para provides the wallet infrastructure: MPC-secured wallets, instant user onboarding, and white-label UX across web, mobile, server, and REST API. Brale provides the financial rails: compliant stablecoin issuance, fiat on-ramps and off-ramps, and orchestration across 20+ chains.
Together, Para+Brale closes the full loop from user identity to settled funds onchain.
| Layer | Provider | What it does |
|---|---|---|
| Wallet infrastructure | Para | MPC-secured wallets, instant onboarding, white-label UX across web, mobile, server, and REST API |
| Stablecoin issuance | Brale | Mint and redeem compliant stablecoins, fiat on/off-ramps across 20+ chains |
| Settlement | Para + Brale | Sign and broadcast transactions from Para wallets funded via Brale |
**Why this combination wins for fintechs:**
- **Compliance-ready from day one** — Brale handles stablecoin licensing and reserve management; Para handles wallet security and key custody
- **No fragmented vendors** — replace a patchwork of banking APIs, custody providers, and blockchain nodes with two focused SDKs
- **User experience that converts** — Para's embedded wallet UX means users never leave your app to fund or move stablecoins
- **Multi-chain by default** — issue on Base, Ethereum, Polygon, and more without rewriting your integration
## Example Use Cases
Integrating Para and Brale enables these example use cases:
**1. Stablecoin Payments App**: Build a payments experience with instant mint and redeem flows powered by Para wallets
**2. Treasury Management**: Automate stablecoin operations for treasury workflows from a Para wallet with programmable rules
**3. Cross-Chain Stablecoin Orchestration**: Manage stablecoin issuance and redemption across multiple chains from a single Para wallet
## Related Walkthroughs
Beginner · 20 min · Programmable stablecoin infrastructure
Advanced · 45 min · Lending, borrowing, and yield strategies
Intermediate · 20 min · Send ETH with Ethers and Viem
# Bulk Wallet Pregeneration for Twitter
Source: https://docs.getpara.com/v2/walkthroughs/bulk-pregeneration
Bulk pregeneration allows you to create Para wallets for multiple Twitter users ahead of time. Users can later claim these wallets by authenticating with their Twitter accounts, creating a seamless onboarding experience for airdrops, token distributions, or whitelist rewards.
## How Bulk Pregeneration Works
When you bulk pregenerate wallets:
1. **Generate wallets** for Twitter usernames using Para's server SDK
2. **Store user shares** securely on your backend
3. **Fund wallets** with tokens or NFTs for airdrops (optional)
4. **Users claim wallets** later by signing in with Twitter
5. **Para matches** the Twitter username to the pregenerated wallet
## Prerequisites
You need a Para API key and basic knowledge of Node.js/TypeScript development.
## Getting Twitter Usernames
You can obtain Twitter usernames for bulk pregeneration from various sources:
- **Database of pre-registered users** - Users who joined your whitelist or waitlist
- **Twitter API** - Programmatically fetch followers, mentions, or community members
- **CSV files** - Export from existing user databases or CRM systems
- **Contest participants** - Users who engaged with your Twitter campaigns
For this tutorial, we'll use a local CSV file as an example, but the core logic applies regardless of your data source.
## Server-Side Implementation
### Setup Para Server Client
First, create a Para server client to handle wallet generation:
```typescript lib/para-server.ts
import { Para } from "@getpara/server-sdk";
export function getParaServerClient() {
const apiKey = process.env.PARA_API_KEY;
if (!apiKey) {
throw new Error("PARA_API_KEY is required");
}
return new Para(apiKey);
}
```
### Create Bulk Generation API
Create an API endpoint to generate wallets for Twitter usernames:
```typescript api/wallet/generate/route.ts
import { getParaServerClient } from "@/lib/para-server";
import { NextResponse } from "next/server";
interface GenerateWalletRequest {
handle: string;
type: "TWITTER";
}
export async function POST(request: Request) {
try {
const { handle, type }: GenerateWalletRequest = await request.json();
if (!handle || type !== "TWITTER") {
return NextResponse.json({ error: "Invalid handle or type" }, { status: 400 });
}
const para = getParaServerClient();
const wallet = await para.createPregenWallet({
type: "EVM",
pregenId: { xUsername: handle.trim() }
});
const userShare = await para.getUserShare();
if (!wallet || !userShare) {
throw new Error("Failed to generate wallet");
}
await storeWalletData(handle.trim(), wallet, userShare);
return NextResponse.json({
success: true,
handle: handle.trim(),
address: wallet.address
});
} catch (error) {
console.error("Wallet generation error:", error);
return NextResponse.json({ error: "Generation failed" }, { status: 500 });
}
}
async function storeWalletData(handle: string, wallet: any, userShare: any) {
// Store wallet and user share in your database
// This is critical for users to claim their wallets later
}
```
### Batch Processing Implementation
For processing multiple handles efficiently:
```typescript hooks/use-batch-processor.ts
import { useState } from "react";
interface BatchResult {
handle: string;
success: boolean;
address?: string;
error?: string;
}
export function useBatchProcessor() {
const [processing, setProcessing] = useState(false);
const [results, setResults] = useState([]);
const [progress, setProgress] = useState(0);
const processBatch = async (handles: string[]) => {
setProcessing(true);
setResults([]);
setProgress(0);
const batchSize = 10;
const batches = [];
for (let i = 0; i < handles.length; i += batchSize) {
batches.push(handles.slice(i, i + batchSize));
}
const allResults: BatchResult[] = [];
for (let i = 0; i < batches.length; i++) {
const batch = batches[i];
const batchResults = await Promise.all(
batch.map(async (handle) => {
try {
const response = await fetch("/api/wallet/generate", {
method: "POST",
headers: { "Content-Type": "application/json" },
body: JSON.stringify({ handle, type: "TWITTER" })
});
const data = await response.json();
return {
handle,
success: data.success,
address: data.address,
error: data.error
};
} catch (error) {
return {
handle,
success: false,
error: "Network error"
};
}
})
);
allResults.push(...batchResults);
setResults([...allResults]);
setProgress(((i + 1) / batches.length) * 100);
// Rate limiting delay
if (i < batches.length - 1) {
await new Promise(resolve => setTimeout(resolve, 1000));
}
}
setProcessing(false);
};
return {
processing,
results,
progress,
processBatch
};
}
```
## Alternative Data Sources
### From Database
You can fetch usernames directly from your database:
```typescript
// Example: Fetch whitelist users from database
async function getWhitelistUsers() {
const users = await db.users.findMany({
where: { whitelisted: true },
select: { twitterUsername: true }
});
return users.map(user => user.twitterUsername).filter(Boolean);
}
```
### From Twitter API
Programmatically fetch Twitter usernames:
```typescript
// Example: Get followers using Twitter API
async function getFollowers(userId: string) {
const response = await fetch(`https://api.twitter.com/2/users/${userId}/followers`, {
headers: {
'Authorization': `Bearer ${process.env.TWITTER_BEARER_TOKEN}`
}
});
const data = await response.json();
return data.data?.map((user: any) => user.username) || [];
}
```
### Example: CSV Processing
For this tutorial, we'll demonstrate with a CSV file containing Twitter handles:
```csv
handle,type
@username1,twitter
@username2,twitter
username3,twitter
```
The `@` symbol is optional and will be automatically handled. Headers are also optional.
## Frontend Considerations
While the UI implementation depends on your application's design system, consider these patterns:
- **Progress tracking** - Show real-time batch processing status
- **Error handling** - Display failed generations with retry options
- **Results export** - Allow downloading generation results
- **Batch size control** - Let users adjust processing batch sizes
The core logic remains the same regardless of your UI framework choice.
## Important Considerations
### Rate Limiting
Para's API has rate limits. Process handles in batches with delays:
```typescript
// Process 10 handles at a time with 1-second delays
const batchSize = 10;
const delay = 1000; // 1 second between batches
```
### Error Handling
Always implement retry logic for failed generations:
```typescript
const retryFailed = async (failedResults: BatchResult[]) => {
const failedHandles = failedResults
.filter(result => !result.success)
.map(result => result.handle);
// Retry processing
await processBatch(failedHandles);
};
```
### Data Storage
Store wallet data securely in your database:
- **Wallet addresses** for reference
- **User shares** for wallet claiming
- **Handle mappings** for Twitter username lookup
- **Generation timestamps** for tracking
## Testing Your Implementation
1. **Start with small batches** (5-10 handles)
2. **Use test Twitter handles** that you control
3. **Verify wallet generation** in Para Developer Portal
4. **Test claiming flow** with actual Twitter authentication
## Next Steps
Learn how users claim pregenerated wallets
Deep dive into Para's pregeneration system
## Related Walkthroughs
Intermediate · 25 min · Micropayments over HTTP
Advanced · 45 min · Browser extensions with Para wallets
Intermediate · 15 min · AI-powered migration tooling
# Chrome Extension Integration with Para
Source: https://docs.getpara.com/v2/walkthroughs/chrome-extension-integration
Building Chrome extensions with Para requires special considerations for state persistence and user experience. This walkthrough covers how to implement Chrome storage overrides, background workers, and seamless authentication flows.
## Chrome Extension Challenges
Chrome extensions present unique challenges for web applications:
- **State resets** - Clicking outside a popup can close and reset the application state
- **Limited popup space** - Small popup windows aren't ideal for complex authentication flows
- **Background execution** - Background workers need access to authentication state
- **Storage limitations** - Standard localStorage/sessionStorage APIs work differently in extensions
## Solution Overview
Para addresses these challenges through:
1. **Storage overrides** - Custom storage implementations using Chrome extension APIs
2. **Singleton promise pattern** - Shared Para instance across popup and background
3. **Smart routing** - Background worker decides between popup vs tab based on auth state
4. **State persistence** - Authentication state survives popup closures
## Setup and Configuration
### Install Dependencies
```bash
npm install @getpara/react-sdk
```
### Create Chrome Storage Overrides
Create a storage implementation that uses Chrome extension storage APIs:
```typescript lib/chrome-storage.ts
// Chrome local storage overrides
export const localStorageGetItemOverride = async (key: string): Promise => {
try {
// Handle special cases
if (key === "guestWalletIds" || key === "pregenIds") {
return JSON.stringify({});
}
const result = await chrome.storage.local.get([key]);
return result[key] || null;
} catch (error) {
console.error("Local storage get error:", error);
return null;
}
};
export const localStorageSetItemOverride = async (key: string, value: string): Promise => {
try {
await chrome.storage.local.set({ [key]: value });
} catch (error) {
console.error("Local storage set error:", error);
}
};
export const localStorageRemoveItemOverride = async (key: string): Promise => {
try {
await chrome.storage.local.remove([key]);
} catch (error) {
console.error("Local storage remove error:", error);
}
};
// Chrome session storage overrides
export const sessionStorageGetItemOverride = async (key: string): Promise => {
try {
if (key === "guestWalletIds" || key === "pregenIds") {
return JSON.stringify({});
}
const result = await chrome.storage.session.get([key]);
return result[key] || null;
} catch (error) {
console.error("Session storage get error:", error);
return null;
}
};
export const sessionStorageSetItemOverride = async (key: string, value: string): Promise => {
try {
await chrome.storage.session.set({ [key]: value });
} catch (error) {
console.error("Session storage set error:", error);
}
};
export const sessionStorageRemoveItemOverride = async (key: string): Promise => {
try {
await chrome.storage.session.remove([key]);
} catch (error) {
console.error("Session storage remove error:", error);
}
};
// Clear storage with Para prefix
export const clearStorageOverride = async (): Promise => {
try {
// Get all keys from both storages
const [localKeys, sessionKeys] = await Promise.all([
chrome.storage.local.get(),
chrome.storage.session.get()
]);
// Filter keys with Para prefix
const paraLocalKeys = Object.keys(localKeys).filter(key => key.startsWith("@CAPSULE/"));
const paraSessionKeys = Object.keys(sessionKeys).filter(key => key.startsWith("@CAPSULE/"));
// Remove Para keys
await Promise.all([
paraLocalKeys.length > 0 ? chrome.storage.local.remove(paraLocalKeys) : Promise.resolve(),
paraSessionKeys.length > 0 ? chrome.storage.session.remove(paraSessionKeys) : Promise.resolve()
]);
} catch (error) {
console.error("Clear storage error:", error);
}
};
// Export all overrides as a single object
export const chromeStorageOverrides = {
localStorageGetItemOverride,
localStorageSetItemOverride,
localStorageRemoveItemOverride,
sessionStorageGetItemOverride,
sessionStorageSetItemOverride,
sessionStorageRemoveItemOverride,
clearStorageOverride
};
```
### Configure Para Client
Create a singleton Para client with Chrome storage overrides:
```typescript lib/para/client.ts
import { ParaWeb } from "@getpara/react-sdk";
import { chromeStorageOverrides } from "../chrome-storage";
const PARA_API_KEY = process.env.NEXT_PUBLIC_PARA_API_KEY || "your-api-key";
// Create Para instance with Chrome storage overrides
export const para = new ParaWeb(PARA_API_KEY, {
...chromeStorageOverrides,
useStorageOverrides: true,
});
// Export shared promise for initialization
export const paraReady = para.init();
```
### Background Worker Implementation
Create a background worker that manages authentication flows:
```typescript background.ts
import { para, paraReady } from "@/lib/para/client";
// Handle extension icon clicks
chrome.action.onClicked.addListener(async () => {
try {
// Wait for Para to be ready
await paraReady;
// Check authentication status
const isLoggedIn = await para.isFullyLoggedIn();
console.log("User authentication status:", isLoggedIn);
if (!isLoggedIn) {
// User not authenticated - open full tab for login
chrome.tabs.create({
url: chrome.runtime.getURL("index.html")
});
} else {
// User authenticated - open popup for quick actions
await chrome.action.setPopup({ popup: "index.html" });
await chrome.action.openPopup();
// Reset popup after opening (allows clicking icon again)
await chrome.action.setPopup({ popup: "" });
}
} catch (error) {
console.error("Authentication check failed:", error);
// Fallback to tab on error
chrome.tabs.create({
url: chrome.runtime.getURL("index.html")
});
}
});
// Optional: Handle installation
chrome.runtime.onInstalled.addListener(async () => {
console.log("Extension installed");
// Initialize Para on installation
try {
await paraReady;
console.log("Para initialized successfully");
} catch (error) {
console.error("Para initialization failed:", error);
}
});
```
## Manifest Configuration
Create a `manifest.json` file for your Chrome extension:
```json manifest.json
{
"manifest_version": 3,
"name": "Para Chrome Extension",
"version": "1.0",
"description": "Chrome extension with Para authentication",
"permissions": [
"storage",
"activeTab"
],
"background": {
"service_worker": "background.js",
"type": "module"
},
"action": {
"default_title": "Para Extension"
},
"content_security_policy": {
"extension_pages": "script-src 'self' 'wasm-unsafe-eval'; object-src 'self';"
},
"web_accessible_resources": [
{
"resources": ["index.html"],
"matches": [""]
}
]
}
```
## Application Setup
### Main Application Component
```typescript components/App.tsx
import { useEffect, useState } from "react";
import { para, paraReady } from "@/lib/para/client";
import { useAccount } from "@getpara/react-sdk";
export function App() {
const [isReady, setIsReady] = useState(false);
const { data: account } = useAccount();
useEffect(() => {
// Wait for Para initialization
paraReady.then(() => {
setIsReady(true);
}).catch((error) => {
console.error("Para initialization failed:", error);
setIsReady(true); // Show UI even on error
});
}, []);
if (!isReady) {
return (
);
}
return (
{account?.isConnected ? (
) : (
)}
Welcome Back!
Address: {account?.address}
);
}
function LoginView() {
const handleLogin = async () => {
try {
await para.signUpOrLogin();
} catch (error) {
console.error("Login failed:", error);
}
};
return (
Para Chrome Extension
Sign in to get started
);
}
```
### Para Provider Setup
```typescript components/ParaProvider.tsx
import { ParaProvider as BaseParaProvider } from "@getpara/react-sdk";
import { para } from "@/lib/para/client";
interface ParaProviderProps {
children: React.ReactNode;
}
export function ParaProvider({ children }: ParaProviderProps) {
return (
{children}
);
}
```
## User Experience Patterns
### Smart Authentication Flow
The background worker implements smart routing based on authentication state:
```typescript
// Pseudocode for authentication flow decision
if (userNotAuthenticated) {
// Open full tab - more space for authentication
openTab("index.html");
} else {
// Open popup - quick access for authenticated users
openPopup("index.html");
}
```
### State Persistence
Para state persists across popup sessions:
```typescript
// User clicks extension icon
// -> Popup opens with preserved authentication state
// -> User interacts with popup
// -> User clicks outside, popup closes
// -> User clicks extension icon again
// -> Popup reopens with same state (no re-authentication needed)
```
### Error Handling
Implement robust error handling for extension-specific scenarios:
```typescript
const handleExtensionError = (error: Error) => {
console.error("Extension error:", error);
// Always fallback to tab on critical errors
chrome.tabs.create({
url: chrome.runtime.getURL("index.html")
});
};
```
## Building and Deployment
### Build Configuration
Configure your build tool (Webpack, Vite, etc.) for Chrome extension:
```javascript webpack.config.js
module.exports = {
entry: {
background: './src/background.ts',
content: './src/index.tsx'
},
output: {
path: path.resolve(__dirname, 'dist'),
filename: '[name].js'
},
// ... other webpack configuration
};
```
### Development Testing
1. **Build your extension**:
```bash
npm run build
```
2. **Load in Chrome**:
- Open `chrome://extensions/`
- Enable "Developer mode"
- Click "Load unpacked"
- Select your `dist` folder
3. **Test authentication flows**:
- Click extension icon when logged out (should open tab)
- Complete authentication
- Click extension icon when logged in (should open popup)
### Production Considerations
- **Permissions**: Only request necessary permissions in manifest
- **CSP**: Configure Content Security Policy for WASM and external resources
- **Error reporting**: Implement error tracking for production
- **Performance**: Optimize background worker to minimize resource usage
## Advanced Features
### Tab Communication
Communicate between popup and tabs:
```typescript
// In popup
chrome.tabs.query({ active: true, currentWindow: true }, (tabs) => {
chrome.tabs.sendMessage(tabs[0].id!, {
type: "PARA_AUTH_STATUS",
isAuthenticated: true
});
});
// In content script
chrome.runtime.onMessage.addListener((message, sender, sendResponse) => {
if (message.type === "PARA_AUTH_STATUS") {
// Handle authentication status update
updateUIBasedOnAuth(message.isAuthenticated);
}
});
```
### Context Menus
Add context menu integration:
```typescript
// In background.ts
chrome.contextMenus.create({
id: "para-action",
title: "Sign with Para",
contexts: ["selection"]
});
chrome.contextMenus.onClicked.addListener(async (info, tab) => {
if (info.menuItemId === "para-action") {
// Handle context menu action
await paraReady;
const isLoggedIn = await para.isFullyLoggedIn();
if (isLoggedIn) {
// Perform action with selected text
console.log("Selected text:", info.selectionText);
}
}
});
```
## Troubleshooting
### Common Issues
**Storage not persisting**:
- Ensure `useStorageOverrides: true` is set
- Check Chrome storage permissions in manifest
- Verify storage override functions are async
**Background worker not receiving state**:
- Confirm `paraReady` promise is properly awaited
- Check console for initialization errors
- Verify manifest background configuration
**Popup closing unexpectedly**:
- This is expected Chrome behavior
- Use tabs for complex flows
- Implement state persistence with storage overrides
## Next Steps
Learn more about Para's React integration
Understand Para's authentication system
## Related Walkthroughs
Intermediate · 25 min · Large-scale wallet generation
Intermediate · 20 min · Send ETH with Ethers and Viem
Intermediate · 20 min · Structured data signing
# EIP-712 Typed Data Signing with Para
Source: https://docs.getpara.com/v2/walkthroughs/eip712-typed-data-signing
EIP-712 enables signing complex, structured data in a standardized way, providing better security and user experience compared to simple message signing. This walkthrough shows how to implement EIP-712 typed data signing using Para's Ethers integration.
## What is EIP-712?
EIP-712 is a standard for signing typed structured data, offering several advantages:
- **Structured data signing** - Sign complex objects with multiple fields and nested structures
- **Domain separation** - Prevents signature replay attacks across different applications or chains
- **Human-readable format** - Users can see exactly what they're signing in wallet interfaces
- **Type safety** - Ensures data conforms to expected structure before signing
## Common Use Cases
EIP-712 is commonly used for:
- **Meta-transactions** - Gasless transactions with relayer support
- **Permit signatures** - Token approvals without on-chain transactions
- **Attestations** - Cryptographically signed claims or certificates
- **Voting systems** - Off-chain voting with on-chain verification
- **Order signing** - DEX orders and marketplace listings
## Setup Requirements
You need an authenticated Para client and Ethers provider to implement EIP-712 signing.
### Install Dependencies
```bash
npm install @getpara/react-sdk @getpara/ethers-v6-integration ethers
```
### Create Ethers Provider Hook
```typescript hooks/useEthersProvider.ts
import { useMemo } from "react";
import { ethers } from "ethers";
const RPC_URL = process.env.NEXT_PUBLIC_RPC_URL ||
"https://ethereum-holesky-rpc.publicnode.com";
export function useEthersProvider() {
const provider = useMemo(() => {
return new ethers.JsonRpcProvider(RPC_URL);
}, []);
return { provider };
}
```
### Create Para Signer Hook
```typescript hooks/useParaSigner.ts
import { useState, useEffect } from "react";
import { ParaEthersSigner } from "@getpara/ethers-v6-integration";
import { useAccount, useClient } from "@getpara/react-sdk";
import { useEthersProvider } from "./useEthersProvider";
export function useParaSigner() {
const { data: account } = useAccount();
const client = useClient();
const { provider } = useEthersProvider();
const [signer, setSigner] = useState(null);
useEffect(() => {
if (account?.isConnected && provider && client) {
try {
const newSigner = new ParaEthersSigner(client, provider);
setSigner(newSigner);
} catch (error) {
console.error("Failed to initialize Para signer:", error);
setSigner(null);
}
} else {
setSigner(null);
}
}, [account?.isConnected, provider, client]);
return { signer, provider };
}
```
## EIP-712 Implementation
### Define Domain and Types
The domain separator provides context and prevents replay attacks:
```typescript
// Domain definition - provides context for the signature
const domain = {
name: "MyDApp", // Application name
version: "1", // Version of signing domain
chainId: 17000, // Network chain ID (Holesky testnet)
verifyingContract: "0x..." as Address // Contract that will verify signatures
};
// Types definition - structure of the data being signed
const types = {
TokenAttestation: [
{ name: "holder", type: "address" },
{ name: "balance", type: "string" },
{ name: "purpose", type: "string" },
{ name: "timestamp", type: "uint256" },
{ name: "nonce", type: "uint256" }
]
};
```
### Create Typed Data Structure
```typescript
interface TokenAttestation {
holder: string;
balance: string;
purpose: string;
timestamp: number;
nonce: number;
}
// Create the data object to sign
const attestation: TokenAttestation = {
holder: "0x742d35Cc6634C0532925a3b8D756e3C98d8a3a1B",
balance: "1000.5",
purpose: "Identity verification",
timestamp: Math.floor(Date.now() / 1000),
nonce: 1
};
```
### Sign Typed Data
```typescript
import { useParaSigner } from "./hooks/useParaSigner";
export function TypedDataSigning() {
const { signer } = useParaSigner();
const [signature, setSignature] = useState("");
const [isLoading, setIsLoading] = useState(false);
const signAttestation = async () => {
if (!signer) {
throw new Error("Signer not available");
}
setIsLoading(true);
try {
// Sign the typed data
const signature = await signer.signTypedData(domain, types, attestation);
setSignature(signature);
console.log("Signed attestation:", signature);
} catch (error) {
console.error("Signing failed:", error);
} finally {
setIsLoading(false);
}
};
return (
{signature && (
Signature:
{signature}
)}
);
}
```
## Advanced Examples
### Permit Signature for Token Approvals
```typescript
// EIP-2612 Permit signature
const permitTypes = {
Permit: [
{ name: "owner", type: "address" },
{ name: "spender", type: "address" },
{ name: "value", type: "uint256" },
{ name: "nonce", type: "uint256" },
{ name: "deadline", type: "uint256" }
]
};
const permitData = {
owner: userAddress,
spender: spenderAddress,
value: ethers.parseUnits("100", 18),
nonce: await token.nonces(userAddress),
deadline: Math.floor(Date.now() / 1000) + 3600 // 1 hour
};
const permitSignature = await signer.signTypedData(
{
name: "MyToken",
version: "1",
chainId: 1,
verifyingContract: tokenAddress
},
permitTypes,
permitData
);
```
### Voting Signature
```typescript
const voteTypes = {
Vote: [
{ name: "proposalId", type: "uint256" },
{ name: "support", type: "bool" },
{ name: "voter", type: "address" },
{ name: "reason", type: "string" },
{ name: "timestamp", type: "uint256" }
]
};
const voteData = {
proposalId: 42,
support: true,
voter: userAddress,
reason: "I support this proposal",
timestamp: Math.floor(Date.now() / 1000)
};
const voteSignature = await signer.signTypedData(domain, voteTypes, voteData);
```
### Marketplace Order Signature
```typescript
const orderTypes = {
Order: [
{ name: "seller", type: "address" },
{ name: "buyer", type: "address" },
{ name: "tokenContract", type: "address" },
{ name: "tokenId", type: "uint256" },
{ name: "price", type: "uint256" },
{ name: "deadline", type: "uint256" },
{ name: "nonce", type: "uint256" }
]
};
const orderData = {
seller: userAddress,
buyer: "0x0000000000000000000000000000000000000000", // Any buyer
tokenContract: nftContractAddress,
tokenId: 123,
price: ethers.parseEther("1.5"),
deadline: Math.floor(Date.now() / 1000) + 86400, // 24 hours
nonce: 1
};
const orderSignature = await signer.signTypedData(domain, orderTypes, orderData);
```
## Signature Verification
### Client-Side Verification
```typescript
import { ethers } from "ethers";
async function verifySignature(
domain: any,
types: any,
data: any,
signature: string,
expectedSigner: string
) {
try {
const recoveredSigner = ethers.verifyTypedData(domain, types, data, signature);
return recoveredSigner.toLowerCase() === expectedSigner.toLowerCase();
} catch (error) {
console.error("Verification failed:", error);
return false;
}
}
// Usage
const isValid = await verifySignature(
domain,
types,
attestation,
signature,
userAddress
);
console.log("Signature valid:", isValid);
```
### Smart Contract Verification
```solidity
// Solidity contract for verifying EIP-712 signatures
contract AttestationVerifier {
bytes32 private constant ATTESTATION_TYPEHASH = keccak256(
"TokenAttestation(address holder,string balance,string purpose,uint256 timestamp,uint256 nonce)"
);
bytes32 private immutable DOMAIN_SEPARATOR;
constructor() {
DOMAIN_SEPARATOR = keccak256(
abi.encode(
keccak256("EIP712Domain(string name,string version,uint256 chainId,address verifyingContract)"),
keccak256(bytes("MyDApp")),
keccak256(bytes("1")),
block.chainid,
address(this)
)
);
}
function verifyAttestation(
TokenAttestation memory attestation,
uint8 v,
bytes32 r,
bytes32 s
) public view returns (address) {
bytes32 structHash = keccak256(
abi.encode(
ATTESTATION_TYPEHASH,
attestation.holder,
keccak256(bytes(attestation.balance)),
keccak256(bytes(attestation.purpose)),
attestation.timestamp,
attestation.nonce
)
);
bytes32 digest = keccak256(
abi.encodePacked("\x19\x01", DOMAIN_SEPARATOR, structHash)
);
return ecrecover(digest, v, r, s);
}
}
```
## Error Handling
### Common Issues and Solutions
```typescript
const signWithErrorHandling = async () => {
try {
const signature = await signer.signTypedData(domain, types, data);
return signature;
} catch (error) {
if (error.code === 'ACTION_REJECTED') {
console.log("User rejected the signing request");
} else if (error.message.includes('invalid domain')) {
console.error("Domain configuration error:", error);
} else if (error.message.includes('invalid types')) {
console.error("Types definition error:", error);
} else {
console.error("Unexpected signing error:", error);
}
throw error;
}
};
```
### Validation Before Signing
```typescript
function validateTypedData(domain: any, types: any, data: any) {
// Validate domain
if (!domain.name || !domain.version || !domain.chainId) {
throw new Error("Invalid domain: missing required fields");
}
// Validate types
if (!types || Object.keys(types).length === 0) {
throw new Error("Invalid types: empty or undefined");
}
// Validate data matches types
const primaryType = Object.keys(types)[0];
const typeFields = types[primaryType];
for (const field of typeFields) {
if (!(field.name in data)) {
throw new Error(`Missing required field: ${field.name}`);
}
}
return true;
}
```
## Best Practices
### Security Considerations
- **Validate all inputs** before signing
- **Use proper domain separation** to prevent replay attacks
- **Include nonces** to prevent signature reuse
- **Set reasonable deadlines** for time-sensitive signatures
- **Verify contract addresses** in domain separator
### Type Definition Guidelines
- **Use specific types** (uint256 instead of uint)
- **Order fields consistently** across your application
- **Document field purposes** for maintainability
- **Version your types** when making changes
### User Experience
- **Provide clear descriptions** of what users are signing
- **Show human-readable summaries** before signing
- **Handle rejection gracefully** with meaningful error messages
- **Cache signatures** when appropriate to avoid re-signing
## Next Steps
Learn more about Para's Ethers integration
Understand Para's authentication system
## Related Walkthroughs
Intermediate · 20 min · Send ETH with Ethers and Viem
Intermediate · 30 min · EIP-7702 smart accounts with session keys
Advanced · 45 min · Lending, borrowing, and yield strategies
# Ethereum Transfers with Para
Source: https://docs.getpara.com/v2/walkthroughs/ethereum-transfers
This walkthrough covers sending basic Ethereum transfers using Para with both Ethers v6 and Viem v2. You'll learn transaction construction, gas estimation, and signing patterns for each library.
## Prerequisites
You need an authenticated Para client and basic knowledge of Ethereum transactions.
## Core Dependencies
```bash
npm install @getpara/react-sdk @getpara/ethers-v6-integration ethers
```
```bash
npm install @getpara/react-sdk @getpara/viem viem
```
## Provider Setup
### RPC Configuration
```typescript
import { ethers } from "ethers";
const RPC_URL = process.env.NEXT_PUBLIC_HOLESKY_RPC_URL ||
"https://ethereum-holesky-rpc.publicnode.com";
// Create JSON RPC provider
const provider = new ethers.JsonRpcProvider(RPC_URL);
```
```typescript
import { createPublicClient, http } from "viem";
import { holesky } from "viem/chains";
const RPC_URL = process.env.NEXT_PUBLIC_HOLESKY_RPC_URL ||
"https://ethereum-holesky-rpc.publicnode.com";
// Create public client for read operations
const publicClient = createPublicClient({
chain: holesky,
transport: http(RPC_URL)
});
```
### Para Signer Setup
```typescript
import { ParaEthersSigner } from "@getpara/ethers-v6-integration";
import { useAccount, useClient } from "@getpara/react-sdk";
// Get Para client and account
const client = useClient();
const { data: account } = useAccount();
// Create Para Ethers signer
let signer: ParaEthersSigner | null = null;
if (account?.isConnected && provider && client) {
signer = new ParaEthersSigner(client, provider);
}
```
```typescript
import { createParaAccount, createParaViemClient } from "@getpara/viem";
import { useAccount, useClient } from "@getpara/react-sdk";
// Get Para client and account
const client = useClient();
const { data: account } = useAccount();
// Create Para Viem account and wallet client
let walletClient: any = null;
if (account?.isConnected && client) {
const viemAccount = createParaAccount(client);
walletClient = createParaViemClient(client, {
account: viemAccount,
chain: holesky,
transport: http(RPC_URL)
});
}
```
## Transaction Construction
### Basic Transaction Parameters
```typescript
import { parseEther, toBigInt } from "ethers";
const constructTransaction = async (
toAddress: string,
ethAmount: string,
userAddress: string
) => {
// Get transaction parameters
const nonce = await provider.getTransactionCount(userAddress);
const feeData = await provider.getFeeData();
const gasLimit = toBigInt(21000); // Standard ETH transfer gas
const value = parseEther(ethAmount);
// Construct transaction object
const transaction = {
to: toAddress,
value: value,
nonce: nonce,
gasLimit: gasLimit,
maxFeePerGas: feeData.maxFeePerGas,
maxPriorityFeePerGas: feeData.maxPriorityFeePerGas,
chainId: 17000, // Holesky chain ID
};
return transaction;
};
```
```typescript
import { parseEther, parseGwei } from "viem";
const constructTransaction = (
toAddress: `0x${string}`,
ethAmount: string,
userAddress: `0x${string}`
) => {
// Construct transaction object
const transaction = {
account: userAddress,
to: toAddress,
value: parseEther(ethAmount),
chain: holesky,
maxFeePerGas: parseGwei("100"), // Custom max fee
maxPriorityFeePerGas: parseGwei("3") // Custom priority fee
};
return transaction;
};
```
## Gas Estimation
### Estimate Transaction Cost
```typescript
import { formatEther } from "ethers";
const estimateTransactionCost = async (
userAddress: string,
ethAmount: string
) => {
// Get current balance
const balanceWei = await provider.getBalance(userAddress);
// Get fee data
const feeData = await provider.getFeeData();
const gasLimit = toBigInt(21000);
// Calculate max gas cost
const maxGasFee = gasLimit * (feeData.maxFeePerGas ?? toBigInt(0));
const amountWei = parseEther(ethAmount);
const totalCost = amountWei + maxGasFee;
return {
balance: formatEther(balanceWei),
amount: formatEther(amountWei),
estimatedGas: formatEther(maxGasFee),
totalCost: formatEther(totalCost),
hasSufficientBalance: totalCost <= balanceWei
};
};
```
```typescript
import { formatEther, parseEther } from "viem";
const estimateTransactionCost = async (
userAddress: `0x${string}`,
toAddress: `0x${string}`,
ethAmount: string
) => {
// Get current balance
const balance = await publicClient.getBalance({ address: userAddress });
const amountWei = parseEther(ethAmount);
// Estimate gas for the specific transaction
const estimatedGas = await publicClient.estimateGas({
account: userAddress,
to: toAddress,
value: amountWei
});
// Get current gas price
const gasPrice = await publicClient.getGasPrice();
const estimatedGasCost = estimatedGas * gasPrice;
const totalCost = amountWei + estimatedGasCost;
return {
balance: formatEther(balance),
amount: formatEther(amountWei),
estimatedGas: formatEther(estimatedGasCost),
totalCost: formatEther(totalCost),
hasSufficientBalance: totalCost <= balance
};
};
```
## Transaction Validation
### Balance and Parameter Checks
```typescript
const validateTransaction = async (
userAddress: string,
toAddress: string,
ethAmount: string
) => {
// Basic parameter validation
if (!ethers.isAddress(toAddress)) {
throw new Error("Invalid recipient address");
}
if (parseFloat(ethAmount) <= 0) {
throw new Error("Amount must be greater than 0");
}
// Check balance and gas
const estimation = await estimateTransactionCost(userAddress, ethAmount);
if (!estimation.hasSufficientBalance) {
throw new Error(
`Insufficient balance. Need ${estimation.totalCost} ETH, have ${estimation.balance} ETH`
);
}
return true;
};
```
```typescript
import { isAddress } from "viem";
const validateTransaction = async (
userAddress: `0x${string}`,
toAddress: string,
ethAmount: string
) => {
// Basic parameter validation
if (!isAddress(toAddress)) {
throw new Error("Invalid recipient address");
}
if (parseFloat(ethAmount) <= 0) {
throw new Error("Amount must be greater than 0");
}
// Check balance and gas
const estimation = await estimateTransactionCost(
userAddress,
toAddress as `0x${string}`,
ethAmount
);
if (!estimation.hasSufficientBalance) {
throw new Error(
`Insufficient balance. Need ${estimation.totalCost} ETH, have ${estimation.balance} ETH`
);
}
return true;
};
```
## Sending Transactions
### Execute Transfer
```typescript
const sendEthTransfer = async (
toAddress: string,
ethAmount: string,
userAddress: string
) => {
// Validate transaction
await validateTransaction(userAddress, toAddress, ethAmount);
// Construct transaction
const transaction = await constructTransaction(toAddress, ethAmount, userAddress);
// Send transaction using Para signer
const txResponse = await signer.sendTransaction(transaction);
console.log("Transaction sent:", txResponse.hash);
// Wait for confirmation
const receipt = await txResponse.wait();
console.log("Transaction confirmed:", receipt.hash);
console.log("Block number:", receipt.blockNumber);
console.log("Gas used:", receipt.gasUsed.toString());
return {
hash: receipt.hash,
blockNumber: receipt.blockNumber,
gasUsed: receipt.gasUsed.toString(),
status: receipt.status === 1 ? "success" : "failed"
};
};
```
```typescript
const sendEthTransfer = async (
toAddress: `0x${string}`,
ethAmount: string,
userAddress: `0x${string}`
) => {
// Validate transaction
await validateTransaction(userAddress, toAddress, ethAmount);
// Send transaction using Para wallet client
const hash = await walletClient.sendTransaction({
account: userAddress,
to: toAddress,
value: parseEther(ethAmount),
chain: holesky,
maxFeePerGas: parseGwei("100"),
maxPriorityFeePerGas: parseGwei("3")
});
console.log("Transaction sent:", hash);
// Wait for confirmation
const receipt = await publicClient.waitForTransactionReceipt({ hash });
console.log("Transaction confirmed:", receipt.transactionHash);
console.log("Block number:", receipt.blockNumber);
console.log("Gas used:", receipt.gasUsed.toString());
return {
hash: receipt.transactionHash,
blockNumber: receipt.blockNumber,
gasUsed: receipt.gasUsed.toString(),
status: receipt.status === "success" ? "success" : "failed"
};
};
```
## Complete Implementation Example
### Full Transfer Function
```typescript
import { ethers, parseEther, formatEther, toBigInt } from "ethers";
import { ParaEthersSigner } from "@getpara/ethers-v6-integration";
class EthersTransferService {
private provider: ethers.JsonRpcProvider;
private signer: ParaEthersSigner;
constructor(rpcUrl: string, paraClient: any) {
this.provider = new ethers.JsonRpcProvider(rpcUrl);
this.signer = new ParaEthersSigner(paraClient, this.provider);
}
async transfer(toAddress: string, ethAmount: string, fromAddress: string) {
try {
// Validate inputs
if (!ethers.isAddress(toAddress)) {
throw new Error("Invalid recipient address");
}
// Check balance
const balance = await this.provider.getBalance(fromAddress);
const amount = parseEther(ethAmount);
const feeData = await this.provider.getFeeData();
const gasLimit = toBigInt(21000);
const maxGasFee = gasLimit * (feeData.maxFeePerGas ?? toBigInt(0));
if (balance < amount + maxGasFee) {
throw new Error("Insufficient balance for transfer and gas");
}
// Construct and send transaction
const nonce = await this.provider.getTransactionCount(fromAddress);
const transaction = {
to: toAddress,
value: amount,
nonce: nonce,
gasLimit: gasLimit,
maxFeePerGas: feeData.maxFeePerGas,
maxPriorityFeePerGas: feeData.maxPriorityFeePerGas,
chainId: 17000
};
const txResponse = await this.signer.sendTransaction(transaction);
const receipt = await txResponse.wait();
return {
success: true,
hash: receipt.hash,
blockNumber: receipt.blockNumber,
gasUsed: receipt.gasUsed.toString()
};
} catch (error) {
console.error("Transfer failed:", error);
throw error;
}
}
}
```
```typescript
import {
createPublicClient,
createParaViemClient,
createParaAccount,
http,
parseEther,
formatEther,
parseGwei,
isAddress
} from "viem";
import { holesky } from "viem/chains";
class ViemTransferService {
private publicClient: any;
private walletClient: any;
constructor(rpcUrl: string, paraClient: any) {
this.publicClient = createPublicClient({
chain: holesky,
transport: http(rpcUrl)
});
const account = createParaAccount(paraClient);
this.walletClient = createParaViemClient(paraClient, {
account,
chain: holesky,
transport: http(rpcUrl)
});
}
async transfer(
toAddress: `0x${string}`,
ethAmount: string,
fromAddress: `0x${string}`
) {
try {
// Validate inputs
if (!isAddress(toAddress)) {
throw new Error("Invalid recipient address");
}
// Check balance and estimate gas
const balance = await this.publicClient.getBalance({ address: fromAddress });
const amount = parseEther(ethAmount);
const estimatedGas = await this.publicClient.estimateGas({
account: fromAddress,
to: toAddress,
value: amount
});
const gasPrice = await this.publicClient.getGasPrice();
const estimatedGasCost = estimatedGas * gasPrice;
if (balance < amount + estimatedGasCost) {
throw new Error("Insufficient balance for transfer and gas");
}
// Send transaction
const hash = await this.walletClient.sendTransaction({
account: fromAddress,
to: toAddress,
value: amount,
chain: holesky,
maxFeePerGas: parseGwei("100"),
maxPriorityFeePerGas: parseGwei("3")
});
const receipt = await this.publicClient.waitForTransactionReceipt({ hash });
return {
success: true,
hash: receipt.transactionHash,
blockNumber: receipt.blockNumber,
gasUsed: receipt.gasUsed.toString()
};
} catch (error) {
console.error("Transfer failed:", error);
throw error;
}
}
}
```
## Key Differences
### Library Comparison
| Feature | Ethers v6 | Viem v2 |
|---------|-----------|---------|
| **Provider Setup** | `JsonRpcProvider` | `createPublicClient` |
| **Wallet Client** | `ParaEthersSigner` | `createParaViemClient` |
| **Unit Parsing** | `parseEther()` | `parseEther()` |
| **Gas Estimation** | `getFeeData()` | `estimateGas()` + `getGasPrice()` |
| **Transaction Send** | `signer.sendTransaction()` | `walletClient.sendTransaction()` |
| **Receipt Waiting** | `txResponse.wait()` | `publicClient.waitForTransactionReceipt()` |
| **Address Validation** | `ethers.isAddress()` | `isAddress()` |
### Gas Strategy Differences
```typescript
// Ethers uses provider fee data
const feeData = await provider.getFeeData();
const transaction = {
maxFeePerGas: feeData.maxFeePerGas,
maxPriorityFeePerGas: feeData.maxPriorityFeePerGas
};
```
```typescript
// Viem allows manual gas price setting
const transaction = {
maxFeePerGas: parseGwei("100"),
maxPriorityFeePerGas: parseGwei("3")
};
```
## Best Practices
### Transaction Safety
- **Always validate recipient addresses** before sending
- **Check balance including gas costs** before transaction construction
- **Use appropriate gas limits** (21000 for basic ETH transfers)
- **Handle network errors gracefully** with proper try/catch blocks
- **Wait for receipt confirmation** before considering transaction complete
### Gas Optimization
- **Monitor network conditions** for optimal gas pricing
- **Use EIP-1559 gas parameters** for better fee prediction
- **Estimate gas dynamically** rather than using static values
- **Consider gas limit buffers** for complex operations
### Error Handling
Common errors to handle:
- Invalid recipient addresses
- Insufficient balance
- Network connectivity issues
- Transaction reversion
- Nonce management conflicts
## Next Steps
Learn to transfer ERC-20 tokens
Track transaction status and confirmations
## Related Walkthroughs
Intermediate · 20 min · SOL transfers and Solana programs
Intermediate · 20 min · Structured data signing
Advanced · 45 min · Lending, borrowing, and yield strategies
# Inco Integration
Source: https://docs.getpara.com/v2/walkthroughs/inco
This guide demonstrates how to create a seamless private payment flow using Para SDK with Inco's confidential wrapper. The app allows users to deposit, check balances, send confidential transfers, and withdraw with encrypted amounts.
Only transaction amounts are encrypted. Sender and receiver addresses are not.
## Overview
Inco offers confidential transaction capabilities where token amounts are encrypted, providing privacy for:
- **Confidential Transfers:** Token amounts are encrypted. The sender, recipient addresses, and asset are visible, but the transfer amount remains private.
- **Private Balance:** User balances are stored encrypted and can only be decrypted by the account owner through cryptographic attestation.
## Prerequisites
- Node.js 20+
- Next.js project
- pnpm package manager
- A Para API key from the [Para Developer Portal](https://developer.getpara.com)
- WalletConnect project ID
## Environment Setup
Create a `.env` file in the project root:
```bash
# Contract Addresses (Base Sepolia)
NEXT_PUBLIC_ERC20_CONTRACT_ADDRESS=0x2a7f20a455b35ea3cff416f71ddb30e0edf5c9fe
NEXT_PUBLIC_ENCRYPTED_ERC20_CONTRACT_ADDRESS=0x3b9cabcf20eda599c5df823f46eb2eabe99bda40
# Inco Configuration
NEXT_PUBLIC_INCO_ENV=demonet
# Para configuration
NEXT_PUBLIC_PARA_API_KEY=your-para-api-key
NEXT_PUBLIC_PARA_ENVIRONMENT=BETA
# WalletConnect (used by Para for external wallets)
NEXT_PUBLIC_WALLET_CONNECT_PROJECT_ID=your-walletconnect-project-id
```
To obtain values of `NEXT_PUBLIC_PARA_API_KEY` and `NEXT_PUBLIC_PARA_ENVIRONMENT` visit [Para](https://www.getpara.com/).
## Installation
```bash
pnpm install @getpara/react-sdk@^2.6.0 @inco/js@^0.7.7 wagmi@^2.19.5 viem@^2.44.4
```
## Para Wallet Integration
### 1. Configuration Setup
```tsx
// src/config/constants.ts
import { Environment } from "@getpara/react-sdk";
export const API_KEY = process.env.NEXT_PUBLIC_PARA_API_KEY ?? "";
export const ENVIRONMENT = (process.env.NEXT_PUBLIC_PARA_ENVIRONMENT as Environment) || Environment.BETA;
if (!API_KEY) {
throw new Error("Missing NEXT_PUBLIC_PARA_API_KEY environment variable");
}
```
### 2. Para Provider Setup
```tsx
// src/context/para-provider.tsx
"use client";
import { useState } from "react";
import { ParaProvider as Provider } from "@getpara/react-sdk";
import { QueryClient, QueryClientProvider } from "@tanstack/react-query";
import { cookieStorage, createStorage, http } from "wagmi";
import { baseSepolia as chain } from "wagmi/chains";
import { createPublicClient } from "viem";
import { API_KEY, ENVIRONMENT } from "@/config/constants";
const BASE_SEPOLIA_RPC_URL = "your-base-sepolia-rpc-url";
export const baseSepolia = {
...chain,
rpcUrls: {
default: {
http: [BASE_SEPOLIA_RPC_URL],
},
},
};
export const publicClient = createPublicClient({
chain: baseSepolia,
transport: http(BASE_SEPOLIA_RPC_URL),
});
export function ParaProvider({
children,
}: {
children: React.ReactNode;
}) {
const [queryClient] = useState(() => new QueryClient());
return (
{children}
);
}
```
### 3. Root Layout Integration
```tsx
// src/app/layout.tsx
import type { Metadata } from "next";
import { Geist, Geist_Mono } from "next/font/google";
import "./globals.css";
import { ParaProvider } from "@/context/para-provider";
export default function RootLayout({
children,
}: Readonly<{
children: React.ReactNode;
}>) {
return (
{children}
);
}
```
### 4. Connect Wallet Component
```tsx
// src/components/connect-wallet.tsx
"use client";
import { useModal } from "@getpara/react-sdk";
import { useAccount } from "wagmi";
export default function ConnectWallet() {
const { openModal } = useModal();
const { address, isConnected } = useAccount();
return (
{isConnected ? (
Connected to {address}
) : (
)}
Mint ERC20
);
};
export default MintERC20;
```
### 2. Balance Checking
```tsx
// src/components/encrypted-balance.tsx
import React, { useState } from 'react';
import { type Address } from 'viem';
import { useAccount, useBalance, useWalletClient } from 'wagmi';
import { getEncryptedBalance } from '@/lib/balance-utils';
import { publicClient } from '@/context/para-provider';
const BalanceDisplay = () => {
const { data: walletClient } = useWalletClient();
const { address } = useAccount();
const [encryptedBalance, setEncryptedBalance] = useState('0');
const ERC20Balance = useBalance({
address: address as Address,
token: process.env.NEXT_PUBLIC_ERC20_CONTRACT_ADDRESS as Address,
});
const handleFetchBalance = async () => {
if (address && publicClient && walletClient) {
const result = await getEncryptedBalance({
address,
publicClient,
walletClient,
encryptedERC20Address: process.env.NEXT_PUBLIC_ENCRYPTED_ERC20_CONTRACT_ADDRESS as Address,
incoEnv: process.env.NEXT_PUBLIC_INCO_ENV as 'testnet' | 'devnet',
});
if (result) setEncryptedBalance(result);
}
};
return (
ERC20 Balance
{ERC20Balance?.data?.formatted} {ERC20Balance?.data?.symbol}
Encrypted Balance
{encryptedBalance} Tokens
);
};
export default BalanceDisplay;
```
### 3. Wrapping Tokens (Deposit)
```tsx
// src/components/wrap.tsx
'use client';
import { useAccount, useWalletClient } from 'wagmi';
import { type Address } from 'viem';
import { approveTokens, wrapTokens } from '@/lib/wrap-utils';
import { publicClient } from '@/context/para-provider';
export default function WrapTokens() {
const { data: walletClient } = useWalletClient();
const { address } = useAccount();
const handleWrap = async () => {
if (!walletClient || !address) return;
const amount = '0.01';
// Step 1: Approve tokens
const approveTx = await approveTokens({
walletClient,
address,
amount,
erc20Address: process.env.NEXT_PUBLIC_ERC20_CONTRACT_ADDRESS as Address,
encryptedERC20Address: process.env.NEXT_PUBLIC_ENCRYPTED_ERC20_CONTRACT_ADDRESS as Address,
});
await publicClient?.waitForTransactionReceipt({ hash: approveTx });
// Step 2: Wrap tokens
const wrapTx = await wrapTokens({
walletClient,
address,
amount,
encryptedERC20Address: process.env.NEXT_PUBLIC_ENCRYPTED_ERC20_CONTRACT_ADDRESS as Address,
});
await publicClient?.waitForTransactionReceipt({ hash: wrapTx });
};
return (
Wrap Tokens
);
}
```
### 4. Confidential Transfer
```tsx
// src/components/confidential-transfer.tsx
import React, { useState } from "react";
import { Address } from "viem";
import { useAccount, useWalletClient } from "wagmi";
import { confidentialTransfer } from "@/lib/confidential-send";
import { publicClient } from "@/context/para-provider";
const ConfidentialTransfer = () => {
const [recipient, setRecipient] = useState("0x");
const { address } = useAccount();
const { data: walletClient } = useWalletClient();
const transferConfidentialERC20 = async () => {
const txHash = await confidentialTransfer({
amount: "0.01",
address: address,
recipient: recipient,
walletClient: walletClient,
publicClient: publicClient,
encryptedERC20Address:
process.env.NEXT_PUBLIC_ENCRYPTED_ERC20_CONTRACT_ADDRESS as Address,
incoEnv: "testnet",
});
await publicClient?.waitForTransactionReceipt({ hash: txHash });
};
return (
setRecipient(e.target.value as Address)}
placeholder="Recipient address"
/>
);
};
export default ConfidentialTransfer;
```
### 5. Unwrapping Tokens (Withdraw)
```tsx
// src/components/unwrap.tsx
import { unwrapTokens } from "@/lib/unwrap-utils";
import React from "react";
import { useAccount, useWalletClient } from "wagmi";
import { publicClient } from "@/context/para-provider";
const Unwrap = () => {
const { data: walletClient } = useWalletClient();
const { address } = useAccount();
const handleUnwrap = async () => {
if (!walletClient || !address) return;
const unwrapTx = await unwrapTokens({
publicClient,
walletClient,
address,
amount: "0.01",
encryptedERC20Address:
process.env.NEXT_PUBLIC_ENCRYPTED_ERC20_CONTRACT_ADDRESS,
incoEnv: process.env.NEXT_PUBLIC_INCO_ENV,
});
};
return (
Unwrap
);
};
export default Unwrap;
```
## Utility Functions
### Inco Lite Utilities
```tsx
// src/lib/inco-lite.ts
import { Lightning, AttestedComputeSupportedOps } from '@inco/js/lite';
import { handleTypes } from '@inco/js';
import { baseSepolia } from 'viem/chains';
import { type PublicClient, type WalletClient, bytesToHex, pad, toHex } from 'viem';
type IncoEnv = 'testnet' | 'devnet';
async function getConfig(env: IncoEnv) {
return await Lightning.latest(env, baseSepolia.id);
}
export async function encryptValue({
value,
address,
contractAddress,
env,
}: {
value: bigint;
address: `0x${string}`;
contractAddress: `0x${string}`;
env: IncoEnv;
}): Promise<`0x${string}`> {
const inco = await getConfig(env);
const encrypted = await inco.encrypt(value, {
accountAddress: address,
dappAddress: contractAddress,
handleType: handleTypes.euint256,
});
return encrypted as `0x${string}`;
}
export async function decryptValue({
walletClient,
handle,
env,
}: {
walletClient: WalletClient;
handle: string;
env: IncoEnv;
}): Promise {
const inco = await getConfig(env);
const decrypted = await inco.attestedDecrypt(walletClient, [handle]);
return decrypted[0].plaintext.value;
}
export async function attestedCompute({
walletClient,
lhsHandle,
op,
rhsPlaintext,
env,
}: {
walletClient: WalletClient;
lhsHandle: `0x${string}`;
op: AttestedComputeSupportedOps;
rhsPlaintext: bigint;
env: IncoEnv;
}) {
const inco = await getConfig(env);
const result = await inco.attestedCompute(
walletClient,
lhsHandle,
op,
rhsPlaintext
);
const plaintext = result.plaintext;
const attestation = {
handle: result.attestation.handle,
value: encodePlaintext(plaintext),
};
const signatures = result.attestation.covalidatorSignatures.map((sig) =>
bytesToHex(sig)
);
return { plaintext, attestation, signatures };
}
function encodePlaintext(value: unknown): `0x${string}` {
if (typeof value === 'boolean') {
return value ? `0x${'0'.repeat(63)}1` : `0x${'0'.repeat(64)}`;
}
if (typeof value === 'bigint') {
return pad(toHex(value), { size: 32 });
}
throw new Error('Unsupported plaintext type');
}
export async function getFee(env: IncoEnv, publicClient: PublicClient): Promise {
const inco = await getConfig(env);
const fee = await publicClient.readContract({
address: inco.executorAddress,
abi: [
{
type: "function",
inputs: [],
name: "getFee",
outputs: [{ name: "", internalType: "uint256", type: "uint256" }],
stateMutability: "pure",
},
],
functionName: "getFee",
});
return fee;
}
```
### Balance Utilities
```tsx
// src/lib/balance-utils.ts
import { formatEther, type Address, type PublicClient, type WalletClient } from 'viem';
import { decryptValue } from './inco-lite';
import { baseSepolia } from '@/context/para-provider';
export const getEncryptedBalance = async ({
address,
publicClient,
walletClient,
encryptedERC20Address,
incoEnv,
}: {
address: Address;
publicClient: PublicClient;
walletClient: WalletClient;
encryptedERC20Address: Address;
incoEnv: 'testnet' | 'devnet';
}) => {
try {
if (!publicClient || !walletClient || !address) {
return '0';
}
const encryptedHandle = await publicClient.readContract({
address: encryptedERC20Address,
abi: [
{
inputs: [{ internalType: 'address', name: 'account', type: 'address' }],
name: 'balanceOf',
outputs: [{ internalType: 'bytes32', name: '', type: 'bytes32' }],
stateMutability: 'view',
type: 'function',
},
],
functionName: 'balanceOf',
args: [address],
});
if (encryptedHandle === '0x' + '0'.repeat(64)) {
return '0';
}
const decrypted = await decryptValue({
walletClient: { ...walletClient, chain: baseSepolia },
handle: encryptedHandle,
env: incoEnv,
});
return formatEther(decrypted);
} catch (error) {
console.error('Failed to fetch encrypted balance:', error);
return '0';
}
};
```
### Wrap Utilities
```tsx
// src/lib/wrap-utils.ts
import { parseEther, type Address, type WalletClient } from 'viem';
import { baseSepolia } from '@/context/para-provider';
export const approveTokens = async ({
walletClient,
address,
amount,
erc20Address,
encryptedERC20Address,
}: {
walletClient: WalletClient;
address: Address;
amount: string;
erc20Address: Address;
encryptedERC20Address: Address;
}) => {
const amountInWei = parseEther(amount);
return walletClient.writeContract({
address: erc20Address,
account: address,
chain: baseSepolia,
abi: [
{
inputs: [
{ internalType: 'address', name: 'spender', type: 'address' },
{ internalType: 'uint256', name: 'value', type: 'uint256' },
],
name: 'approve',
outputs: [{ internalType: 'bool', name: '', type: 'bool' }],
stateMutability: 'nonpayable',
type: 'function',
},
] as const,
functionName: 'approve',
args: [encryptedERC20Address, amountInWei],
});
};
export const wrapTokens = async ({
walletClient,
address,
amount,
encryptedERC20Address,
}: {
walletClient: WalletClient;
address: Address;
amount: string;
encryptedERC20Address: Address;
}) => {
const amountInWei = parseEther(amount);
return walletClient.writeContract({
address: encryptedERC20Address,
account: address,
chain: baseSepolia,
abi: [
{
inputs: [{ internalType: 'uint256', name: 'amount', type: 'uint256' }],
name: 'wrap',
outputs: [],
stateMutability: 'nonpayable',
type: 'function',
},
] as const,
functionName: 'wrap',
args: [amountInWei],
});
};
```
### Confidential Transfer Utilities
```tsx
// src/lib/confidential-send.ts
import {
type Address,
type PublicClient,
type WalletClient,
parseEther,
} from 'viem';
import { encryptValue, getFee } from './inco-lite';
import { baseSepolia } from '@/context/para-provider';
export const confidentialTransfer = async ({
amount,
address,
recipient,
walletClient,
publicClient,
encryptedERC20Address,
incoEnv,
}: {
amount: string;
address: Address;
recipient: Address;
publicClient: PublicClient;
walletClient: WalletClient;
encryptedERC20Address: Address;
incoEnv: 'testnet' | 'devnet';
}) => {
try {
const amountInWei = parseEther(amount);
const encryptedAmount = await encryptValue({
value: amountInWei,
address,
contractAddress: encryptedERC20Address,
env: incoEnv,
});
const fee = await getFee(incoEnv, publicClient);
return walletClient.writeContract({
address: encryptedERC20Address,
chain: baseSepolia,
abi: [
{
inputs: [
{ internalType: 'address', name: 'to', type: 'address' },
{ internalType: 'bytes', name: 'encryptedAmount', type: 'bytes' },
],
name: 'transfer',
outputs: [{ internalType: 'bool', name: '', type: 'bool' }],
stateMutability: 'payable',
type: 'function',
},
],
functionName: 'transfer',
args: [recipient, encryptedAmount],
account: address,
value: fee,
});
} catch (error) {
console.error('Error in confidential transfer:', error);
throw error;
}
};
```
### Unwrap Utilities
```tsx
// src/lib/unwrap-utils.ts
import {
type Address,
type PublicClient,
type WalletClient,
parseEther,
} from 'viem';
import { AttestedComputeSupportedOps } from '@inco/js/lite';
import { attestedCompute } from './inco-lite';
import { baseSepolia } from '@/context/para-provider';
export const unwrapTokens = async ({
publicClient,
walletClient,
address,
amount,
encryptedERC20Address,
incoEnv,
}: {
publicClient: PublicClient;
walletClient: WalletClient;
address: Address;
amount: string;
encryptedERC20Address: Address;
incoEnv: 'testnet' | 'devnet';
}) => {
try {
const amountInWei = parseEther(amount);
const balanceHandle = await publicClient.readContract({
address: encryptedERC20Address,
abi: [
{
inputs: [{ internalType: 'address', name: 'account', type: 'address' }],
name: 'balanceOf',
outputs: [{ internalType: 'bytes32', name: '', type: 'bytes32' }],
stateMutability: 'view',
type: 'function',
},
],
functionName: 'balanceOf',
args: [address],
});
const { attestation, signatures } = await attestedCompute({
walletClient: {...walletClient, chain: baseSepolia},
lhsHandle: balanceHandle as `0x${string}`,
op: AttestedComputeSupportedOps.Ge,
rhsPlaintext: amountInWei,
env: incoEnv,
});
const unwrapTx = await walletClient.writeContract({
address: encryptedERC20Address,
chain: baseSepolia,
abi: [
{
inputs: [
{ internalType: 'uint256', name: 'amount', type: 'uint256' },
{
internalType: 'tuple',
name: 'enoughBalanceDecryptionAttestation',
components: [
{ internalType: 'bytes32', name: 'handle', type: 'bytes32' },
{ internalType: 'bytes32', name: 'value', type: 'bytes32' },
],
type: 'tuple',
},
{ internalType: 'bytes[]', name: 'signature', type: 'bytes[]' },
],
name: 'unwrap',
outputs: [],
stateMutability: 'nonpayable',
type: 'function',
},
],
functionName: 'unwrap',
args: [amountInWei, attestation, signatures],
account: address,
});
await publicClient.waitForTransactionReceipt({
hash: unwrapTx,
confirmations: 5,
});
return unwrapTx;
} catch (error) {
console.error('Unwrap error:', error);
throw error;
}
};
```
## Conclusion
With Para, setting up secure, user-friendly access to Inco Confidential Wrapper contracts is fast and easy.
## Related Walkthroughs
Intermediate · 25 min · Zero-knowledge virtual machine
Advanced · 45 min · Cross-chain USDC bridges
Intermediate · 20 min · Send ETH with Ethers and Viem
# Para + M0 Integration
Source: https://docs.getpara.com/v2/walkthroughs/m0
Para's embedded wallets [provide seamless access to M0's programmable stablecoin infrastructure](https://blog.getpara.com/money-movement/). Build next-generation financial applications with custom digital dollars.
Learn about M0's stablecoin protocol
## Prerequisites
- Para API key configured
- Node.js 18+ environment
- Understanding of stablecoin mechanics
- [M0 contract addresses](https://docs.m0.org/home/overview/) for your network
## Installation
Install the required packages:
```bash
npm install @getpara/server-sdk @getpara/viem-v2-integration viem@^2
```
## Setup
Import the required Para SDK and Viem components:
```typescript
import { ParaServer } from "@getpara/server-sdk";
import { createParaViemClient, createParaAccount } from "@getpara/viem-integration";
import { http } from 'viem';
import { mainnet } from 'viem/chains';
```
Set up Para server instance:
```typescript
const para = new ParaServer(process.env.PARA_API_KEY);
```
Check for existing wallet or create new pregenerated wallet:
```typescript
const hasWallet = await para.hasPregenWallet({
pregenId: { email: 'user@example.com' },
});
let pregenWallet;
if (!hasWallet) {
pregenWallet = await para.createPregenWallet({
type: 'EVM',
pregenId: { email: "user@example.com" },
});
}
```
Set up the account and Viem client for M0 interactions:
```typescript
const account = await createParaAccount(para);
const client = createParaViemClient(para, {
account,
chain: mainnet,
transport: http(),
});
```
## Contract Configuration
### M0 Contract Addresses
```typescript
const M_ADDRESS = '0x866A2BF4E572CbcF37D5071A7a58503Bfb36be1b';
const WM_ADDRESS = '0x437cc33344a0B27A429f795ff6B469C72698B291';
```
### Contract ABIs
```typescript
const ERC20_ABI = [
{ name: 'approve', type: 'function', inputs: [{ name: 'spender', type: 'address' }, { name: 'amount', type: 'uint256' }], outputs: [{ type: 'bool' }] },
{ name: 'transfer', type: 'function', inputs: [{ name: 'recipient', type: 'address' }, { name: 'amount', type: 'uint256' }], outputs: [{ type: 'bool' }] }
];
const WM_ABI = [
{ name: 'wrap', type: 'function', inputs: [{ name: 'recipient', type: 'address' }, { name: 'amount', type: 'uint256' }], outputs: [{ type: 'uint240' }] },
{ name: 'unwrap', type: 'function', inputs: [{ name: 'recipient', type: 'address' }, { name: 'amount', type: 'uint256' }], outputs: [{ type: 'uint240' }] }
];
```
## Usage
### Wrapping \$M to \$wM
```typescript
async function wrapMToWM(amount) {
const approveHash = await client.writeContract({
address: M_ADDRESS,
abi: ERC20_ABI,
functionName: 'approve',
args: [WM_ADDRESS, amount]
});
console.log('Approve hash:', approveHash);
```
```typescript
const wrapHash = await client.writeContract({
address: WM_ADDRESS,
abi: WM_ABI,
functionName: 'wrap',
args: [account.address, amount]
});
console.log('Wrap hash:', wrapHash);
}
```
### Unwrapping \$wM to \$M
```typescript
async function unwrapWMToM(amount) {
const unwrapHash = await client.writeContract({
address: WM_ADDRESS,
abi: WM_ABI,
functionName: 'unwrap',
args: [account.address, amount]
});
console.log('Unwrap hash:', unwrapHash);
}
```
### Token Transfers
```typescript
async function transferToken(tokenAddress, recipient, amount) {
const transferHash = await client.writeContract({
address: tokenAddress,
abi: ERC20_ABI,
functionName: 'transfer',
args: [recipient, amount]
});
console.log('Transfer hash:', transferHash);
}
```
## Examples
### Basic Operations
```typescript
await wrapMToWM(1000000n);
await unwrapWMToM(1000000n);
await transferToken(M_ADDRESS, '0xRecipientAddress', 1000000n);
```
## Next Steps
Learn about M0's stablecoin protocol
Deep dive into wallet pregeneration
## Related Walkthroughs
Advanced · 45 min · Lending, borrowing, and yield strategies
Beginner · 20 min · Stablecoin issuance API
Advanced · 45 min · Cross-chain USDC bridges
# Miden Integration
Source: https://docs.getpara.com/v2/walkthroughs/miden
## What is Miden?
[Miden](https://miden.xyz/) is a zero-knowledge virtual machine (zkVM) built by Polygon. It enables developers to build high-throughput, privacy-preserving applications with:
- **Client-side proving**: Users generate proofs locally, enabling private transactions
- **Parallel transaction execution**: Transactions can be processed concurrently for high throughput
- **Programmable accounts**: Flexible account logic using Miden Assembly or higher-level languages
- **Privacy by default**: Transaction details remain private while maintaining verifiability
## What the Para Integration Enables
Integrating Para with Miden gives your users:
- **Seamless onboarding**: Users can create Miden accounts using familiar authentication methods (email, social login, passkeys) without managing seed phrases
- **Embedded wallet experience**: Para's distributed MPC infrastructure secures user keys while maintaining a smooth UX
- **Cross-platform support**: Build web and React applications that connect to Miden with consistent wallet functionality
To integrate Para on Miden, please visit [`miden-para`](https://github.com/0xMiden/miden-para).
## Prerequisites
Before getting started, you'll need:
- A Para API key from the [Para Developer Portal](https://developer.getpara.com)
- Node.js installed in your development environment
- Yarn 1.22.22 or later (required by miden-para)
## Installation
Install `miden-para` along with its peer dependencies:
```bash
yarn add miden-para @demox-labs/miden-sdk@^0.12.5 @getpara/web-sdk@2.0.0-alpha.73
```
The `miden-para` package requires specific versions of peer dependencies to avoid duplicate copies. Make sure to install the exact versions shown above.
## Basic Setup
```typescript
import { MidenPara } from "miden-para";
const midenPara = new MidenPara({
paraApiKey: process.env.PARA_API_KEY,
// Additional configuration options
});
```
### Private Storage Mode
When using `storageMode: "private"`, you must provide an `accountSeed` parameter to ensure private accounts remain recoverable:
```typescript
const midenPara = new MidenPara({
paraApiKey: process.env.PARA_API_KEY,
storageMode: "private",
accountSeed: "your-account-seed", // Required for private mode
});
```
Never hardcode your account seed in production code. Use secure environment variables or a secrets manager.
## React Integration
For React applications, the Miden team provides dedicated hooks via the `use-miden-para-react` package:
```bash
yarn add use-miden-para-react
```
## Scaffolding a New Project
To quickly bootstrap a new project with Miden and Para integration, use the scaffolding tool:
```bash
npx create-miden-para-react my-miden-app
cd my-miden-app
yarn install
yarn dev
```
This creates a Vite-based React TypeScript project with Para and Miden pre-configured.
## Features In Progress
Miden is currently on testnet. The following features are being developed:
### On-Ramps
The Miden team is working on on-ramp solutions to allow users to fund their Miden accounts directly. This feature will be available as Miden progresses toward mainnet.
## Resources
- [Miden Website](https://miden.xyz/)
- [Miden Documentation](https://docs.polygon.technology/miden/)
- [miden-para GitHub Repository](https://github.com/0xMiden/miden-para)
## Next Steps
Learn more about Para's Web SDK features and configuration options
Explore Para's React SDK for building web applications
## Related Walkthroughs
Intermediate · 30 min · Confidential payment flows
Intermediate · 25 min · Micropayments over HTTP
Intermediate · 25 min · Large-scale wallet generation
# Automated Migration to Para with MCP
Source: https://docs.getpara.com/v2/walkthroughs/migration-mcp
The [Para Migration MCP Server](https://github.com/getpara/Para-Migration-MCP) is an AI-powered Model Context Protocol (MCP) server that automates wallet provider migrations to Para. Instead of manually rewriting providers, hooks, imports, and configuration, you can run the migration through your AI coding assistant and have it handle the entire process atomically — all changes succeed together or roll back automatically.
It works with Claude Code, Cursor, and Claude Desktop, and supports migrations from Privy, Reown (AppKit), Web3Modal, and WalletConnect.
## Supported Migration Paths
| Source Provider | Strategy | Description |
|---|---|---|
| Privy | `privy-to-para` | Replaces `PrivyProvider`, `usePrivy`, `useWallets`, and related hooks |
| Reown / AppKit | `reown-to-para` | Replaces `AppKit`, `useAppKit`, `useAppKitAccount`, and related hooks |
| Web3Modal | `web3modal-to-para` | Replaces `Web3Modal`, `useWeb3Modal`, `useWeb3ModalAccount`, and related hooks |
| WalletConnect | `walletconnect-to-para` | Replaces WalletConnect provider and connector configuration |
## Prerequisites
Before starting, make sure you have:
- A Para API key from the [Developer Portal](https://developer.getpara.com/)
- Node.js 18+ installed
- An existing project using one of the supported wallet providers above
- An AI tool that supports MCP: [Claude Code](https://docs.anthropic.com/en/docs/claude-code), [Cursor](https://www.cursor.com/), or [Claude Desktop](https://claude.ai/download)
## Installation
Add the Migration MCP server to your AI tool of choice:
Run the following command in your terminal:
```bash
claude mcp add para-migration -- npx -y para-migration-mcp
```
Restart Claude Code to pick up the new server.
Add the following to your `.cursor/mcp.json` file (create it if it doesn't exist):
```json .cursor/mcp.json
{
"mcpServers": {
"para-migration": {
"command": "npx",
"args": ["-y", "para-migration-mcp"]
}
}
}
```
Restart Cursor to pick up the new server.
Add the following to your Claude Desktop configuration file:
- **macOS**: `~/Library/Application Support/Claude/claude_desktop_config.json`
- **Windows**: `%APPDATA%\Claude\claude_desktop_config.json`
```json claude_desktop_config.json
{
"mcpServers": {
"para-migration": {
"command": "npx",
"args": ["-y", "para-migration-mcp"]
}
}
}
```
Restart Claude Desktop to pick up the new server.
## Step-by-Step Migration
Once the MCP server is connected, walk through these steps in your AI tool's chat interface. Each step corresponds to an MCP tool that runs automatically behind the scenes.
Start by asking your AI assistant to analyze your project:
```text
Analyze my project at ./my-app for wallet provider usage
```
This runs the `analyze_project` tool, which scans your project's dependencies, imports, provider components, hooks, and styles. It returns:
- The detected wallet provider (Privy, Reown, Web3Modal, or WalletConnect)
- The recommended migration strategy
- A summary of all provider-related code found (hooks, providers, imports)
If your project uses a non-standard structure, you can also specify the path to your `package.json` directly.
Para maintains full [Wagmi](https://wagmi.sh/) compatibility, so your existing Wagmi hooks continue to work after migration. Verify this by asking:
```text
Check Wagmi hook compatibility for my project at ./my-app
```
This runs `check_compatibility` and reports which Wagmi hooks are in use and whether they're compatible with Para's provider.
Before making any changes, preview what the migration will do:
```text
Run a dry run migration from Privy to Para for my project at ./my-app
```
This runs `execute_atomic_migration` with `dryRun: true`. It returns a detailed list of every operation that **would** be performed — dependency removals, import replacements, provider swaps, hook updates, and CSS additions — without actually modifying any files.
Review the output to make sure you're comfortable with the changes.
When you're ready, execute the migration:
```text
Execute the atomic migration from Privy to Para for my project at ./my-app
```
This runs `execute_atomic_migration` with `dryRun: false`. The migration is **atomic** — either all operations succeed together, or everything rolls back to the original state. You'll never be left with a half-migrated project.
The tool will:
1. Remove old wallet provider imports
2. Add Para SDK imports
3. Replace provider components with `ParaProvider`
4. Update hook usages (e.g., `usePrivy` becomes `useAccount`)
5. Add Para CSS imports to your entry point
Make sure your project is committed to version control before running the migration, so you can easily review the diff afterward.
After the migration completes, run validation to catch the issues that cause 90% of migration failures:
```text
Validate my Para migration at ./my-app
```
This runs `validate_para_migration` and checks for five critical issues:
1. **ParaModal missing** — `` must be rendered inside ``
2. **CSS imports missing** — `@getpara/react-sdk/styles.css` must be imported in your entry point
3. **Environment enum** — Must use `Environment.DEVELOPMENT` (not the string `"development"`)
4. **Old dependencies present** — Old provider packages should be fully removed
5. **Para dependencies missing** — `@getpara/react-sdk` must be installed
You can also check the overall migration completion percentage:
```text
Check migration completion state for ./my-app
```
This runs `validate_migration_state` and returns a breakdown of how much of the migration is complete across dependencies, imports, providers, hooks, and styles.
Based on the validation output, update your dependencies:
```bash Terminal
# Remove old provider packages
npm uninstall @privy-io/react-auth # For Privy migrations
npm uninstall @reown/appkit @reown/appkit-adapter-wagmi # For Reown migrations
npm uninstall @web3modal/wagmi # For Web3Modal migrations
# Install Para SDK
npm install @getpara/react-sdk
```
Then run your project to verify everything works:
```bash Terminal
npm run dev
```
## Generating Additional Components
If you need to generate specific components after the migration, the MCP server includes several code generation tools you can invoke through your AI assistant.
### Provider Component
Generate a production-ready `ParaProvider` component:
```text
Generate a Para provider component with my API key and mainnet + polygon chains
```
This runs `generate_provider_component` and outputs a complete provider with `ParaModal`, CSS imports, and `Environment` enum already configured correctly.
### Connect Button
Generate a styled wallet connection button:
```text
Generate a Para connect button with Tailwind styling
```
Supported styling options: `tailwind`, `styled-components`, `css-modules`, or `none`.
### CSS Imports
Auto-detect your project's entry point and generate the correct CSS import:
```text
Generate CSS imports for my project at ./my-app
```
This runs `generate_css_imports` and detects whether your entry point is `main.tsx`, `layout.tsx`, `_app.tsx`, or another file, then generates the appropriate import statement.
### Hook Migration Examples
See before/after examples of how hooks change during migration:
```text
Show me hook migration examples from Privy to Para
```
This runs `generate_hooks_examples` and shows the mapping for each hook — for example, `usePrivy` becomes `useAccount`, `useWallets` becomes `useWallet`, and so on. Supported source providers: `privy`, `reown`, `walletconnect`.
### Next.js Layout with Styles
Generate a complete Next.js root layout with Para styles properly imported:
```text
Generate a Next.js layout with Para styles
```
This runs `generate_layout_with_styles` and outputs a `layout.tsx` file with the `@getpara/react-sdk/styles.css` import in the correct location.
## Common Issues
**Missing ParaModal**: The most common migration issue. `` must be rendered inside your `` component. Without it, the wallet connection modal won't appear. The migration tool adds this automatically, but verify it's present after migration.
**Missing CSS Import**: Para's modal requires its stylesheet. Make sure `@getpara/react-sdk/styles.css` is imported in your application's entry point (e.g., `layout.tsx`, `main.tsx`, or `_app.tsx`). Without it, the modal renders without styling.
**Environment String vs Enum**: Use the `Environment` enum from `@getpara/react-sdk` rather than a plain string. For example, use `Environment.DEVELOPMENT` instead of `"development"`. Using a string will cause runtime errors.
## Tool Reference
Full parameter documentation for all 14 MCP tools provided by the migration server.
**`analyze_project`** — Analyze a project to detect wallet provider usage and prepare a migration plan.
| Parameter | Type | Required | Description |
|---|---|---|---|
| `projectPath` | string | Yes | Path to the project directory |
| `packageJsonPath` | string | No | Path to package.json (auto-detected if omitted) |
---
**`check_compatibility`** — Check compatibility between current Wagmi hooks and Para.
| Parameter | Type | Required | Description |
|---|---|---|---|
| `projectPath` | string | Yes | Path to the project directory |
---
**`validate_migration`** — Validate migration setup and check for common issues.
| Parameter | Type | Required | Description |
|---|---|---|---|
| `projectPath` | string | Yes | Path to the project directory |
| `config` | object | No | Migration configuration to validate against |
---
**`validate_para_migration`** — Validate the 5 critical issues that cause 90% of migration failures.
| Parameter | Type | Required | Description |
|---|---|---|---|
| `projectPath` | string | Yes | Path to the project directory |
---
**`validate_migration_state`** — Get migration completion percentage across dependencies, imports, providers, hooks, and styles.
| Parameter | Type | Required | Description |
|---|---|---|---|
| `projectPath` | string | Yes | Path to the project directory |
**`execute_atomic_migration`** — Execute a complete atomic migration with automatic rollback on failure.
| Parameter | Type | Required | Default | Description |
|---|---|---|---|---|
| `projectPath` | string | Yes | — | Path to the project directory |
| `strategy` | enum | Yes | — | Migration strategy: `privy-to-para`, `reown-to-para`, `web3modal-to-para`, or `walletconnect-to-para` |
| `dryRun` | boolean | No | `false` | Preview changes without modifying files |
**`generate_migration_config`** — Generate a Para configuration object.
| Parameter | Type | Required | Default | Description |
|---|---|---|---|---|
| `paraApiKey` | string | Yes | — | Your Para API key |
| `environment` | enum | No | `"development"` | `"development"` or `"production"` |
| `supportedChains` | number[] | No | `[1]` | Chain IDs to support (e.g., `[1, 137]` for mainnet + Polygon) |
| `wallets` | string[] | No | `["METAMASK", "COINBASE", "WALLETCONNECT"]` | External wallets to enable: `METAMASK`, `COINBASE`, `WALLETCONNECT`, `RAINBOW` |
---
**`generate_provider_component`** — Generate a React provider component for Para integration.
| Parameter | Type | Required | Default | Description |
|---|---|---|---|---|
| `config` | object | Yes | — | Migration configuration (from `generate_migration_config`) |
| `typescript` | boolean | No | `true` | Generate TypeScript or JavaScript |
---
**`generate_connect_button`** — Generate a styled connect button component.
| Parameter | Type | Required | Default | Description |
|---|---|---|---|---|
| `styling` | enum | No | `"tailwind"` | Styling approach: `none`, `tailwind`, `styled-components`, or `css-modules` |
| `typescript` | boolean | No | `true` | Generate TypeScript or JavaScript |
---
**`generate_css_imports`** — Generate CSS import statements for the correct entry point.
| Parameter | Type | Required | Default | Description |
|---|---|---|---|---|
| `projectPath` | string | Yes | — | Path to the project directory |
| `typescript` | boolean | No | `true` | Generate TypeScript or JavaScript |
---
**`generate_layout_with_styles`** — Generate a Next.js layout with Para SDK styles properly imported.
| Parameter | Type | Required | Default | Description |
|---|---|---|---|---|
| `typescript` | boolean | No | `true` | Generate TypeScript or JavaScript |
---
**`generate_hooks_examples`** — Generate before/after hook usage examples showing migration patterns.
| Parameter | Type | Required | Default | Description |
|---|---|---|---|---|
| `fromProvider` | enum | No | `"privy"` | Source provider: `privy`, `reown`, or `walletconnect` |
| `typescript` | boolean | No | `true` | Generate TypeScript or JavaScript |
**`create_migration_guide`** — Generate a step-by-step migration guide tailored to your project.
| Parameter | Type | Required | Description |
|---|---|---|---|
| `projectName` | string | Yes | Name of the project being migrated |
| `currentSetup` | string | No | Description of the current wallet provider setup |
| `targetConfig` | object | No | Target Para configuration |
---
**`quick_migration_mode`** — Generate an ultra-fast development configuration with timeouts and fallbacks.
| Parameter | Type | Required | Description |
|---|---|---|---|
| `config` | object | Yes | Base migration configuration |
## Next Steps
Step-by-step manual migration guide from Reown to Para
Step-by-step manual migration guide from Web3Modal to Para
Get started with the Para React SDK from scratch
View the Migration MCP source code and contribute
## Related Walkthroughs
Intermediate · 30 min · Wallet-enabled AI agents
Advanced · 40 min · Smart accounts and gas sponsorship
Intermediate · 20 min · Send ETH with Ethers and Viem
# Para Walkthroughs & Modules
Source: https://docs.getpara.com/v2/walkthroughs/overview
Don't see your project here? [Get In Touch](mailto:hello@getpara.com)
Explore step-by-step guides for integrating Para's wallet infrastructure with various platforms, protocols, and use cases.
Advanced · 45 min · Enable borrowing, lending, and yield strategies with Aave's lending protocol
Beginner · 15 min · Programmable USDC and money movement
Beginner · 20 min · Stablecoin issuance, minting, and redeeming
Intermediate · 25 min · Large-scale wallet generation for user onboarding
Advanced · 45 min · Browser extensions with embedded Para wallets
Intermediate · 20 min · Structured data signing for smart contracts
Intermediate · 30 min · Build wallet-enabled AI agents with Para and Eliza OS
Intermediate · 20 min · Send ETH with Ethers and Viem
Intermediate · 30 min · Confidential payment flows with encrypted tokens
Beginner · 20 min · Programmable stablecoin infrastructure
Intermediate · 25 min · Zero-knowledge virtual machine integration
Intermediate · 30 min · EIP-7702 smart accounts with session keys
Advanced · 40 min · Cross-chain smart accounts with gas abstraction
Beginner · 20 min · Bitcoin sidechain with EVM compatibility
Intermediate · 20 min · SOL transfers and Solana programs
Advanced · 45 min · Cross-chain USDC bridges with Para SDK
Advanced · 40 min · Smart accounts, gas sponsorship, and in-app payments
Intermediate · 25 min · Micropayments over HTTP with x402 protocol
Advanced · 45 min · Lending, borrowing, and yield strategies
Beginner · 20 min · Stablecoin issuance API
Beginner · 20 min · Programmable stablecoin infrastructure
Advanced · 45 min · Cross-chain USDC bridges
Intermediate · 30 min · EIP-7702 smart accounts with session keys
Advanced · 40 min · Cross-chain smart accounts with gas abstraction
Advanced · 40 min · Smart accounts and gas sponsorship
Beginner · 15 min · Programmable USDC and money movement
Intermediate · 20 min · Structured data signing
Intermediate · 20 min · Send ETH with Ethers and Viem
Intermediate · 30 min · Confidential payment flows
Intermediate · 25 min · Zero-knowledge virtual machine
Beginner · 20 min · Bitcoin sidechain with EVM compatibility
Intermediate · 20 min · SOL transfers and Solana programs
Intermediate · 25 min · Large-scale wallet generation
Advanced · 45 min · Browser extensions with Para wallets
Intermediate · 30 min · Wallet-enabled AI agents
Intermediate · 25 min · Micropayments over HTTP
# Integrating Para with Porto
Source: https://docs.getpara.com/v2/walkthroughs/porto
Integrate Para's embedded wallets with Porto to combine Para's authentication and key management with Porto's smart account features. The `usePortoSmartAccount` hook handles the entire upgrade flow — wrapping the Para signer, registering admin keys, and submitting the upgrade to Porto's relay — so you can focus on your application logic.
## What You Get
| Feature | Para EOA | Porto Smart Account |
|---------|----------|---------------------|
| Address | Single address | Same address (preserved) |
| Signing Keys | 1 (MPC-secured) | Multiple authorized keys |
| Session Keys | Not supported | Supported |
| Batched Transactions | Not supported | Supported |
| Gas Sponsorship | Not supported | Supported |
| Programmable Permissions | Not supported | Supported |
## Integration Pattern
**Para handles:**
- Authentication (social login, email, SMS)
- Key custody (MPC security)
- Cross-app identity
- Raw message signing
**Porto handles:**
- Smart account operations (EIP-7702)
- Transaction batching
- Gas sponsorship
- Session key management
## Prerequisites
- Para API key from the [Para Developer Portal](https://developer.getpara.com/)
- Basic React and Next.js knowledge
- Node.js 18+
## Installation
```bash npm
npm install @getpara/react-sdk viem @tanstack/react-query
```
```bash yarn
yarn add @getpara/react-sdk viem @tanstack/react-query
```
```bash pnpm
pnpm add @getpara/react-sdk viem @tanstack/react-query
```
## Setup Para Provider
Configure the Para provider:
```tsx filename="app/providers.tsx"
"use client";
import { QueryClient, QueryClientProvider } from "@tanstack/react-query";
import { ParaProvider } from "@getpara/react-sdk";
const queryClient = new QueryClient();
export function Providers({ children }: { children: React.ReactNode }) {
return (
{children}
);
}
```
## Gas Sponsorship
On **testnets**, Porto's relay sponsors gas by default — no configuration needed.
For **mainnet**, you must set up a [Porto merchant account](https://porto.sh/sdk/guides/sponsoring)
to cover gas fees for your users:
1. Run `pnpx porto onboard --admin-key` to create a merchant account
2. Deploy a server-side merchant route using `porto/server`
3. Pass your endpoint URL as `merchantUrl` in the hook config
## Usage
Use the `usePortoSmartAccount` hook to create and manage a Porto smart account. The hook handles Para signer creation, admin key registration, EOA upgrade, and Porto relay configuration internally.
```tsx filename="components/PortoDemo.tsx"
"use client";
import { usePortoSmartAccount } from "@getpara/react-sdk";
import { useMutation } from "@tanstack/react-query";
import { parseEther } from "viem";
import { baseSepolia } from "viem/chains";
export function PortoDemo() {
const { smartAccount, isLoading, error } = usePortoSmartAccount({
chain: baseSepolia,
// merchantUrl: '/porto/merchant', // required for mainnet
});
const {
mutate: sendTransaction,
isPending: isSending,
error: sendError,
} = useMutation({
mutationFn: async () => {
if (!smartAccount) throw new Error("Smart account not ready");
return smartAccount.sendTransaction({
to: "0xRecipient",
value: parseEther("0.01"),
});
},
onSuccess: (receipt) => {
console.log("Transaction hash:", receipt.transactionHash);
},
});
const {
mutate: sendBatch,
isPending: isBatching,
error: batchError,
} = useMutation({
mutationFn: async () => {
if (!smartAccount) throw new Error("Smart account not ready");
return smartAccount.sendBatchTransaction([
{ to: "0xRecipientA", value: parseEther("0.01") },
{ to: "0xRecipientB", data: "0xencodedCallData" },
]);
},
onSuccess: (receipt) => {
console.log("Batch tx hash:", receipt.transactionHash);
},
});
if (isLoading) return Setting up smart account...
;
if (error) return Error: {error.message}
;
if (!smartAccount) return null;
return (
Porto Smart Account
Address: {smartAccount.smartAccountAddress}
Mode: {smartAccount.mode}
{sendError &&
{sendError.message}
}
{batchError &&
{batchError.message}
}
);
}
```
### Accessing the Porto Client Directly
For advanced use cases like session key management, access the underlying Porto client:
```tsx
const { smartAccount } = usePortoSmartAccount({ chain: baseSepolia });
if (smartAccount) {
const { portoAccount, portoClient } = smartAccount.client;
// Use Porto's RelayActions directly for advanced operations
}
```
## How It Works
The `usePortoSmartAccount` hook performs these steps internally:
1. **Resolves the Para wallet** — finds the user's EVM wallet address
2. **Creates a viem account** — wraps the Para signer for raw ECDSA signing
3. **Connects to Porto's relay** — creates a client pointed at `https://rpc.porto.sh`
4. **Registers an admin key** — creates a secp256k1 admin key from the Para signer
5. **Upgrades the EOA** — submits a 7702 delegation via `prepareUpgradeAccount` + `upgradeAccount`
6. **Returns a unified SmartAccount** — with `sendTransaction`, `sendBatchTransaction`, and access to the underlying Porto client
## Next Steps
Explore Porto's smart account features and SDK documentation
See all supported AA providers and the unified SmartAccount interface
View the complete working example
Learn more about Para's React SDK features and configuration
## Related Walkthroughs
Advanced · 40 min · Cross-chain smart accounts with gas abstraction
Advanced · 40 min · Smart accounts and gas sponsorship
Intermediate · 20 min · Structured data signing
# Rootstock Integration
Source: https://docs.getpara.com/v2/walkthroughs/rootstock
## Prerequisites
Before integrating Para with Roostock, ensure you have:
- A Para API key from the Para Developer Portal
- Roostock RPC API Account
- Node.js 18+ and Next.js development environment
- Basic familiarity with React and TypeScript
## Installation
``` npm install @getpara/react-sdk ```
Please make sure to be on version 2.2.0
## Setup Para Provider
Create a ParaSDKProvider that communicates with Rootstock.
```import { ParaSDKProvider } from "@para/sdk-react";
import { rootstockTestnet } from "viem/chains";
const ROOTSTOCK_TESTNET = {
name: "Rootstock Testnet",
evmChainId: "31" as const,
nativeTokenSymbol: "tRBTC",
logoUrl:
"https://raw.githubusercontent.com/rsksmart/rsk-contract-metadata/refs/heads/master/images/rootstock-orange.png",
rpcUrl: "https://rpc.testnet.rootstock.io/",
explorer: {
name: "Rootstock Testnet Explorer",
url: "https://explorer.testnet.rootstock.io",
txUrlFormat:
"https://explorer.testnet.rootstock.io/tx/{HASH}",
},
isTestnet: true,
};
export function ParaProvider({ children }: { children: React.ReactNode }) {
return (
{children}
);
}
```
## Key Features
This integration provides a way to use Para Wallet with Rootstock adding custom tokens.
## Complete Example
See the full working example with [Para + Rootstock here](https://github.com/rsksmart/examples-hub).
## Related Walkthroughs
Intermediate · 20 min · Send ETH with Ethers and Viem
Beginner · 15 min · Programmable USDC and money movement
Intermediate · 20 min · Structured data signing
# Solana SOL Transfers with Para
Source: https://docs.getpara.com/v2/walkthroughs/solana-transfers
This walkthrough covers sending basic SOL transfers using Para with three different Solana libraries: Solana Web3.js (legacy), Solana Signers v2 (modern), and Coral Anchor (smart contracts). Each approach has different patterns for transaction construction and signing.
## Prerequisites
You need an authenticated Para client and basic knowledge of Solana transactions.
## Core Dependencies
```bash
npm install @getpara/react-sdk @getpara/solana-web3-integration @solana/web3.js
```
```bash
npm install @getpara/react-sdk @getpara/solana-signers-v2-integration @solana/kit @solana/transactions @solana-program/system
```
```bash
npm install @getpara/react-sdk @getpara/solana-web3-integration @solana/web3.js @coral-xyz/anchor
```
## Connection Setup
### RPC Configuration
```typescript
import { Connection } from "@solana/web3.js";
const DEVNET_RPC_URL = "https://api.devnet.solana.com";
// Create Solana connection
const connection = new Connection(DEVNET_RPC_URL, "confirmed");
```
```typescript
import { createHttpTransport } from "@solana/rpc-spec";
import { createSolanaRpc } from "@solana/kit";
const DEVNET_RPC_URL = "https://api.devnet.solana.com";
// Create HTTP transport
const transport = createHttpTransport({ url: DEVNET_RPC_URL });
// Create Kit RPC client
const kitRpc = createSolanaRpc({ transport });
// Create Para RPC client
const paraRpc = createHttpTransport({ url: DEVNET_RPC_URL });
```
```typescript
import { Connection } from "@solana/web3.js";
import { AnchorProvider } from "@coral-xyz/anchor";
const DEVNET_RPC_URL = "https://api.devnet.solana.com";
// Create Solana connection
const connection = new Connection(DEVNET_RPC_URL, "confirmed");
```
### Para Signer Setup
```typescript
import { ParaSolanaWeb3Signer } from "@getpara/solana-web3-integration";
import { useAccount, useClient } from "@getpara/react-sdk";
// Get Para client and account
const client = useClient();
const { data: account } = useAccount();
// Create Para Solana signer
let signer: ParaSolanaWeb3Signer | null = null;
if (account?.isConnected && connection && client) {
signer = new ParaSolanaWeb3Signer(client, connection);
}
```
```typescript
import { createParaSolanaSigner } from "@getpara/solana-signers-v2-integration";
import { useAccount, useClient } from "@getpara/react-sdk";
// Get Para client and account
const client = useClient();
const { data: account } = useAccount();
// Create Para Solana signer
let signer: any = null;
if (account?.isConnected && paraRpc && client) {
signer = createParaSolanaSigner({
para: client,
rpc: paraRpc
});
}
```
```typescript
import { ParaSolanaWeb3Signer } from "@getpara/solana-web3-integration";
import { AnchorProvider } from "@coral-xyz/anchor";
import { useAccount, useClient } from "@getpara/react-sdk";
// Get Para client and account
const client = useClient();
const { data: account } = useAccount();
// Create Para Solana signer and Anchor provider
let anchorProvider: AnchorProvider | null = null;
if (account?.isConnected && connection && client) {
const signer = new ParaSolanaWeb3Signer(client, connection);
// Create wallet adapter for Anchor
const walletAdapter = {
publicKey: signer.sender,
signTransaction: async (tx: any) => await signer.signTransaction(tx),
signAllTransactions: async (txs: any[]) => await signer.signAllTransactions(txs)
};
anchorProvider = new AnchorProvider(connection, walletAdapter, {
commitment: "confirmed"
});
}
```
## Transaction Construction
### Basic SOL Transfer
```typescript
import {
Transaction,
SystemProgram,
PublicKey,
LAMPORTS_PER_SOL
} from "@solana/web3.js";
const constructTransaction = async (
toAddress: string,
solAmount: string,
fromPublicKey: PublicKey
) => {
const toPubKey = new PublicKey(toAddress);
const amountLamports = parseFloat(solAmount) * LAMPORTS_PER_SOL;
// Create transaction
const transaction = new Transaction();
// Add transfer instruction
transaction.add(
SystemProgram.transfer({
fromPubkey: fromPublicKey,
toPubkey: toPubKey,
lamports: BigInt(amountLamports)
})
);
// Set transaction parameters
const { blockhash } = await connection.getLatestBlockhash();
transaction.recentBlockhash = blockhash;
transaction.feePayer = fromPublicKey;
return transaction;
};
```
```typescript
import { pipe } from "@solana/transactions";
import {
getTransferSolInstruction,
lamports,
address
} from "@solana-program/system";
import {
appendTransactionMessageInstruction,
createTransactionMessage,
setTransactionMessageFeePayerSigner,
setTransactionMessageLifetimeUsingBlockhash
} from "@solana/transactions";
const constructTransaction = async (
toAddress: string,
solAmount: string,
signerAddress: any
) => {
// Get latest blockhash
const { value: latestBlockhash } = await kitRpc.getLatestBlockhash().send();
// Convert SOL to lamports
const amountLamports = BigInt(parseFloat(solAmount) * 1e9);
// Create transfer instruction
const transferInstruction = getTransferSolInstruction({
source: signerAddress,
destination: address(toAddress),
amount: lamports(amountLamports)
});
// Build transaction message
const transactionMessage = pipe(
createTransactionMessage({ version: 0 }),
tx => setTransactionMessageFeePayerSigner(signerAddress, tx),
tx => setTransactionMessageLifetimeUsingBlockhash(latestBlockhash.blockhash, tx),
tx => appendTransactionMessageInstruction(transferInstruction, tx)
);
return transactionMessage;
};
```
```typescript
import {
Transaction,
SystemProgram,
PublicKey,
LAMPORTS_PER_SOL
} from "@solana/web3.js";
const constructTransaction = async (
toAddress: string,
solAmount: string,
walletPublicKey: PublicKey
) => {
const toPubKey = new PublicKey(toAddress);
const amountLamports = parseFloat(solAmount) * LAMPORTS_PER_SOL;
// Create transaction
const transaction = new Transaction();
// Add transfer instruction
transaction.add(
SystemProgram.transfer({
fromPubkey: walletPublicKey,
toPubkey: toPubKey,
lamports: BigInt(amountLamports)
})
);
// Set transaction parameters
const { blockhash } = await connection.getLatestBlockhash();
transaction.recentBlockhash = blockhash;
transaction.feePayer = walletPublicKey;
return transaction;
};
```
## Balance Validation
### Check Sufficient Balance
```typescript
const validateTransaction = async (
userPublicKey: PublicKey,
solAmount: string
) => {
// Get current balance
const balanceLamports = await connection.getBalance(userPublicKey);
// Calculate amount in lamports
const amountLamports = parseFloat(solAmount) * LAMPORTS_PER_SOL;
// Estimate transaction fee (5000 lamports is typical)
const estimatedFee = 5000;
const totalCost = amountLamports + estimatedFee;
if (totalCost > balanceLamports) {
throw new Error(
`Insufficient balance. Need ${totalCost / LAMPORTS_PER_SOL} SOL, have ${balanceLamports / LAMPORTS_PER_SOL} SOL`
);
}
return true;
};
```
```typescript
const validateTransaction = async (
signerAddress: any,
solAmount: string
) => {
// Get current balance
const { value: balance } = await kitRpc.getBalance(signerAddress).send();
// Calculate amount in lamports
const amountLamports = BigInt(parseFloat(solAmount) * 1e9);
// Estimate transaction fee
const estimatedFee = BigInt(5000);
const totalCost = amountLamports + estimatedFee;
if (totalCost > balance) {
throw new Error(
`Insufficient balance. Need ${Number(totalCost) / 1e9} SOL, have ${Number(balance) / 1e9} SOL`
);
}
return true;
};
```
```typescript
const validateTransaction = async (
walletPublicKey: PublicKey,
solAmount: string
) => {
// Get current balance
const balanceLamports = await connection.getBalance(walletPublicKey);
// Calculate amount in lamports
const amountLamports = parseFloat(solAmount) * LAMPORTS_PER_SOL;
// Estimate transaction fee
const estimatedFee = 5000;
const totalCost = amountLamports + estimatedFee;
if (totalCost > balanceLamports) {
throw new Error(
`Insufficient balance. Need ${totalCost / LAMPORTS_PER_SOL} SOL, have ${balanceLamports / LAMPORTS_PER_SOL} SOL`
);
}
return true;
};
```
## Sending Transactions
### Execute Transfer
```typescript
const sendSolTransfer = async (
toAddress: string,
solAmount: string,
fromPublicKey: PublicKey
) => {
// Validate transaction
await validateTransaction(fromPublicKey, solAmount);
// Construct transaction
const transaction = await constructTransaction(toAddress, solAmount, fromPublicKey);
// Send transaction using Para signer
const txSignature = await signer.sendTransaction(transaction);
console.log("Transaction sent:", txSignature);
// Wait for confirmation with polling
let receipt = null;
while (!receipt) {
receipt = await connection.getSignatureStatus(txSignature, {
searchTransactionHistory: true
});
if (receipt?.value?.confirmationStatus === "confirmed" ||
receipt?.value?.confirmationStatus === "finalized") {
break;
}
// Wait 500ms before next check
await new Promise(resolve => setTimeout(resolve, 500));
}
console.log("Transaction confirmed:", receipt);
return {
signature: txSignature,
status: receipt?.value?.confirmationStatus,
slot: receipt?.value?.slot
};
};
```
```typescript
import {
compileTransaction,
getBase64EncodedWireTransaction
} from "@solana/transactions";
const sendSolTransfer = async (
toAddress: string,
solAmount: string,
signerAddress: any
) => {
// Validate transaction
await validateTransaction(signerAddress, solAmount);
// Construct transaction message
const transactionMessage = await constructTransaction(toAddress, solAmount, signerAddress);
// Sign transaction
const [signedTransaction] = await signer.modifyAndSignTransactions([
compileTransaction(transactionMessage)
]);
// Serialize transaction
const serializedTransaction = getBase64EncodedWireTransaction(signedTransaction);
// Send transaction
const { value: signature } = await kitRpc.sendTransaction(
serializedTransaction,
{
encoding: "base64",
skipPreflight: false,
preflightCommitment: "confirmed"
}
).send();
console.log("Transaction sent:", signature);
// Wait for confirmation
const { value: statuses } = await kitRpc.getSignatureStatuses([signature]).send();
const status = statuses[0];
console.log("Transaction confirmed:", status);
return {
signature,
status: status?.confirmationStatus,
slot: status?.slot
};
};
```
```typescript
const sendSolTransfer = async (
toAddress: string,
solAmount: string,
walletPublicKey: PublicKey
) => {
// Validate transaction
await validateTransaction(walletPublicKey, solAmount);
// Construct transaction
const transaction = await constructTransaction(toAddress, solAmount, walletPublicKey);
// Send and confirm transaction using Anchor provider
const txSignature = await anchorProvider.sendAndConfirm(transaction);
console.log("Transaction sent and confirmed:", txSignature);
return {
signature: txSignature,
status: "confirmed"
};
};
```
## Complete Implementation Example
### Full Transfer Service
```typescript
import {
Connection,
Transaction,
SystemProgram,
PublicKey,
LAMPORTS_PER_SOL
} from "@solana/web3.js";
import { ParaSolanaWeb3Signer } from "@getpara/solana-web3-integration";
class SolanaWeb3TransferService {
private connection: Connection;
private signer: ParaSolanaWeb3Signer;
constructor(rpcUrl: string, paraClient: any) {
this.connection = new Connection(rpcUrl, "confirmed");
this.signer = new ParaSolanaWeb3Signer(paraClient, this.connection);
}
async transfer(toAddress: string, solAmount: string) {
try {
const fromPublicKey = this.signer.sender;
// Validate balance
const balanceLamports = await this.connection.getBalance(fromPublicKey);
const amountLamports = parseFloat(solAmount) * LAMPORTS_PER_SOL;
const estimatedFee = 5000;
if (balanceLamports < amountLamports + estimatedFee) {
throw new Error("Insufficient balance");
}
// Create transaction
const transaction = new Transaction().add(
SystemProgram.transfer({
fromPubkey: fromPublicKey,
toPubkey: new PublicKey(toAddress),
lamports: BigInt(amountLamports)
})
);
const { blockhash } = await this.connection.getLatestBlockhash();
transaction.recentBlockhash = blockhash;
transaction.feePayer = fromPublicKey;
// Send transaction
const signature = await this.signer.sendTransaction(transaction);
// Wait for confirmation
await this.connection.confirmTransaction(signature);
return { success: true, signature };
} catch (error) {
console.error("Transfer failed:", error);
throw error;
}
}
}
```
```typescript
import { pipe } from "@solana/transactions";
import { createSolanaRpc, createHttpTransport } from "@solana/kit";
import { getTransferSolInstruction, lamports, address } from "@solana-program/system";
import { createParaSolanaSigner } from "@getpara/solana-signers-v2-integration";
class SolanaSignersTransferService {
private kitRpc: any;
private signer: any;
constructor(rpcUrl: string, paraClient: any) {
const transport = createHttpTransport({ url: rpcUrl });
this.kitRpc = createSolanaRpc({ transport });
this.signer = createParaSolanaSigner({
para: paraClient,
rpc: createHttpTransport({ url: rpcUrl })
});
}
async transfer(toAddress: string, solAmount: string) {
try {
const signerAddress = this.signer.address;
// Validate balance
const { value: balance } = await this.kitRpc.getBalance(signerAddress).send();
const amountLamports = BigInt(parseFloat(solAmount) * 1e9);
const estimatedFee = BigInt(5000);
if (balance < amountLamports + estimatedFee) {
throw new Error("Insufficient balance");
}
// Get latest blockhash
const { value: latestBlockhash } = await this.kitRpc.getLatestBlockhash().send();
// Create transfer instruction
const transferInstruction = getTransferSolInstruction({
source: signerAddress,
destination: address(toAddress),
amount: lamports(amountLamports)
});
// Build and sign transaction
const transactionMessage = pipe(
createTransactionMessage({ version: 0 }),
tx => setTransactionMessageFeePayerSigner(signerAddress, tx),
tx => setTransactionMessageLifetimeUsingBlockhash(latestBlockhash.blockhash, tx),
tx => appendTransactionMessageInstruction(transferInstruction, tx)
);
const [signedTransaction] = await this.signer.modifyAndSignTransactions([
compileTransaction(transactionMessage)
]);
// Send transaction
const serialized = getBase64EncodedWireTransaction(signedTransaction);
const { value: signature } = await this.kitRpc.sendTransaction(serialized).send();
return { success: true, signature };
} catch (error) {
console.error("Transfer failed:", error);
throw error;
}
}
}
```
```typescript
import {
Connection,
Transaction,
SystemProgram,
PublicKey,
LAMPORTS_PER_SOL
} from "@solana/web3.js";
import { AnchorProvider } from "@coral-xyz/anchor";
import { ParaSolanaWeb3Signer } from "@getpara/solana-web3-integration";
class AnchorTransferService {
private connection: Connection;
private anchorProvider: AnchorProvider;
constructor(rpcUrl: string, paraClient: any) {
this.connection = new Connection(rpcUrl, "confirmed");
const signer = new ParaSolanaWeb3Signer(paraClient, this.connection);
const walletAdapter = {
publicKey: signer.sender,
signTransaction: async (tx: any) => await signer.signTransaction(tx),
signAllTransactions: async (txs: any[]) => await signer.signAllTransactions(txs)
};
this.anchorProvider = new AnchorProvider(this.connection, walletAdapter, {
commitment: "confirmed"
});
}
async transfer(toAddress: string, solAmount: string) {
try {
const fromPublicKey = this.anchorProvider.wallet.publicKey;
// Validate balance
const balanceLamports = await this.connection.getBalance(fromPublicKey);
const amountLamports = parseFloat(solAmount) * LAMPORTS_PER_SOL;
const estimatedFee = 5000;
if (balanceLamports < amountLamports + estimatedFee) {
throw new Error("Insufficient balance");
}
// Create transaction
const transaction = new Transaction().add(
SystemProgram.transfer({
fromPubkey: fromPublicKey,
toPubkey: new PublicKey(toAddress),
lamports: BigInt(amountLamports)
})
);
const { blockhash } = await this.connection.getLatestBlockhash();
transaction.recentBlockhash = blockhash;
transaction.feePayer = fromPublicKey;
// Send and confirm transaction
const signature = await this.anchorProvider.sendAndConfirm(transaction);
return { success: true, signature };
} catch (error) {
console.error("Transfer failed:", error);
throw error;
}
}
}
```
## Key Differences
### Library Comparison
| Feature | Solana Web3.js | Solana Signers v2 | Coral Anchor |
|---------|----------------|-------------------|--------------|
| **Status** | Legacy | Modern/Recommended | Smart Contracts |
| **Transaction Type** | `Transaction` | `TransactionMessage` | `Transaction` |
| **Instruction Creation** | `SystemProgram.transfer()` | `getTransferSolInstruction()` | `SystemProgram.transfer()` |
| **Signing** | `signer.sendTransaction()` | `signer.modifyAndSignTransactions()` | `provider.sendAndConfirm()` |
| **Amount Format** | `BigInt(lamports)` | `lamports(bigint)` | `BigInt(lamports)` |
| **Confirmation** | Manual polling | Status check | Automatic |
### Transaction Construction Patterns
```typescript
// Legacy approach with Transaction class
const transaction = new Transaction();
transaction.add(SystemProgram.transfer({...}));
transaction.recentBlockhash = blockhash;
transaction.feePayer = publicKey;
```
```typescript
// Modern functional approach with pipes
const transactionMessage = pipe(
createTransactionMessage({ version: 0 }),
tx => setTransactionMessageFeePayerSigner(signer, tx),
tx => setTransactionMessageLifetimeUsingBlockhash(blockhash, tx),
tx => appendTransactionMessageInstruction(instruction, tx)
);
```
```typescript
// Anchor provider abstraction
const transaction = new Transaction();
transaction.add(SystemProgram.transfer({...}));
// Provider handles blockhash and fee payer automatically
const signature = await provider.sendAndConfirm(transaction);
```
## Best Practices
### Library Selection
- **Solana Web3.js**: Use for compatibility with existing projects, but consider migrating
- **Solana Signers v2**: Recommended for new projects, modern patterns, better performance
- **Coral Anchor**: Best for dApps interacting with Anchor-based smart contracts
### Transaction Safety
- **Always validate recipient addresses** using `PublicKey` constructor
- **Check balance including fees** before transaction construction
- **Use appropriate commitment levels** ("confirmed" for most cases)
- **Handle network errors gracefully** with proper retry logic
- **Monitor transaction confirmation** rather than assuming success
### Performance Optimization
- **Reuse connection instances** rather than creating new ones
- **Batch multiple transfers** when possible
- **Use appropriate RPC endpoints** for your use case
- **Monitor transaction fees** and adjust as needed
## Next Steps
Learn to transfer SPL tokens on Solana
Interact with Solana smart contracts
## Related Walkthroughs
Intermediate · 20 min · Send ETH with Ethers and Viem
Advanced · 45 min · Cross-chain USDC bridges
Intermediate · 25 min · Large-scale wallet generation
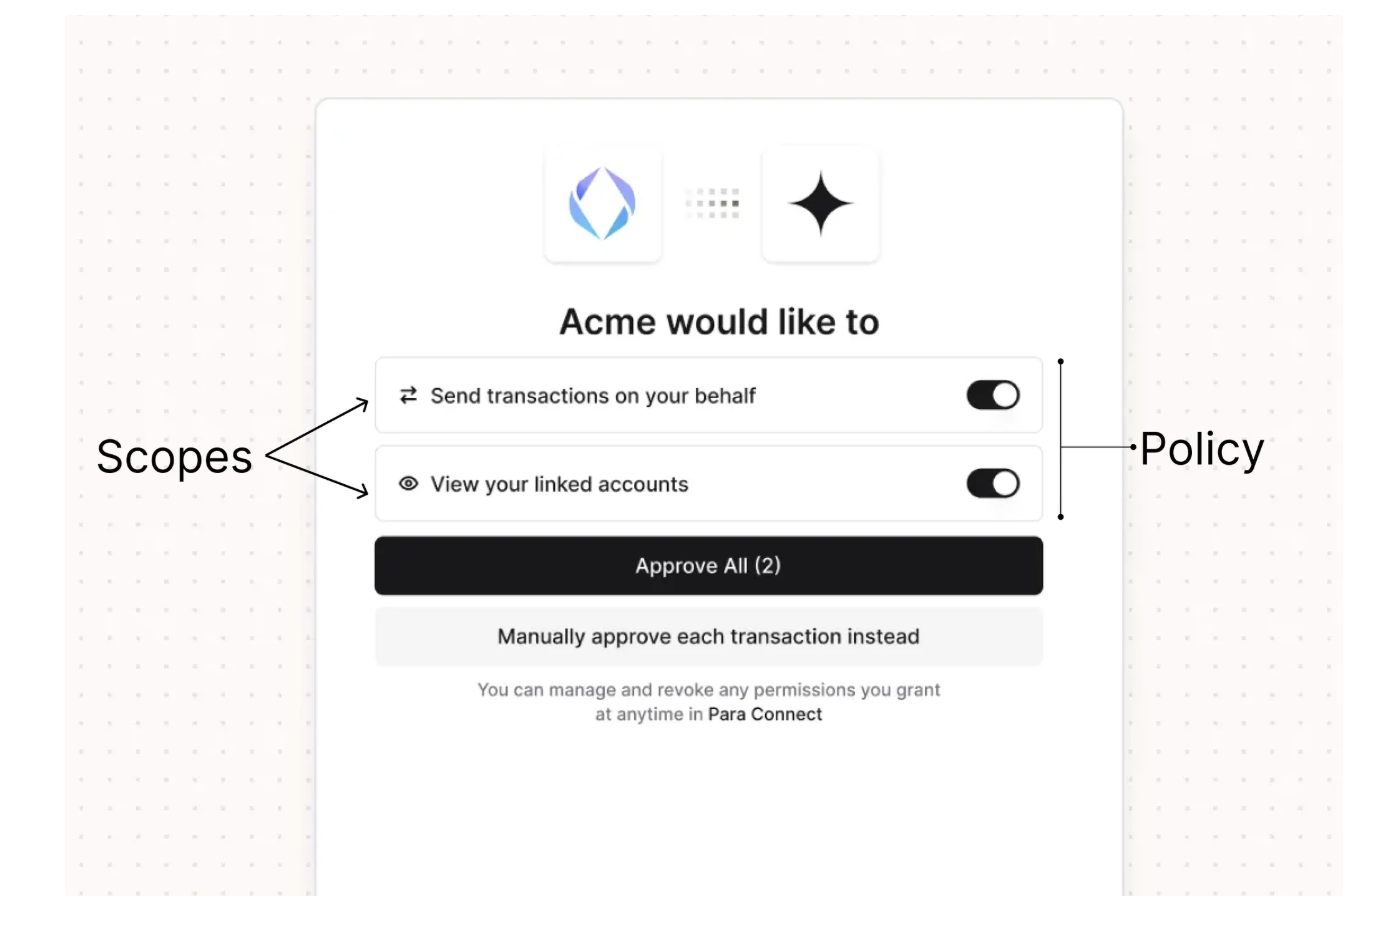 ## Cross-App Permissions
Permissions become especially important with [universal wallets](/v2/concepts/universal-embedded-wallets), where a single wallet is used across multiple applications. Each app defines its own policy, and users approve permissions separately for each app. This means:
- A DeFi app can request swap permissions without gaining access to sign arbitrary messages
- A portfolio tracker can request read-only message signing without being able to transfer funds
- Users maintain visibility and control over what each app can do
## Cross-App Permissions
Permissions become especially important with [universal wallets](/v2/concepts/universal-embedded-wallets), where a single wallet is used across multiple applications. Each app defines its own policy, and users approve permissions separately for each app. This means:
- A DeFi app can request swap permissions without gaining access to sign arbitrary messages
- A portfolio tracker can request read-only message signing without being able to transfer funds
- Users maintain visibility and control over what each app can do
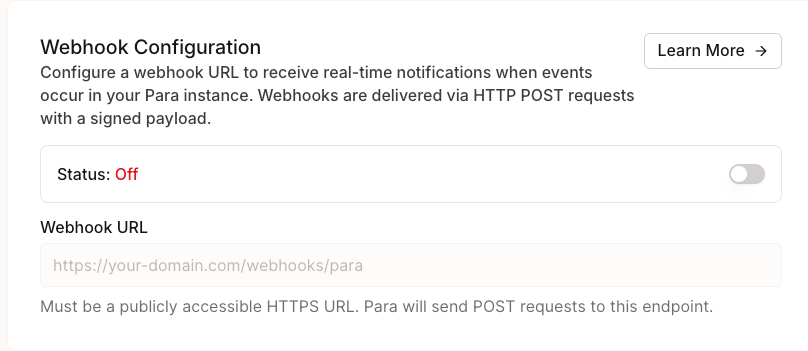
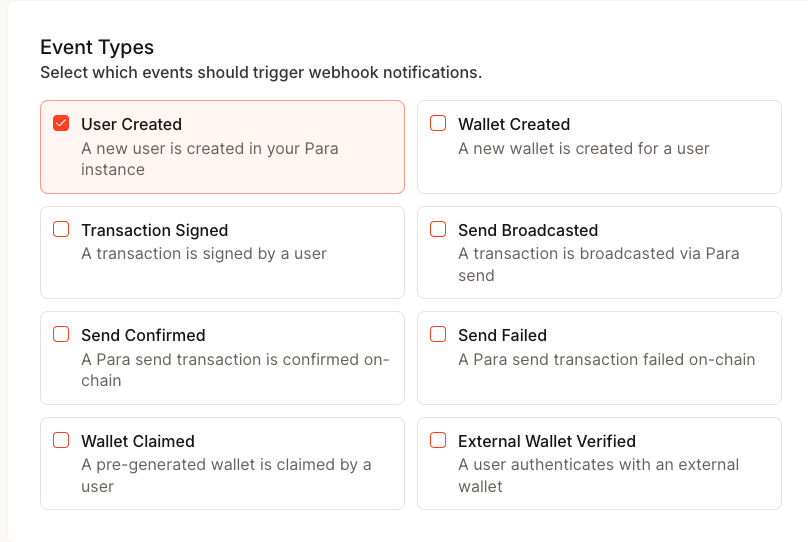 ### Save and Copy Your Secret
When you first save your webhook configuration, Para generates a signing secret (prefixed with `whsec_`). This secret is
**displayed only once** — copy and store it securely. You'll use it to
[verify webhook signatures](#verify-webhook-signatures).
### Save and Copy Your Secret
When you first save your webhook configuration, Para generates a signing secret (prefixed with `whsec_`). This secret is
**displayed only once** — copy and store it securely. You'll use it to
[verify webhook signatures](#verify-webhook-signatures).
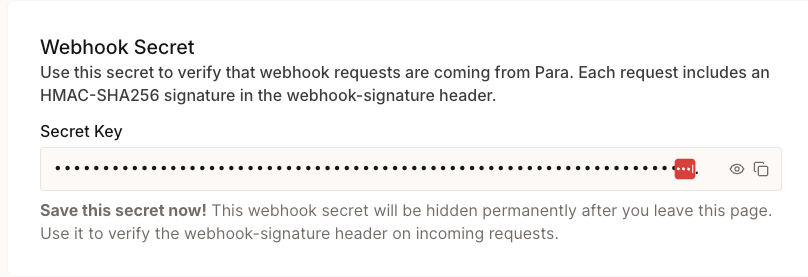
 ### Disable or Delete
Toggle webhooks off to temporarily stop delivery without losing your configuration. To remove the webhook entirely, use
the **Delete Webhook** button — this removes the URL, events, and secret permanently.
## Best Practices
- **Respond quickly**: Return a `2xx` status within a few seconds. Offload heavy processing to a background job.
- **Verify signatures**: Always validate the `webhook-signature` header before trusting the payload.
- **Check timestamps**: Reject webhooks with timestamps more than 5 minutes old to prevent replay attacks.
- **Handle duplicates**: Use the `webhook-id` header to deduplicate events in case of retries.
- **Use HTTPS**: Your endpoint must be HTTPS. Para rejects HTTP URLs.
# Chain Support
Source: https://docs.getpara.com/v2/introduction/chain-support
import RPCChainsTable from '/snippets/v2/rpc-chains-table.mdx';
Para integrates seamlessly with all EVM chains, Solana, Cosmos chains, and Stellar. To add support for any additional chains within these networks, include its chain ID (or network passphrase for Stellar) and RPC endpoint. Breakdown below:
### Disable or Delete
Toggle webhooks off to temporarily stop delivery without losing your configuration. To remove the webhook entirely, use
the **Delete Webhook** button — this removes the URL, events, and secret permanently.
## Best Practices
- **Respond quickly**: Return a `2xx` status within a few seconds. Offload heavy processing to a background job.
- **Verify signatures**: Always validate the `webhook-signature` header before trusting the payload.
- **Check timestamps**: Reject webhooks with timestamps more than 5 minutes old to prevent replay attacks.
- **Handle duplicates**: Use the `webhook-id` header to deduplicate events in case of retries.
- **Use HTTPS**: Your endpoint must be HTTPS. Para rejects HTTP URLs.
# Chain Support
Source: https://docs.getpara.com/v2/introduction/chain-support
import RPCChainsTable from '/snippets/v2/rpc-chains-table.mdx';
Para integrates seamlessly with all EVM chains, Solana, Cosmos chains, and Stellar. To add support for any additional chains within these networks, include its chain ID (or network passphrase for Stellar) and RPC endpoint. Breakdown below:
 #### Set Up Associated Domains
1. Open your project in Xcode
2. Select your target and go to "Signing & Capabilities"
3. Click "+ Capability" and add "Associated Domains"
4. Add the following domains:
- webcredentials:app.beta.usecapsule.com
- webcredentials:app.usecapsule.com
For additional information on associated domains, refer to the .
#### Set Up Associated Domains
1. Open your project in Xcode
2. Select your target and go to "Signing & Capabilities"
3. Click "+ Capability" and add "Associated Domains"
4. Add the following domains:
- webcredentials:app.beta.usecapsule.com
- webcredentials:app.usecapsule.com
For additional information on associated domains, refer to the .