> ## Documentation Index
> Fetch the complete documentation index at: https://docs.getpara.com/llms.txt
> Use this file to discover all available pages before exploring further.
# Permissions & Access Control
> Control exactly what each application can do with a user's wallet: scoped, transparent, and enforced server-side
Traditional embedded wallets force a tradeoff: either prompt users to approve every single action, or give applications blanket signing access with no guardrails. Neither works when wallets are shared across applications or when compliance teams need to audit what an app can do.
Para's **policy-based permissions system** controls what each application can do with a user's wallet. Policies are defined per API key, enforced server-side on every transaction, and presented to users as plain-language consent items.
* **Declared up front:** every capability needed is specified in a policy before any user interaction
* **User consent is explicit:** permissions are grouped into readable scopes that users review and approve during onboarding
* **Server-side enforcement:** Para evaluates every transaction against the approved policy before it reaches the MPC signing ceremony. This cannot be bypassed client-side
* **Default deny:** any action not explicitly allowed in the policy is blocked
## How It Works
Each policy declares what your app can do: sign messages, transfer tokens, call specific smart contracts, or deploy contracts. Rules can include constraints like value caps, address allowlists, and per-chain scoping. Policies are configured in the [Para Permissions Builder](https://permissions.getpara.com) and are immutable once published; changes require a new version.
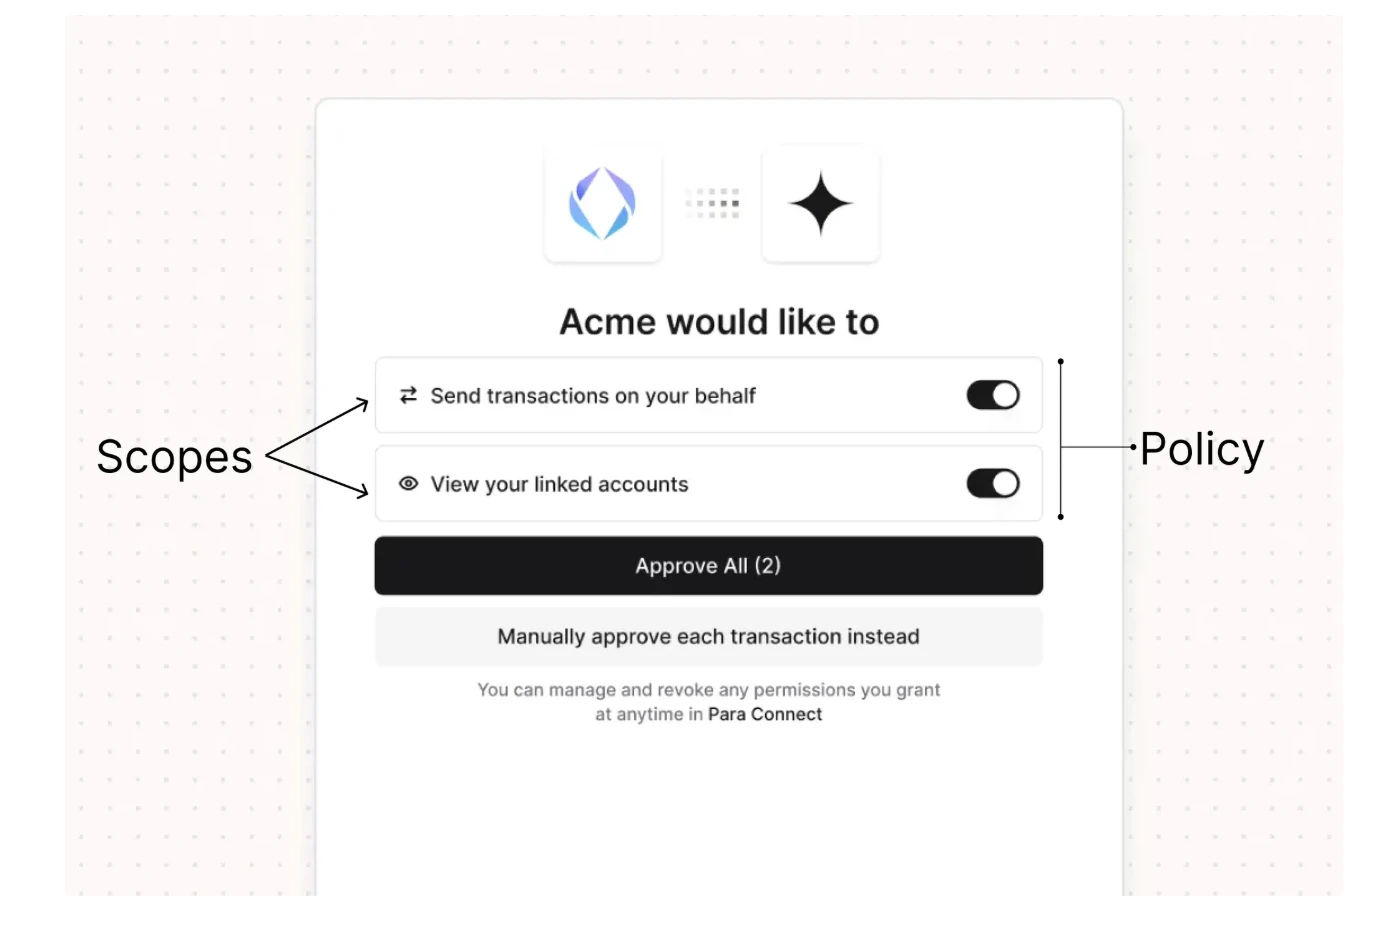
Permissions are grouped into user-facing consent items called scopes. Each scope has a plain-language name and description (for example, "Automated token swaps" rather than a raw contract address). Scopes can be marked as required or optional.
During onboarding or login, users see the scopes and choose which to approve. Required scopes must be accepted to use the app. Optional scopes can be declined without losing access.
When the application requests a transaction, Para evaluates it against the user's approved permissions. If the action falls outside the policy (wrong contract, value too high, unapproved chain), it's rejected before signing.
## Permission Configuration Options
Allow or deny the ability to sign arbitrary messages. Useful for login flows, attestations, and off-chain signatures.
Control who can send native tokens and how much. Set per-chain rules, cap transfer amounts, or restrict destination addresses.
Lock interactions to specific contracts and functions. For example, allow calling `swap` on a DEX router but nothing else.
Allow or block the ability to deploy new smart contracts entirely.
**`DENY` always overrides `ALLOW`.** Developers can create broad allow rules and add narrow deny exceptions for specific cases. If no rule matches an action, it's blocked by default.
## The User Experience
Users see permissions in plain language, not raw technical details. Here's what the consent flow looks like:
1. During onboarding, users see the scopes defined in the application's policy
2. Required scopes are pre-checked and must be accepted; optional scopes can be toggled
3. Users approve or decline each optional scope
4. Para stores consent and enforces only the approved permissions
5. Any out-of-policy action is rejected before it reaches signing
There is no silent permission creep; policy changes require a new policy version.
 ## Cross-App Permissions
Permissions become especially important with [universal wallets](/v3/concepts/universal-embedded-wallets), where a single wallet is used across multiple applications. Each app defines its own policy, and users approve permissions separately for each app. This means:
* A DeFi app can request swap permissions without gaining access to sign arbitrary messages
* A portfolio tracker can request read-only message signing without being able to transfer funds
* Users maintain visibility and control over what each app can do
Complete technical reference: full policy schema, permission types, condition system, comparators, and worked examples.
## Get Started
Permissions policies are configured in the [Para Permissions Builder](https://permissions.getpara.com). For help designing a policy that fits a specific use case, reach out at **[hello@getpara.com](mailto:hello@getpara.com)**.
Implement client-side transaction confirmation dialogs
How wallets work across multiple apps
Para's security and trust model
## Cross-App Permissions
Permissions become especially important with [universal wallets](/v3/concepts/universal-embedded-wallets), where a single wallet is used across multiple applications. Each app defines its own policy, and users approve permissions separately for each app. This means:
* A DeFi app can request swap permissions without gaining access to sign arbitrary messages
* A portfolio tracker can request read-only message signing without being able to transfer funds
* Users maintain visibility and control over what each app can do
Complete technical reference: full policy schema, permission types, condition system, comparators, and worked examples.
## Get Started
Permissions policies are configured in the [Para Permissions Builder](https://permissions.getpara.com). For help designing a policy that fits a specific use case, reach out at **[hello@getpara.com](mailto:hello@getpara.com)**.
Implement client-side transaction confirmation dialogs
How wallets work across multiple apps
Para's security and trust model